It’s a favorite of mine because of the colors, the copper accenting, and the simplicity and ease of creating gorgeous cards and gifts. Gotta love punches! I shared three of these projects on my blog the morning of September 18 to pique your interest in joining me for my Facebook Live broadcast later that day. Hope it helped some of you to find me. ?
Then I shared how-to tips for those and several other creations that I made with this suite in that broadcast…my Wednesday, September 18th Online Paper Crafting Class on Facebook. I uploaded the recorded version of my Facebook Live video to my YouTube channel (since I know not everyone is ON Facebook). Be sure to watch the video (you can just click on this image below if you are already on my blog), scroll through the close-up photos, check out the products lists below the photos, and then let me know if you have any questions.
I hope you enjoyed what I shared in this video. Below are some measurements and the remainder of the close-up photos. Click here to see many other photos that I posted on the morning of the 18th.
Products I used… See below for a complete list of products linked to where you can find them in my online store.
This was the first card I shared showing off the Hammered Metal Embossing folder and the copper printed ribbon.
Measurements…
Night of Navy Cardstock
4-1/4” x 11” scored at 5-1/2″ and folded in half for the card base
Very Vanilla Cardstock
4″ x 5-1/4″ (for the inside layer)
3″ x 2-3/4″
Scrap for stamping and punching large ornament
Old Olive Cardstock
3-1/8″ x 2-7/8″
Scrap for stamping and punching small ornament
Copper Foil Sheet
2-3/4″ x 4″
Then I shared how to assemble the ornament that I showed on my September 18th post. The one on the right is the one I already had assembled prior to the broadcast. The one on the left is the one I started building during in the video.
And here it is! There are two stamp images that match the larger ornament punch. This image gives it a bolder look.
And I created this one with Mint Macaron Cardstock on the base so it can be written on and used as a tag on a present.
I shared this super simple card towards the end of the video featuring the Pressed Petals Designer Paper which is part of the Buy 3, Get 1 Free Promotion (see below for details). Isn’t it awesome that the punches can be used in other ways? Here the larger ornament punch is a vase.
Measurements…
Very Vanilla Cardstock
7″ x 5″ scored at 3-1/2″ and folded in half for the card base (or a Very Vanilla Notecard)
Pressed Petals Designer Paper
3-1/4″ x 4-1/4″
Copper Foil Sheet
Scrap for punching vase shape
This is another vase card. I CASEd the layout and idea from fellow demonstrator, Sue Nurnberger. Thanks Sue!
Measurements…
Night of Navy Cardstock
4-1/4” x 11” scored at 5-1/2″ and folded in half for the card base
Very Vanilla Cardstock
4″ x 5-1/4″ (for the inside layer)
3″ x 2-1/2″
Pretty Peacock Cardstock
3-1/8″ x 2-5/8″
Copper Foil Sheet
2-3/4″ x 3-1/4″
Scrap for punching vase shape (this could be punched from the middle of the above piece)
Brightly Gleaming Designer Paper
Scrap for punching two daisies
6″ x 2″
And this last card I put together after the video ended so I could feature that fun flower…also another idea that I got from Sue.
Measurements…
Very Vanilla Cardstock
7″ x 5″ scored at 3-1/2″ and folded in half for the card base (or a Very Vanilla Notecard)
Perennial Essence Designer Paper
Scraps for punching petals and leaves (ornaments)
Thanks for visiting!
If you ARE on Facebook, I invite you to “like” then “follow” my page so you can get updates when I share and when I go live. My next FB Live will be on Wednesday, September 25th at 11 AM Central Time. Hope you can join me!
Click here to shop my online store. Click here to access & view the current catalogs. Click here to subscribe to those fun Paper Pumpkin kits of creativity! Click here to learn about my Loyalty Rewards program. You can earn free stamps just for shopping with me! Click here for more information about joining my Online Paper Crafters’ Club. Earn even more goodies by joining a club! Click here to learn more about joining my Stampers With ART community. Get the MOST rewards including a discount on future products!
Follow me on social media! I share regularly on Pinterest, YouTube, and Facebook! Please subscribe to my blog, too!Click here and enter your email in the blue box (above the butterfly).
BUY 3, GET 1 FREE DESIGNER PAPER SALE By popular demand, Stampin’ Up! brought back the Designer Series Paper Sale! From September 4–30, you can buy three packages of select Designer Series Paper, and get one FREE! Click here for more details. Click here for the informational flyer.
BETTER THAN FLAT TUTORIALS I’m so proud to be teamed up with five other super talented Stampin’ Up!® demonstrators so we can create Fun Fold cards & 3-D projects to share exclusively with our customers, paper crafting friends & team members each month! (Our September 2019 projects featuring new products from the Holiday Catalog are now available!) CLICK HERE for more information.
A PEEK AT OCTOBER’S & EVEN NOVEMBER’S PAPER PUMPKIN KITS Christmastime papercrafting with Paper Pumpkin has become an annual tradition! So to deliver more of what our subscribers love this holiday season, in October and November we are offering back-to-back coordinating kits, one with Christmas cards, the other with Christmas tags. Both kits make it easy for you to add a handmade, personal touch to your holiday giving—without a lot of fuss. It’s Christmas made easy with Paper Pumpkin! The October 2019 Paper Pumpkin kit makes ten 4-1/4″ x 5-1/2″ cards and includes envelopes. The November 2019 Paper Pumpkin kit makes 24 holiday-themed gift tags of 4 various sizes and designs. Both kits include coordinating colors: Early Espresso, Pool Party, Poppy Parade, and Shaded Spruce. The October and November kits coordinate; however, each kit is all-inclusive and can stand alone. Click here to get your subscription started by October 10th for the next kit.
Today at 11 AM Central Time I’ll be hopping on my Facebook Page to broadcast live and share several ideas and projects that I made with the Brightly Gleaming Suite of products from the 2019 Holiday Catalog. Here are three of them that I’ll be explaining how to make. Products I used… See below for a list of products mentioned linked to where you can find them in my online store.
Our Copper Tea Tins go so well with this suite! And THIS tin shows off much of the awesome suite product: the Christmas Gleaming Stamp Set, the Gleaming Ornaments Punch Pack, the Brightly Gleaming Foil Elements, the Brightly Gleaming Designer Paper, and the Star Designer Elements.
Here is an actual ornament I made from 25 punched ornament shapes, the large star from the Brightly Gleaming Foil Elements, some hot glue and some Multipurpose Liquid Glue, some Mint Macaron Textile Ribbon, and a couple punched circles (2″ and 1/2″).
It looks harder to make than it really is.
Do you remember me sharing how I turned the Countdown Christmas Project Kit into a Halloween “Pick a Drawer” game back on my August 19th blog post? And do you remember the list of ideas I shared for other ways to use this kit?
Countdown to a vacation or a special visit
Countdown to a wedding
Countdown to the birth of a baby
Countdown to another holiday
Countdown to someone returning home
Drawers to hold craft items/embellishments
Drawers to hold notes/memories/trinkets for a couple celebrating an anniversary or for a soon-to-be bride
Drawers to hold notes of gratitude for Thanksgiving
Drawers to hold jewelry
Drawers to hold 25 things that are special about you or 25 reasons why I love you
Well… I love the green and copper designer paper in the Brightly Gleaming Designer Paper pack (I’m a huge fan of the color green!). And so I decided to decorate a set of these drawers with that sheet and another more solid green sheet from the pack, some Pearls, and some Star Designer Elements. Ta-da! I think this needs to be a permanent addition to my craft room.
I’ll give how-to tips for these three projects and more. I sure hope you can join me live! If not, stop back on Saturday to see the recorded version of that broadcast that I will post here on my blog. And see photos of the cards and other ideas I share.
Click here to shop my online store. Click here to access & view the current catalogs. Click here to subscribe to those fun Paper Pumpkin kits of creativity! Click here to learn about my Loyalty Rewards program. You can earn free stamps just for shopping with me! Click here for more information about joining my Online Paper Crafters’ Club. Earn even more goodies by joining a club! Click here to learn more about joining my Stampers With ART community. Get the MOST rewards including a discount on future products!
Follow me on social media! I share regularly on Pinterest, YouTube, and Facebook! Please subscribe to my blog, too!Click here and enter your email in the blue box (above the butterfly).
BUY 3, GET 1 FREE DESIGNER PAPER SALE By popular demand, Stampin’ Up! brought back the Designer Series Paper Sale! From September 4–30, you can buy three packages of select Designer Series Paper, and get one FREE! Click here for more details. Click here for the informational flyer.
BETTER THAN FLAT TUTORIALS I’m so proud to be teamed up with five other super talented Stampin’ Up!® demonstrators so we can create Fun Fold cards & 3-D projects to share exclusively with our customers, paper crafting friends & team members each month! (Our September 2019 projects featuring new products from the Holiday Catalog are now available!) CLICK HERE for more information.
A PEEK AT OCTOBER’S & EVEN NOVEMBER’S PAPER PUMPKIN KITS Christmastime papercrafting with Paper Pumpkin has become an annual tradition! So to deliver more of what our subscribers love this holiday season, in October and November we are offering back-to-back coordinating kits, one with Christmas cards, the other with Christmas tags. Both kits make it easy for you to add a handmade, personal touch to your holiday giving—without a lot of fuss. It’s Christmas made easy with Paper Pumpkin! The October 2019 Paper Pumpkin kit makes ten 4-1/4″ x 5-1/2″ cards and includes envelopes. The November 2019 Paper Pumpkin kit makes 24 holiday-themed gift tags of 4 various sizes and designs. Both kits include coordinating colors: Early Espresso, Pool Party, Poppy Parade, and Shaded Spruce. The October and November kits coordinate; however, each kit is all-inclusive and can stand alone. Click here to get your subscription started by October 10th for the next kit.
Today is the day brand new products debut in the 2019 Holiday Catalog!! And you are gonna love seeing all that awaits! Click here or on the image below to access the online version of this catalog. CLICK HERE to shop the new products in my online store.
Click here if you wish to add this catalog in with your order.
Also keep in mind that today starts the Designer Paper Sale!
BUY 3, GET 1 FREE DESIGNER PAPER SALE By popular demand, Stampin’ Up! brought back the Designer Series Paper Sale! From September 4–30, you can buy three packages of select Designer Series Paper, and get one FREE! Click here for more details. Click here for the informational flyer.
Today I am sharing the cards I made with the make-n-take supplies and catalog products that were given to me as one of my gifts on the Greek Isles Incentive Trip. These are all made with the Most Wonderful Time Product Medley on page 39. The product medley includes an 11-pc photopolymer stamp set, 6 coordinating dies, 48 sheets of double-sided foiled designer paper, 10 yds of tinsel trim, 58 adhesive-backed gold faceted stars, 12 gold foil card fronts, and 7 sticker sheets.
Click here to see the cards Stampin’ Up! suggested we make. (My friend, Dawn shared them on her blog.)
I wanted to do mine a little differently. Here is what I came up with. We were given three card bases. This one is my simple 3″ x 3″ card.
This one is my 3-1/2″ x 5″ note card. I trimmed 1″ off the bottom of the front.
And then I added a 1″ x 5″ strip of designer paper to the inside bottom (which peeks out when the card is closed) and a 2-5/8″ x 5″ piece to the inside top. The flip side of this designer paper is a red and white candy cane striped pattern. You can see that it peeks out a bit on the front of the closed card.
This is my 4-1/4″ x 5-1/2″ full size card. It’s my favorite! I used the Layering Oval Dies and Stitched Shapes Dies along with some extra Real Red Cardstock and Gold Foil. I love how the tinsel trim accents the tree. ❤️
I ended up making a fourth card by adding a piece of 8-1/2″ x 5-1/2″ Basic Black Cardstock that I folded in half to get another full size card base.
I also added a piece of 2-1/2″ x 4-1/2″ Whisper White Cardstock to the inside and a 3-1/4″ x 4-3/4″ piece (same size as the designer paper underneath) of Vellum Cardstock to the front.
I hope I inspired your creativity with my cards today. Make sure you take time to peruse the new 2019 Holiday Catalog!
And…if you find your wish list is over $99, consider getting the Starter Kit. It’s so much better to get $125 worth of product for $99 than just $99 worth of product for $99. Plus, you get free shipping, a bonus Paper Pumpkin kit, a box of catalogs to share with your friends, and a few other free goodies in this kit. SO worth it! Click here to read about the other perks that come along with getting the Starter Kit.
Click here to shop my online store. Click here to access & view the current catalogs. Click here to subscribe to those fun Paper Pumpkin kits of creativity! Click here to learn about my Loyalty Rewards program. You can earn free stamps just for shopping with me! Click here for more information about joining my Online Paper Crafters’ Club. Earn even more goodies by joining a club! Click here to learn more about joining my Stampers With ART community. Get the MOST rewards including a discount on future products!
Follow me on social media! I share regularly on Pinterest, YouTube, and Facebook! Please subscribe to my blog, too!Click here and enter your email in the blue box (above the butterfly).
A PEEK AT SEPTEMBER’S PAPER PUMPKIN KIT The September 2019 Paper Pumpkin, Bone Appétit kit includes 20 food-safe treat boxes, a unique and exclusive Halloween stamp set, and a spooky, special-edition box. September’s kit also gives new meaning to the word “handmade.” Coordinating colors are: Basic Black, Gorgeous Grape, Pumpkin Pie, and Whisper White Click here to get your subscription started by September 10th for this next kit.
MY ONLINE PAPER CRAFTERS CLUB IS LOOKING FOR NEW MEMBERS I’m forming a new Paper Crafters club that will begin mid-September (with orders due mid-month for October, November, December, January, February & March). And we are looking for THREE more to join us. The commitment is to order at least $25 worth of Stampin’ Up! product in each of those 6 months. In one of those months, you would reap the hosting rewards (free merchandise based on the club orders). And then you’d also be able to get in on monthly product perks that would be sent to you along with your monthly club cards.
BETTER THAN FLAT TUTORIALS I’m so proud to be teamed up with five other super talented Stampin’ Up!® demonstrators so we can create Fun Fold cards & 3-D projects to share exclusively with our customers, paper crafting friends & team members each month! (Our September 2019 projects featuring new products from the Holiday Catalog are now available!) CLICK HERE for more information.
Welcome to the August 2019 Greek Isles Achievers Blog Hop! Follow along and check out all the other blogs in the hop (click on the names of the participants in the list below my signature) so you can see some fabulous cards and projects created by other demonstrators who also earned the Stampin’ Up!® Greek Isles incentive trip that took place in July.
This month’s hop features new products in the 2019 Holiday Catalog that will debut September 4. Click here to shop online and see all the fun Stampin’ Up! products that are NOW available. And then visit the store on the 4th to see new Holiday Catalog products when they become available.
One item that I believe will be a huge hit is the Christmas Countdown Project Kit. The kit includes a sturdy white box of 25 mini drawers, the decorative pre-cut papers and stickers to add to the white drawer fronts, and a direction pamphlet.
The box measures 11-3/16″ x 11-3/16″ x 2-3/16″. And each drawer measures 2-1/8″ x 2-1/8″ x 2-1/16″.
The Christmas Countdown Stamp Set is available separately and helps to add beautiful images to the drawer fronts. By offering the stamp set separately, those that want to get more than one kit will get just the consumables with each additional kit purchase.
And you just MAY want to get more than one kit so you can give them as gifts or make lots of variations of this kit. Here are some ideas of other ways you can use this kit:
Countdown to a vacation or a special visit
Countdown to a wedding
Countdown to the birth of a baby
Countdown to another holiday
Countdown to someone returning home
Drawers to hold craft items/embellishments
Drawers to hold notes/memories/trinkets for a couple celebrating an anniversary or for a soon-to-be bride
Drawers to hold notes of gratitude for Thanksgiving
Drawers to hold jewelry
Drawers to hold 25 things that are special about you or 25 reasons why I love you
Or you can make a Halloween “pick a drawer” game as I did below. ?
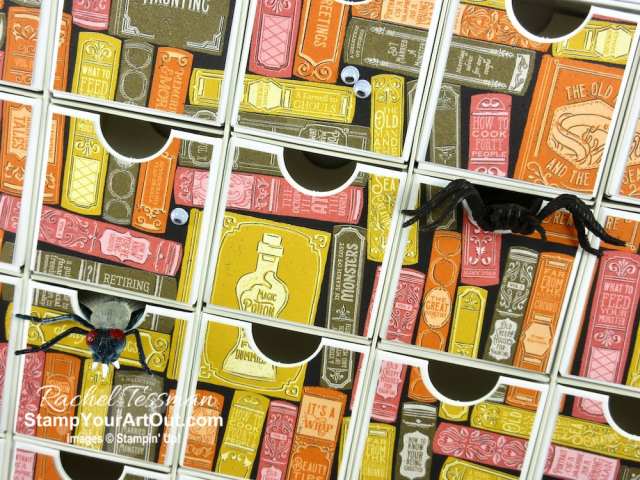
If you want to make two variations, you only need ONE kit. I have one kit, but I flipped my drawers around. One side of my drawers are decorated per the kit instructions and with the consumables that come with the kit. The other side of my drawers are decorated with Monster Bash Designer Paper, another fun product debuting in the Holiday Catalog.
Here are the details.
Measurements…
Monster Bash Designer Paper (books on a shelf sheet)
Twenty-five “connected” pieces that measure 1-15/16″ x 1-15/16″
Black Glittered Organdy Ribbon
6 feet
Whisper White Cardstock
Scrap for stamping and die-cutting warning sign
Basic Black Cardstock
3-1/2″ x 1-3/4″ scored in the middle at 1-3/4″ and folded in half for die-cutting warning sign background
1-3/8″ x 5/8″ scored 3/8″ in at each end as the supporting piece for the sign
Products I used… See below for a complete list of products I used linked to where you can find them in my online store.
Directions…
Cut five rows of five Monster Bash designer paper pieces and keep them in order after you’ve cut them.
Use one of the extra drawer front pieces from the kit (you’ll have 3 extra) as a guide to punch the half-circles in the top of each drawer front. Then adhere them to the drawers using SNAIL.
In the largest black spaces between the books in the designer paper images add Googly Eyes with Glue Dots.
Stamp the “Open if you Dare” image, then die-cut with the coordinating die.
Die-cut the folded 3-1/2″ x 1-3/4″ Basic Black Cardstock with the larger coordinating die making sure that the folded area of the cardstock stays just inside the die.
Fold the 1-3/8″ x 5/8″ Basic Black Cardstock into a U-shape, attach this to the die-cut black piece to form a “tent,” then adhere the Whisper White stamped sign with SNAIL.
Wrap the ribbon around the box, insert the tent (which I forgot to do before taking my photos), tie a bow, then wind the ends of the ribbon in and around as shown.
Finally fill the drawers with a variety of treats, goodies, and scary surprises. Each trick-or-treater can open a drawer if they dare.
Have fun on the hop! And enjoy seeing all those inspiring ideas made by fellow trip achievers using new products!
Click here to shop my online store. Click here to access & view the current catalogs. Click here to subscribe to those fun Paper Pumpkin kits of creativity! Click here to learn about my Loyalty Rewards program. You can earn free stamps just for shopping with me! Click here for more information about joining my Online Paper Crafters’ Club. Earn even more goodies by joining a club! Click here to learn more about joining my Stampers With ART community. Get the MOST rewards including a discount on future products!
Follow me on social media! I share regularly on Pinterest, YouTube, and Facebook! Please subscribe to my blog, too!Click here and enter your email in the blue box (above the butterfly).
STAMP-N-STORAGE FRIENDS SALE I am excited to announce that now through Tuesday, August 20 at 11:59 pm Central Time, my friends can get 10% off of anything/everything at Stamp-n-Storage!!! Click here or the image below to start shopping.
Then you must use this code at checkout in order for the discount to apply to your purchase/s: FRIENDS19 As many of you know I am a HUGE fan. Click here to see my creative space and get links to my favorite units: https://stampyourartout.com/2018/06/new-stamp-pads-new-organization-a-sale.html
ONSTAGE NOVEMBER 16
Demonstrators are getting ready to register for the next Stampin’ Up!® convention, OnStage November 2019. Registration begins August 20th. And there are several locations to pick from: Atlanta, Edmunton, Hartford, Lansing, Las Vegas, Portland (where I’ll be attending!), and Toronto. Become a demonstrator by purchasing your Starter Kit. Then join us in our excitement as we plan for this fun event. See the Extra, Extra! starter kit special below to learn more about the other perks that come along with being a demonstrator.
REDEEM BONUS DAYS COUPON CODES IN AUGUST Your Bonus Days coupon codes that you earned in July may now be redeemed! (Every $50 spent July 1–31 before shipping and tax, earned a $5 Bonus Days coupon code. Check your emails for your code/s.) Codes can only be redeemed August 1–31. Click here to learn more about how to redeem your code/s. Click here for more information.
EXTRA, EXTRA!
From now until August 31, receive an additional $30 in product for free in your Starter Kit. So instead of $26 for free, you can get $56 in free product (and of course free shipping as always). Yep! Choose $155 worth of product for $99 + tax!! And if that wasn’t awesome enough, a $10 coupon code will be gifted to you the following month to use towards an order by October 31st. Click here for more information.
A PEEK AT SEPTEMBER’S PAPER PUMPKIN KIT The September 2019 Paper Pumpkin, Bone Appétit kit includes 20 food-safe treat boxes, a unique and exclusive Halloween stamp set, and a spooky, special-edition box. September’s kit also gives new meaning to the word “handmade.” Coordinating colors: Basic Black, Gorgeous Grape, Pumpkin Pie, and Whisper White Click here to get your subscription started by September 10th for this next kit.
BETTER THAN FLAT TUTORIALS I’m so proud to be teamed up with five other super talented Stampin’ Up!® demonstrators so we can create Fun Fold cards & 3-D projects to share exclusively with our customers, paper crafting friends & team members each month! (Our Christmas in August projects are now available!) CLICK HERE for more information.
NEW CLUB FORMING SOON! Do you find that you order at least $25 worth of Stampin’ Up! product each month? Do you want to get perks for those monthly orders? I’m forming a new Paper Crafters club that will kick off in less than a month, and we are looking for more members. Click here to learn more. Then contact me with your questions &/or to sign up.
Thank you all so much for making my 2018 so special! I love to share my passion for paper crafting with Stampin’ Up! products. And it’s because of you – my friends, family, customers, subscribers, fellow demonstrators, blog followers, etc. – that I am able to make my passion as my career! For that I am so VERY grateful.
Today I’m sharing a card that I created with a few 2018 Holiday Catalog products with a sentiment fitting of my thoughts today. I built it from the smaller mini thank you’s that I had sent out in September along with my August birthday thank you gifts.
Need a thank you card idea to send to that special gift giver this holiday season? These mini cards alone would be great. But it looks even better on a full size card. And the black background and ribbon really make the gold snowflake die-cuts pop!
Measurements…
Early Espresso Cardstock:
11″ x 4-1/4″ scored at 5-1/2″ and folded in half for the card base
3″ x 3″
Whisper White Cardstock:
Two pieces that are 5-3/8″ x 4-1/8″ (one for the inside layer)
2″ x 3″
Basic Black Cardstock:
5-1/4″ x 4″
Gold Foil Sheets:
Scrap for die-cutting snowflakes
Black Shimmer Ribbon
11″
14″
Products: See below for a full list of supplies linked to where you can find them in my online store.
Directions…
Run the Basic Black Cardstock through the Big Shot with the Blizzard die using the embossing mat so that the die doesn’t cut but only leaves an impression in the cardstock.
Stamp then sentiment with VersaMark ink horizontally onto the 2″ x 3″ Whisper White Cardstock (leaving room for the ribbon). Add the embossing powder, tap off excess, and heat emboss.
Add the Whisper White piece to the Early Espresso Cardstock. Then tie on the 11″ Black Shimmer Ribbon.
Tie the 14″ Black Shimmer Ribbon around the front of the card base, but tie the knot on the inside.
Assemble all the other card layers: add one of the 5-3/8″ x 4-1/8″ Whisper White pieces to the inside, add one to the outside, add the embossed Basic Black, then add the sentiment layer.
Adhere Sizzix Adhesive Sheet to the back of the Gold Foil Sheet scrap. Then die-cut to create snowflake stickers.
Peel off the adhesive sticker backings, and add full and partial gold snowflakes where you see fit.
This Beautiful Blizzard stamp set and coordinating Blizzard Thinlits die are leaving us soon. So if you want them (or any other departing/retiring products), be sure to get them by January 2nd.
YEAR-END CLOSEOUTS
There are many items that are leaving us from the 2018 Holiday Catalog (which ends January 2nd), and some of them are discounted. But hurry, many items are “while supplies last.” CLICK HERE to learn more. CLICK HERE to access the Year-End Closeout list. And CLICK HERE to shop the Closeout online.
With all the new products being released on the 3rd, I am very much looking forward to 2019! I have so many more creative ideas to share with you!!
The 2019 Occasions Catalog debuts January 3rd! That means it’s that time of year to get in on my popular product shares so you can gather up lots of new product for LESS! Sign up today by contacting me with your share choice/s. I’m taking orders for shares now through January 2nd, 2019. CLICK HERE for more information.
JOIN THE CLUB
Do you find that you order at least $25 worth of Stampin’ Up! product each month? Do you want to get perks for those monthly orders? I’m forming a new Paper Crafters club that will kick off soon, and we are looking for new members. Click here to learn more. Then contact me with your questions &/or to sign up. We are currently looking for more members so we can start another new club. Who is ready?!
“BETTER THAN FLAT” TUTORIALS
Five super talented Stampin’ Up!® demonstrators and I have joined together as the “Stampin’ Anonymous team” to create Fun Fold cards & 3-D (“better than flat”) projects to share exclusively with our customers, paper crafting friends & team members each month! (Our January projects are almost ready!!) CLICK HERE to find out how you can get your hands on these great tutorials. A new one will be offered each month.
CLING STAMPS ARE COMING!
Cling stamps will debut in the 2019 Occasions catalog and Sale-A-Bration brochure! Click HERE for more information.
My Grandma Tessman used to make us beautiful gifts for Christmas. She would make “suvvy” tricot blankets, embroidered pillow cases, nightgowns (with matching ones for our dolls), and more. She eventually had 15 grandchildren, though. So can you imagine all the time she put into those gifts!? She probably worked on them year-round! Eventually there was a time when she had to do away with sewing elaborate gifts for each of her grandchildren. I can’t remember if that was when I was in high school or in college. But she still made Christmas grand. She would hang envelopes all over the tree with money in them. We each had one on the tree with our name on it.
This quick and simple gift packaging idea I have for you tonight made reminded me of her. AND you can hang these on the tree with money and/or treats inside. Make a few, and watch the smiles as everyone finds these special ornaments at Christmas.
Measurements
Crumb Cake Cardstock: 4-1/4″ x 5-1/2″
Early Espresso Cardstock: Scrap for stamping and punching sentiment
Whisper White Cardstock: Scrap for punching 1-1/2″ Circle
Silver Baker’s Twine: 10″
Directions
Emboss the Crumb Cake Cardstock (optional), then add Tear & Tape Adhesive along a short edge and along a long edge.
Tear off the backing on the Tear & Tape, then connect the two short ends to make a tube.
Pinch the end of the shut that has the Tear & Tape on it making sure that the seam of the tube is off center as shown.
Then staple the middle of the twine to that closed end. Connect the ends of the twine (adjust if needed), and make an overhand knot to tie it shut and form the loop for hanging this on the Christmas Tree.
Add the candy, treats and/or money through the open end. Then staple that end shut so it closes the opposite way as the top end.
Stamp the sentiment image onto the Whisper White scrap. Then punch it out.
Punch the 1-1/2″ Early Espresso Circle, and layer the Whisper White piece onto this.
Add the layered sentiment piece to the “ornament” using a Dimensional.
Then add a rhinestone to give it a little more sparkle.
You can personalize each one by either writing the recipient’s name on the bottom or back. Or you could punch another white piece (unstamped), and attach it to the back of the Early Espresso circle before putting that sentiment layer onto the ornament. That way you’d have a small white space for writing.
There are many items that are leaving us from the 2018 Holiday Catalog (which ends January 2nd), and some of them are discounted. But hurry, many items are “while supplies last.” CLICK HERE to learn more. CLICK HERE to access the Year-End Closeout list. And CLICK HERE to shop the Closeout online.
OCCASIONS/SAB PRODUCT SHARES AVAILABLE!
The 2019 Occasions Catalog debuts January 3rd! That means it’s that time of year to get in on my popular product shares so you can gather up lots of new product for LESS! Sign up today by contacting me with your share choice/s. I’m taking orders for shares now through January 2nd, 2019. CLICK HERE for more information.
JOIN THE CLUB
Do you find that you order at least $25 worth of Stampin’ Up! product each month? Do you want to get perks for those monthly orders? I’m forming a new Paper Crafters club that will kick off soon, and we are looking for new members. Click here to learn more. Then contact me with your questions &/or to sign up. We are currently looking for more members so we can start another new club. Who is ready?!
“BETTER THAN FLAT” TUTORIALS
Five super talented Stampin’ Up!® demonstrators and I have joined together as the “Stampin’ Anonymous team” to create Fun Fold cards & 3-D (“better than flat”) projects to share exclusively with our customers, paper crafting friends & team members each month! Our December projects are ready!! CLICK HERE to find out how you can get your hands on these great tutorials. A new one will be offered each month.
CLING STAMPS ARE COMING!
Cling stamps will debut in the 2019 Occasions catalog and Sale-A-Bration brochure! Click HERE for more information.
Stamp Your Art Out! Rachel Tessman Independent Demonstrator 763-502-6813
This is the best way to enjoy all that Stampin' Up! has to offer. Plus it's fun to be on the demonstrator side of things!
Subscribe to our monthly Paper Pumpkin crafting kits through me to enjoy exclusive ideas shared in PDF tutorials from the our PP Creatives team of Stampin’ Up! demonstrators.
In the spirit of full disclosure, I am an affiliate with Stamp-n-Storage which means I may get commissions if you click on links I provide and decide to purchase anything from this company. I love their products and recommend them because I own several myself and believe my readers will benefit from them.
Recent Achievements
#5 Overall
#5 in Leadership
#11 in Sales
#4 in Team Building
2025 Incentive Trip Achiever (My 20th trip earned will be an Alaskan Cruise in 2026!)


")
")

")


 Classic Weave Ribbon")
 Textile Ribbon")
 Denim Ribbon")
 Circle Punch")
 Circle Punch")


 Circle Punch")


")


 Envelopes")


 Circle Punch")


 Glittered Organdy Ribbon")


