If you are new to paper crafting with Stampin’ Up! products, there is an acronym that many of us use…DSP. It stands for Designer Series Paper. Just wanted to share that with you in case you had seen it and were curious.
My favorite DSP is currently Expressions in Ink. The colors are amazing, and the designs are trendy and feature the alcohol ink art technique you may have seen out there. One side of the sheets include gold foiling. So of course it is so much more stunning in person. But hopefully these photos will do it a bit of justice.
I’ve share lots of projects already featuring this paper on May 12, May 14, May 31, June 11, June 18, July 7, August 6, and August 30. But I have to share it AGAIN. Hahaha! Here is my latest card featuring my favorite of all the papers in this pack. Yes, I finally cut it up and used that deep and dreamy green sheet.
And here is the information you’ll need if you wish to recreate what I made.
Products I used… See below for a complete list of products linked to where you can find them in my online store.
Measurements for one card…
Basic White Thick Cardstock
5-1/2” x 7-1/2” scored parallel to short side at 4-1/4”
Shaded Spruce Cardstock
2-1/8″ x 5-1/2″
Early Espresso Cardstock
Scrap for die-cutting pinecone piece
Soft Suede Cardstock
Scrap for die-cutting pinecone piece
Gold Foil Paper
Scraps for die-cutting pine branch pieces
Expessions in Ink Designer Paper
2-5/8″ x 5-1/4″
Directions
Die-cut the pine cones and branch pieces. Trim the branch piece so you just have what you need. (The rest of it can be used for additional cards. OR you can just die-cut the portion you want to use for one card in the first place.) You’ll need a bit of the branches for the outside AND the inside.
Add the designer paper with just a tiny bit of adhesive (so you can remove it if you mess up) to the front 3-1/4″ wide section of the Basic White card base. Then stamp the vertical sentiment. If you mess up, you can always use that designer paper on another card base. I suggest practicing your stamping first on scrap paper. I mass-produced my set of cards. So I used the Stamparatus tool. That way all my stamp images landed in the same place on all 40 of my cards.
Stamp the inside sentiment.
Once you’ve stamped the vertical Happy Birthday and the inside sentiment, add the designer paper layer with more adhesive making sure to tuck in a gold branch piece before pressing all the way down.
Assemble your pinecone/s using Multipurpose Liquid Glue and then add to the front with Dimensionals.
Emboss the Shaded Spruce cardstock. Add to the inside of the card on the right making sure to tuck in that second gold branch piece before pressing all the way down.
Ta-da!! Here are a few different versions…different designer paper pieces, different branch pieces, and different pinecone configurations.
Thanks for stopping by to see what I had to share today.
Click here to shop my online store. Click here to access & view the current catalogs. Click here to shop My Favorite Extras. Click here to subscribe to those fun Paper Pumpkin kits of creativity! Click here to learn about my Loyalty Rewards program. You can earn free stamps just for shopping with me! Click here to learn more about joining my Stampers With ART community. Get the MOST rewards including a discount on future products! Follow me on social media! I share regularly on Pinterest, YouTube, Instagram, my Facebook Page, and my Facebook Group! Please subscribe to my blog, too!Click here and enter your email in the blue box (above the butterfly).
SALE-A-BRATION 2021 IS BACK – ROUND TWO This year Stampin’ Up! has split the annual Sale-A-Bration event in TWO seasons! The first season took place in January & February. And the second one is happening now… August 3 – September 30, 2021! Sale-A-Bration is one of the BEST times of the Stampin’ Up! Year. There are perks for those that purchase product, those that host parties (or purchase a lot of product), those that join the Stampin’ Up! family (purchase the Starter Kit), and those who are already demonstrators (including those that join early on during SAB). Click here for all the details.
A PEEK AT OCTOBER’S PAPER PUMPKIN KIT
Picture a peaceful Christmas with the Peaceful Christmas Paper Pumpkin Kit! This glimmering and gleaming kit is your creative kickstart to Christmas cardmaking. With sprinkles of snow, shimmering silver skies, and heartwarming holiday wishes, you’ll have enough elements and embellishments to create 10 Christmas cards (5 each of 2 designs) and coordinating envelopes. Speaking of coordination, make even more Christmas magic with Peaceful Place products! Our stunning Peaceful Place Suite Collection (item 156277) pairs perfectly with the kit’s components. Brew a cup of cocoa, snuggle up with a soft blanket, and prepare for a cozy craft night in! Coordinating colors: Basic Gray, Real Red, Shaded Spruce, silver foil If you are not a Paper Pumpkin subscriber, I invite you to give it a try. CLICK HERE to learn more. CLICK HERE to sign up by October 10th for this next kit.
ALL STAR TUTORIALS I’m a designer with the All Stars, a group of globally recognized Stampin’ Up! demonstrators. And we are excited to share exclusively with our customers, paper crafting friends & team members our bundle of twelve September 2021 You’re a Peach Suite Tutorials which are now available! CLICK HERE for more information. Click here to get to my Tutorials for Sale page to see the others that have been offered. The next one featuring the Blackberry Beauty Suite will be available October 1st! AND these tutorial bundles include links to instructional videos!
KITS COLLECTION BY STAMPIN’ UP!® Creativity made easy! A line of affordably priced, versatile all-inclusive kits… Click here for more details. Click here to shop. Be sure to check out Christmas Whimsy, the new kit that just debuted September 8th.
#APaperPumpkinThing Welcome to our monthly “A Paper Pumpkin Thing” blog hop! See what I have to share. Then check out all the other blogs in the hop to see additional creative alternate paper crafting project ideas that we each came up with using the contents of the August 2021 Hope BoxPaper Pumpkin kit. To follow the hop and see other creative project ideas, simply scroll down and click on the names of other hop participants. (If you are receiving this blog post by email, click HERE to see the hop.)
Here are the cards the kit instructs how to make. (Click here for a link to Stampin’ Up!’s how-to video featuring Shelli to help you assemble these as intended.)
I’ve already shared some other alternate projects using the contents of this kit on August 21st.
How I doubled the kit by turning the envelopes into more cards
Today I am sharing a birthday-themed 12×12 scrapbook page and a coordinating birthday card with you.
Products I used… See below for a complete list of extra products I used linked to where you can find them in my online store.
Measurements for the page…
Basic White Cardstock
12″ x 12″
Poppy Parade Cardstock
Three pieces that are 3-5/8″ x 5-1/8″
4-1/8″ x 5-5/8″
Blackberry Bliss Cardstock
Three pieces that are 3-1/2″ x 5″
4″ x 5-1/2″
Directions for the page…
Layer together all the photo mat pieces. Attach the three on the left, but just use the other as a guide for a bit before attaching.
Position that layered photo mat piece, and add the banners so that the orange and yellow sections are outside the border of the page. (To space evenly, add the outer two first. Then add the middle loosely. Add the other two shifting the middle if needed.
Now place the large butterfly upside-down in the lower right section of the page, pull the large layered photo mat piece away, and use Blending Brushes to apply color in and around this “butterfly stencil.” Start with Fresh Freesia. And finish with a bit of Blackberry Bliss through the middle.
Pull the “butterfly stencil” away and adhere that large layered photo mat piece.
Use the dauber to add Poppy Parade ink on the outer edges of the medium size butterfly piece.
Then add this butterfly and a small purple one with the help of Multipurpose Liquid Glue.
Stamp the title piece onto the back side of one of the blue “hope” labels from the kit. (I used the back side of one that was in German or French.) Add this to the top right of the page with Dimensionals from the kit.
Color a few Rhinestones with the Dark Poppy Parade Marker. Allow to dry.
Then add the sequins from the kit, some of these red rhinestones, and (with the help of Multipurpose Liquid Glue) a couple Flower Flourishes.
Your page is now ready for photos!
Directions for the card…
Use the large butterfly from the kit as a stencil again. (Be sure to use it in the upside-down position. This way by maintaining the original coloring on the front, you can still opt to use the butterfly as intended or in some other way.) Use Blending Brushes and apply Fresh Freesia ink first. Then add a bit of Blackberry Bliss ink through the middle.
Open up the card, run it through the Stampin’ Cut & Emboss Machine with the Layering Circle Die to cut a window.
Stamp the sentiment through the window. Open the card and stamp the other sentiment below.
Color a couple small Rhinestones with the Dark Bermuda Bay Blends Marker. Allow them to dry.
Add three small butterflies to the inside of the card and the Flower Flourishes in and around the window area of the card using Multipurpose Liquid Glue.
Then add the two small blue Rhinestones.
I hope I inspired your creativity with what I shared today! If you did not get this kit, the refill kit which will be available until supplies last will suffice. Or I hope you can apply these ideas to products you already own.
If you are not a Paper Pumpkin subscriber, I invite you to give it a try. CLICK HERE to learn more. CLICK HERE to sign up by September 10th for this next kit…
A PEEK AT SEPTEMBER’S PAPER PUMPKIN KIT Hay, there! Experience everything the autumn season has to offer with the Haunts & Harvest Paper Pumpkin Kit! This month’s kit includes enough supplies to create 12 treat boxes—4 each of 3 designs. That means you can take your pick of apple, pumpkins, or jack-o-lantern treat boxes! Plus, the Paper Pumpkin box is designed to easily transform into a vintage wheelbarrow for you to display your harvest! Whether you’re thinking about crisp red apples or you’re ready to carve some spooky jack-o-lanterns (or both!), the Haunts & Harvest Paper Pumpkin Kit—designed in a vivid fall palette—is a hands-on crafting experience for all autumn lovers! Coordinating colors: Basic Black, Pale Papaya, Poppy Parade, Pumpkin Pie, Soft Succulent.
Click here to shop my online store. Click here to access & view the current catalogs. Click here to shop My Favorite Extras. Click here to subscribe to those fun Paper Pumpkin kits of creativity! Click here to learn about my Loyalty Rewards program. You can earn free stamps just for shopping with me! Click here to learn more about joining my Stampers With ART community. Get the MOST rewards including a discount on future products! Follow me on social media! I share regularly on Pinterest, YouTube, Instagram, my Facebook Page, and my Facebook Group! Please subscribe to my blog, too!Click here and enter your email in the blue box (above the butterfly).
Product List…things you might need/want in addition to the August 2021 Paper Pumpkin kit
NEW PRODUCTS ARE HERE! CLICK HERE to access the PDF of the new July-December 2021 Mini Catalog. CLICK HERE to access these new July-December 2021 Mini Catalog items in my online store. Enjoy shopping and seeing all the new ideas!
SALE-A-BRATION 2021 IS BACK – ROUND TWO This year Stampin’ Up! has split the annual Sale-A-Bration event in TWO seasons! The first season took place in January & February. And the second one is happening now… August 3 – September 30, 2021! Sale-A-Bration is one of the BEST times of the Stampin’ Up! Year. There are perks for those that purchase product, those that host parties (or purchase a lot of product), those that join the Stampin’ Up! family (purchase the Starter Kit), and those who are already demonstrators (including those that join early on during SAB). Click here for all the details.
A PEEK AT SEPTEMBER’S PAPER PUMPKIN KIT Hay, there! Experience everything the autumn season has to offer with the Haunts & Harvest Paper Pumpkin Kit! This month’s kit includes enough supplies to create 12 treat boxes—4 each of 3 designs. That means you can take your pick of apple, pumpkins, or jack-o-lantern treat boxes! Plus, the Paper Pumpkin box is designed to easily transform into a vintage wheelbarrow for you to display your harvest! Whether you’re thinking about crisp red apples or you’re ready to carve some spooky jack-o-lanterns (or both!), the Haunts & Harvest Paper Pumpkin Kit—designed in a vivid fall palette—is a hands-on crafting experience for all autumn lovers! Coordinating colors: Basic Black, Pale Papaya, Poppy Parade, Pumpkin Pie, Soft Succulent. If you are not a Paper Pumpkin subscriber, I invite you to give it a try. CLICK HERE to learn more. CLICK HERE to sign up by September 10th for this next kit.
ALL STAR TUTORIALS I’m a designer with the All Stars, a group of globally recognized Stampin’ Up! demonstrators. And we are excited to share exclusively with our customers, paper crafting friends & team members our bundle of twelve September 2021 You’re a Peach Suite Tutorials which are now available! CLICK HERE for more information. Click here to get to my Tutorials for Sale page to see the others that have been offered. The next one featuring the Blackberry Beauty Suite will be available October 1st! AND these tutorial bundles include links to instructional videos!
KITS COLLECTION BY STAMPIN’ UP!® A new line of affordably priced, versatile all-inclusive kits is here! Creativity made easy!Click here for more details.
When preparing supplies for my August 11th blog post, I put together a card base and a few layers for my metric version of that card. It helps me to do that when I write out measurements, because the metric measurements go with a completely different base cardstock size (A4 vs. Letter). Some people don’t realize that, but that is why you can’t just do a straight conversion from inches to centimeters or vise-versa.
Anyways, I decided to take those pieces and put together a cute mouse and cheese version of my Simple Slide-Out card as I was inspired by how Diana Gibbs turned that squirrel from the Nuts About Squirrels Stamp Set into a mouse in one of her recent cards. Click here to see it. (Thanks Diana for the fun idea!)
Products I used… See the bottom of my post for a complete list of products linked to where you can find them in my online store. Pictured here are a few of them.
Do you see how the squirrels became the mice? Too fun, right?
4-1/4” x 11” scored parallel to the short side at 5-1/2”
4″ x 5-1/4″
4″ x 4″
Basic White Cardstock
4” x 5-1/2″ scored parallel to the short side at 1-1/2″ from one end (the bottom) and 1″ from the other (the top)
1” x 4”
Scraps for stamping & cutting squirrels (which turn into the mice)
Beauty of the Earth Designer Paper
1” x 4”
4” x 4”
Black Glittered Organdy Ribbon
4″
12″
Metric Measurements…
So Saffron Cardstock
10.5 cm x 29.7 cm scored parallel to the short side at 14.8 cm
9.9 cm x 14.2 cm
9.9 cm x 9.9 cm
Basic White Cardstock
9.9 cm x 16.5 cm scored parallel to the short side at 4 cm from one end (the bottom) and 3.7 cm from the other (the top)
2.5 cm x 9.9 cm
Scraps for stamping & cutting squirrels (which turn into the mice)
Beauty of the Earth Designer Paper
2 cm x 9.9 cm
9.9 cm x 9.9 cm
Black Glittered Organdy Ribbon
9 cm
30 cm
Tips
Die-cut the circles from the So Saffron layer to make the cheese. Then use temporary adhesive (I used Dotto) to attach this piece to the smaller So Saffron layer, and use the Blending Brush to add Pale Papaya Ink within the circles which will also add a bit of color to the edges of the circles on the larger layer.
After stamping the squirrels onto Basic White scraps, use the Basic Black Stampin’ Write marker to draw a curved line along the inside of the lower portion of the bushy tail to make a skinnier mouse tail. Extend the whiskers a bit, too. After coloring with the Blends Markers, trim around the critters. Leave a white edge (much easier for cutting around the whiskers) and just come closer in when cutting away the lines from the original tails.
Remove the acorn from the one critter, then cut the portion of the acorn that shows the little hand.
Make a wedge of cheese with one of the leftover little circles from die-cutting the So Saffron piece, cut into the left arm of the mouse a bit, tuck the cheese in, and add that extra hand so it peeks out from behind. (Use the Multipurpose Glue to connect these pieces together.
Peel away the die-cut layer from the smaller So Saffron layer, and prepare all the other card layers: stamp sentiments, tie on ribbon, fold on score lines.
To make the pocket for the gift card, use a thin line of glue as shown below.
Attach all the inside layers. Watch my video for tips on the card assembly.
Add LOTS of Dimensionals to the backside of the cheese layer. (I even used the Mini Dimensionals.) Then attach to the front of the card.
Create little angle-cut strips from the small length of ribbon and the narrow designer paper, and tuck under the sentiment strip. Be careful to add this assembled strip just to the die-cut layer and avoid the holes.
Then just attach that other cute little mouse.
Add a gift card, and send it to someone special for their birthday!
Even your lactose Intolerant friends will get a kick out of this card.
A big happy birthday to anyone who shares this day with me! It’s Friday, but those of us who were born on the 13th of any month aren’t bothered by that, right? Tonight my husband and boys are celebrating with me by taking me out to dinner! I do love Panera (as you can see by the gift card in the photos), but we are trying out a new place. I’m excited!
Thanks for stopping by to see what I had to share today.
Click here to shop my online store. Click here to access & view the current catalogs. Click here to shop My Favorite Extras. Click here to subscribe to those fun Paper Pumpkin kits of creativity! Click here to learn about my Loyalty Rewards program. You can earn free stamps just for shopping with me! Click here to learn more about joining my Stampers With ART community. Get the MOST rewards including a discount on future products! Follow me on social media! I share regularly on Pinterest, YouTube, Instagram, my Facebook Page, and my Facebook Group! Please subscribe to my blog, too!Click here and enter your email in the blue box (above the butterfly).
NEW PRODUCTS ARE HERE! CLICK HERE to access the PDF of the new July-December 2021 Mini Catalog. CLICK HERE to access these new July-December 2021 Mini Catalog items in my online store. Enjoy shopping and seeing all the new ideas!
SALE-A-BRATION 2021 IS BACK – ROUND TWO This year Stampin’ Up! has split the annual Sale-A-Bration event in TWO seasons! The first season took place in January & February. And the second one is happening now… August 3 – September 30, 2021! Sale-A-Bration is one of the BEST times of the Stampin’ Up! Year. There are perks for those that purchase product, those that host parties (or purchase a lot of product), those that join the Stampin’ Up! family (purchase the Starter Kit), and those who are already demonstrators (including those that join early on during SAB). Click here for all the details.
A PEEK AT SEPTEMBER’S PAPER PUMPKIN KIT Hay, there! Experience everything the autumn season has to offer with the Haunts & Harvest Paper Pumpkin Kit! This month’s kit includes enough supplies to create 12 treat boxes—4 each of 3 designs. That means you can take your pick of apple, pumpkins, or jack-o-lantern treat boxes! Plus, the Paper Pumpkin box is designed to easily transform into a vintage wheelbarrow for you to display your harvest! Whether you’re thinking about crisp red apples or you’re ready to carve some spooky jack-o-lanterns (or both!), the Haunts & Harvest Paper Pumpkin Kit—designed in a vivid fall palette—is a hands-on crafting experience for all autumn lovers! Coordinating colors: Basic Black, Pale Papaya, Poppy Parade, Pumpkin Pie, Soft Succulent. If you are not a Paper Pumpkin subscriber, I invite you to give it a try. CLICK HERE to learn more. CLICK HERE to sign up by September 10th for this next kit.
ALL STAR TUTORIALS I’m a designer with the All Stars, a group of globally recognized Stampin’ Up! demonstrators. And we are excited to share exclusively with our customers, paper crafting friends & team members our bundle of twelve August 2021 Hand-Penned Suite Tutorials which are now available! CLICK HERE for more information. Click here to get to my Tutorials for Sale page to see the others that have been offered. The next one featuring the You’re a Peach Suite will be available September 1st! AND these tutorial bundles include links to instructional videos!
KITS COLLECTION BY STAMPIN’ UP!® A new line of affordably priced, versatile all-inclusive kits is here! Creativity made easy!Click here for more details.
There is a stamp set that debuted in the July-December 2021 Mini Catalog called Nuts About Squirrels. And the illustrated images are super adorable. I fell in love with it right away when I opened the publication.
In fact the Simple Slide-Out Card I am sharing today was one that I made right when all my new products showed up during preorder time last month. And I’m thrilled that I’m finally able to share it with you.
I just showed live on YouTube about an hour ago step-by-step directions for creating this interactive card featuring the Nuts About Squirrels Stamp Set, the Beauty of the Earth Designer Series Paper, and the Subtle Shimmer Sequins. And now I’m sharing that video here in my blog post. Be sure to watch the video by clicking here (or you can just click on this image below if you are already on my blog post), scroll through the close-up photos that follow, check out the measurements & products list below, and then let me know if you have any questions.
I hope you enjoyed what I shared in this video. Below are measurements, close-up photos, and a product list for what I demonstrated. (Please subscribe to my YouTube channel so you can get updates when I share and go live).
Products I used… See below for a complete list of products linked to where you can find them in my online store.
Click here to access and download a printable “measurements & supplies” sheet.
Imperial Measurements…
Early Espresso Cardstock
4-1/4” x 11” scored parallel to the short side at 5-1/2”
Basic White Cardstock
2-1/4” x 4”
4” x 4”
Scrap for stamping & cutting squirrel and extra nuts
Beauty of the Earth Designer Paper
3” x 4” (design #1 for front)
4” x 4” (design #2 for top inside)
3” x 4” scored parallel to the long side at 1” (design #3 for middle inside)
Metric Measurements…
Early Espresso Cardstock
10.5 cm x 29.7 cm scored parallel to the short side at 14.8 cm
Basic White Cardstock
5.8 cm x 9.9 cm
9.9 cm x 9.9 cm
Scrap for stamping & cutting squirrel and extra nuts
Beauty of the Earth Designer Paper
8.5 cm x 9.9 cm (design #1 for front)
9.9 cm x 9.9 cm (design #2 for top inside)
9.9 cm x 9.9 cm scored parallel to the long side at 3.7 cm (design #3 for middle inside)
Here are photos of the finished cards.
\
I hope you enjoyed what I shared!
I invite you to subscribe to my YouTube channel. And then click on the bell to the right of the subscribe button and set notifications to “all” so you can get updates when I share and when I go live. My next Live will be on Wednesday, August 18 at 11 AM Central Time. I hope you can join me!
Click here to shop my online store. Click here to access & view the current catalogs. Click here to shop My Favorite Extras. Click here to subscribe to those fun Paper Pumpkin kits of creativity! Click here to learn about my Loyalty Rewards program. You can earn free stamps just for shopping with me! Click here to learn more about joining my Stampers With ART community. Get the MOST rewards including a discount on future products! Follow me on social media! I share regularly on Pinterest, YouTube, Instagram, my Facebook Page, and my Facebook Group! Please subscribe to my blog, too!Click here and enter your email in the blue box (above the butterfly).
NEW PRODUCTS ARE HERE! CLICK HERE to access the PDF of the new July-December 2021 Mini Catalog. CLICK HERE to access these new July-December 2021 Mini Catalog items in my online store. Enjoy shopping and seeing all the new ideas!
SALE-A-BRATION 2021 IS BACK – ROUND TWO This year Stampin’ Up! has split the annual Sale-A-Bration event in TWO seasons! The first season took place in January & February. And the second one is happening now… August 3 – September 30, 2021! Sale-A-Bration is one of the BEST times of the Stampin’ Up! Year. There are perks for those that purchase product, those that host parties (or purchase a lot of product), those that join the Stampin’ Up! family (purchase the Starter Kit), and those who are already demonstrators (including those that join early on during SAB). Click here for all the details.
A PEEK AT SEPTEMBER’S PAPER PUMPKIN KIT Hay, there! Experience everything the autumn season has to offer with the Haunts & Harvest Paper Pumpkin Kit! This month’s kit includes enough supplies to create 12 treat boxes—4 each of 3 designs. That means you can take your pick of apple, pumpkins, or jack-o-lantern treat boxes! Plus, the Paper Pumpkin box is designed to easily transform into a vintage wheelbarrow for you to display your harvest! Whether you’re thinking about crisp red apples or you’re ready to carve some spooky jack-o-lanterns (or both!), the Haunts & Harvest Paper Pumpkin Kit—designed in a vivid fall palette—is a hands-on crafting experience for all autumn lovers! Coordinating colors: Basic Black, Pale Papaya, Poppy Parade, Pumpkin Pie, Soft Succulent. If you are not a Paper Pumpkin subscriber, I invite you to give it a try. CLICK HERE to learn more. CLICK HERE to sign up by September 10th for this next kit.
ALL STAR TUTORIALS I’m a designer with the All Stars, a group of globally recognized Stampin’ Up! demonstrators. And we are excited to share exclusively with our customers, paper crafting friends & team members our bundle of twelve August 2021 Hand-Penned Suite Tutorials which are now available! CLICK HERE for more information. Click here to get to my Tutorials for Sale page to see the others that have been offered. The next one featuring the You’re a Peach Suite will be available September 1st! AND these tutorial bundles include links to instructional videos!
KITS COLLECTION BY STAMPIN’ UP!® A new line of affordably priced, versatile all-inclusive kits is here! Creativity made easy!Click here for more details.
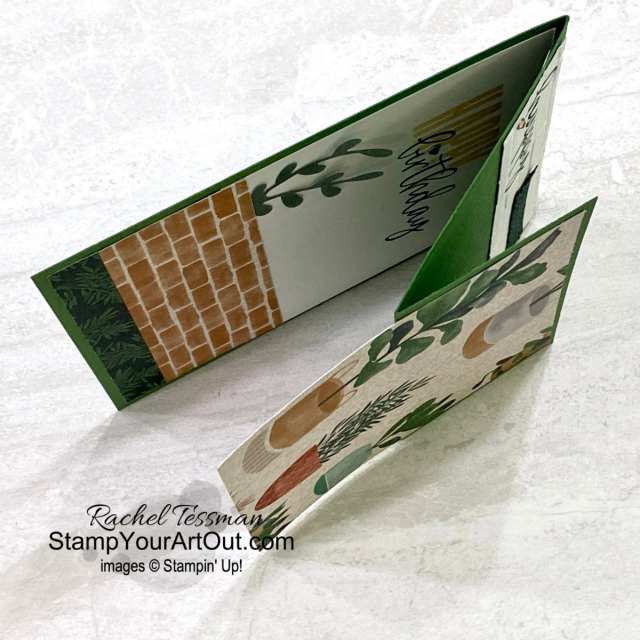
I’m bringing in another Vertical Z-fold card similar to the one I shared last week. I needed more team birthday cards and ran out of the Hand-Penned paper that I was using. So here is my second version that would appeal to maybe a few more people (I could see giving this card to a female OR a male).
The Designer Paper Sale is still going on (through August 2). And this Bloom Where You’re Planted Paper is one of the nine packs being offered at 15% off! Click here for more details.
Products I used in today’s card… See below for a complete list of products linked to where you can find them in my online store.
Measurements:
Garden Green Cardstock: 4-1/4” x 11” scored parallel to short side at 2-1/8” and 5-1/2”
Basic White Cardstock: 3-3/8” x 4″ & 1-1/2” x 4”
Bloom Where You’re Planted Designer Paper: 4″ x 4″ (potted plants design), 1” x 4” & ½” x 4” (dk green leaves design), & 1-1/2″ x 4″ (brick design)
2021-23 In Color Shimmer Vellum (Evening Evergreen): Scrap for punching sprig
Stamp “happy” on small white piece, then emboss & add a small Rhinestone that has been colored with the Dark Cinnamon Cider Blends Marker.
Stamp “HAPPY” (with stamped-off/second generation Cinnamon Cider ink) and “birthday” on larger white piece.
Fold card base into a Z as shown below. Then add the large white piece, the thinest green leaves designer paper piece, and the brick designer paper piece in that order to the inside area first tucking the punched Sprig under the upper left edge of the brick layer. There will be an overlap of the white & striped piece.
Fold the card shut. Line up the 4” x 4” potted plant piece so that it fills the front folded flap & covers the layers underneath.
Cut a notch in the end of the smaller ribbon and adhere it to the embossed piece (trim off excess). Attach the other green leaves designer paper piece to the longer ribbon (trim off the excess). Open the card fully and attach this piece under the potted plants section. Close the card and attach the embossed white piece at the top but also tucked under the front flap a bit.
Open the card and add a green Holiday Rhinestone to dot the i in birthday.
Last weekend we were finally all able to gather (after a year and a half apart) at Grandma Jandro’s house to spend the day with my husband’s side of the family. We grilled and ate, played lawn games, and enjoyed the fabulous weather as we caught up on each other’s lives.
Here is Tim’s mom, Grandma Jandro with her grandkids and great grandkids.
This is my husband, Tim with his sisters and mom.
And here is our immediate family with grandma. Gosh… My boys look almost as tall as their dad!
Family is such a treasure.
Click here to shop my online store. Click here to access & view the current catalogs. Click here to shop My Favorite Extras. Click here to subscribe to those fun Paper Pumpkin kits of creativity! Click here to learn about my Loyalty Rewards program. You can earn free stamps just for shopping with me! Click here to learn more about joining my Stampers With ART community. Get the MOST rewards including a discount on future products! Follow me on social media! I share regularly on Pinterest, YouTube, Instagram, my Facebook Page, and my Facebook Group! Please subscribe to my blog, too!Click here and enter your email in the blue box (above the butterfly).
THE JULY-DECEMBER 2021 MINI CATALOG & SALE-A-BRATION BOTH DEBUT AUG. 3! Get ready for new product and FREE product pics! Click here to learn more about our Stampin’ Up! publications.
DESIGNER SERIES PAPER SALE! From July 1 to August 2, you can enjoy a 15% discount on select Designer Series Paper from the 2021–2022 Annual Catalogue! Click here for more information. Click here for the informational flyer.
A PEEK AT AUGUST’S PAPER PUMPKIN KIT Empower yourself and others with the Hope Box Paper Pumpkin Kit! Created from the heart and soul of Stampin’ Up! cofounder, Shelli, the Hope Box Paper Pumpkin Kit reminds us why life is precious. It includes supplies to create nine encouraging 4-1/4″ x 5-1/2″ cards in a specially designed box designed to be a keepsake box—keep mementos of cherished memories or reminders of what’s yet to come. Collect treats and trinkets (letters, song lyrics, inspiring quotes, photographs, etc.) that represent what hope means to you in your Hope Box and look inside for inspiration or share it with a friends who could use some uplifting! For more inspiration on how to build your Hope Box, watch Shelli herself put one together in this video. Coordinating colors: Bermuda Bay, Blackberry Bliss, Bumblebee, Melon Mambo, Petal Pink, Pool Party, Poppy Parade. If you are not a Paper Pumpkin subscriber, I invite you to give it a try. CLICK HERE to learn more. CLICK HERE to sign up by August 10th for this next kit.
ALL STAR TUTORIALS I’m a designer with the All Stars, a group of globally recognized Stampin’ Up! demonstrators. And we are excited to share exclusively with our customers, paper crafting friends & team members our bundle of twelve July 2021 Expressions in Ink Suite Tutorials which are now available! CLICK HERE for more information. Click here to get to my Tutorials for Sale page to see the others that have been offered. The next one featuring the Hand-Penned Suite will be available August 1st! AND these tutorial bundles include links to instructional videos!
KITS COLLECTION BY STAMPIN’ UP!® A new line of affordably priced, versatile all-inclusive kits is here! Creativity made easy!Click here for more details.
UNITED THROUGH CREATIVITY Celebrate what makes us unique through what brings us together: creativity! In honor of the Stampin’ Up! value statement, “we care about people first”—and in the spirit of World Diversity Day— Stampin’ Up! created a collection of inclusive, multicultural, and multilingual craft elements. Click here to access this digital download so you can create away! Available through May 2, 2022.
I can’t get enough of the beautiful Hand-Penned Designer Paper. And I wanted to create a card that also showed off a bit of the amazing 2021-23 In Color Shimmer Vellum. So I created this fun-fold card which is perfect for showing off multiple designer paper patterns at once. AND bonus…this Hand-Penned Paper is one of the nine select packs that are on sale this month! Click here for more details.
PDF Tutorial…Click here to access and download a printable direction sheet.
Products I used… See below for a complete list of products linked to where you can find them in my online store.
Measurements:
Just Jade Cardstock: 4-1/4” x 11” scored parallel to short side at 2-1/8” and 5-1/2”
Basic White Cardstock: 3-3/8” x 4″ & 1-1/2” x 4”
Hand-Penned Designer Paper: 4″ x 4″ (floral design), 1” x 4” & ½” x 4” (purple design), & 1-1/2″ x 4″ (striped design)
2021-23 In Color Shimmer Vellum (Fresh Freesia): Scrap for punching daisy
Stamp “happy” on small white piece, then emboss & add a sequin. Stamp “HAPPY” and “birthday” on larger white piece.
Fold card base into a Z as shown below. Then add the large white piece, the thinest purple designer paper piece, and the striped designer paper piece in that order to the inside area first. There will be an overlap of the white & striped piece.
Fold the card shut. Line up the 4” x 4” floral piece so that it fills the front folded flap & covers the layers underneath.
Cut a notch in the end of the smaller ribbon and adhere it to the embossed piece (trim off excess). Attach the other purple designer paper piece to the longer ribbon (trim off the excess). Open the card fully and attach this piece under the floral section. Close the card and attach the embossed white piece at the top but also tucked under the front flap a bit.
Punch the daisy, cut it in half, and layer it together with a Glue Dot. Add it to the inside of the card and add a sequin.
Did you enjoy the printable tutorial in this post? Then you may want to join my Facebook Group. I share my tutorials there, too. And you can access them all from this one album.
Thanks for stopping by to see what I had to share today.
Click here to shop my online store. Click here to access & view the current catalogs. Click here to shop My Favorite Extras. Click here to subscribe to those fun Paper Pumpkin kits of creativity! Click here to learn about my Loyalty Rewards program. You can earn free stamps just for shopping with me! Click here to learn more about joining my Stampers With ART community. Get the MOST rewards including a discount on future products! Follow me on social media! I share regularly on Pinterest, YouTube, Instagram, my Facebook Page, and my Facebook Group! Please subscribe to my blog, too!Click here and enter your email in the blue box (above the butterfly).
THE JULY-DECEMBER 2021 MINI CATALOG & SALE-A-BRATION BOTH DEBUT AUG. 3! Get ready for new product and FREE product pics! Click here to learn more about our Stampin’ Up! publications.
DESIGNER SERIES PAPER SALE! From July 1 to August 2, you can enjoy a 15% discount on select Designer Series Paper from the 2021–2022 Annual Catalogue! Click here for more information. Click here for the informational flyer.
A PEEK AT AUGUST’S PAPER PUMPKIN KIT Empower yourself and others with the Hope Box Paper Pumpkin Kit! Created from the heart and soul of Stampin’ Up! cofounder, Shelli, the Hope Box Paper Pumpkin Kit reminds us why life is precious. It includes supplies to create nine encouraging 4-1/4″ x 5-1/2″ cards in a specially designed box designed to be a keepsake box—keep mementos of cherished memories or reminders of what’s yet to come. Collect treats and trinkets (letters, song lyrics, inspiring quotes, photographs, etc.) that represent what hope means to you in your Hope Box and look inside for inspiration or share it with a friends who could use some uplifting! For more inspiration on how to build your Hope Box, watch Shelli herself put one together in this video. Coordinating colors: Bermuda Bay, Blackberry Bliss, Bumblebee, Melon Mambo, Petal Pink, Pool Party, Poppy Parade. If you are not a Paper Pumpkin subscriber, I invite you to give it a try. CLICK HERE to learn more. CLICK HERE to sign up by August 10th for this next kit.
ALL STAR TUTORIALS I’m a designer with the All Stars, a group of globally recognized Stampin’ Up! demonstrators. And we are excited to share exclusively with our customers, paper crafting friends & team members our bundle of twelve July 2021 Expressions in Ink Suite Tutorials which are now available! CLICK HERE for more information. Click here to get to my Tutorials for Sale page to see the others that have been offered. The next one featuring the Hand-Penned Suite will be available August 1st! AND these tutorial bundles include links to instructional videos!
KITS COLLECTION BY STAMPIN’ UP!® A new line of affordably priced, versatile all-inclusive kits is here! Creativity made easy!Click here for more details.
UNITED THROUGH CREATIVITY Celebrate what makes us unique through what brings us together: creativity! In honor of the Stampin’ Up! value statement, “we care about people first”—and in the spirit of World Diversity Day— Stampin’ Up! created a collection of inclusive, multicultural, and multilingual craft elements. Click here to access this digital download so you can create away! Available through May 2, 2022.
Stamp Your Art Out! Rachel Tessman Independent Demonstrator 763-502-6813
This is the best way to enjoy all that Stampin' Up! has to offer. Plus it's fun to be on the demonstrator side of things!
Subscribe to our monthly Paper Pumpkin crafting kits through me to enjoy exclusive ideas shared in PDF tutorials from the our PP Creatives team of Stampin’ Up! demonstrators.
In the spirit of full disclosure, I am an affiliate with Stamp-n-Storage which means I may get commissions if you click on links I provide and decide to purchase anything from this company. I love their products and recommend them because I own several myself and believe my readers will benefit from them.
Recent Achievements
#5 Overall
#5 in Leadership
#11 in Sales
#4 in Team Building
2025 Incentive Trip Achiever (My 20th trip earned will be an Alaskan Cruise in 2026!)


")


 Specialty Designer Series Paper")


")
 Cardstock")


")

 Designer Series Paper")
 Glittered Organdy Ribbon")


 \
\ 


")
 Designer Series Paper")


 Chevron Weave Ribbon")


 Designer Series Paper")


 Grosgrain Ribbon")


