Easter is around the corner. And I have been having fun making bunnies with punches and dies. I have some cute boxes to share with you today. And next weekend I’ll have another punch art bunny to share with you. If Easter bunnies aren’t your thing, use different sentiments. These fun little animals would look adorable on gifts and cards for babies.
Today’s bunnies (inspired by a card I saw on Pinterest by Eva Dietz) are made with the Catch of the Day Dies, the Stitched Shapes Dies, the Heart Punch, and various size circle punches. I mounted my bunnies each on Baker’s Boxes that I decorated with designer series paper…two boxes with the Parisian Blossoms paper and one with the Ornate Garden paper which is debuting April 1. And then I shared them in my latest Online Paper Crafting Class.
I uploaded the recorded version of my Facebook Live video to my YouTube channel (since I know not everyone is ON Facebook). And then I was able to share it here in my blog post. Be sure to watch the video (you can just click on this image below if you are already on my blog), scroll through the close-up photos, check out the products list below, and then let me know if you have any questions.
I hope you enjoyed what I shared in this video. Below are measurements, more close-up photos, and a product list for the box I demonstrated. To learn more about the Ornate Garden Suite of products debuting April 1, see below.
Products I used… See below for a complete list of products linked to where you can find them in my online store.
Measurements…
Parisian Blossoms Designer Paper
1-7/8” x 4” (four pieces)
4” x 4”
Crumb Cake Cardstock
Scrap for punching 2-1/4” Circle & Heart
Scrap for die-cutting two small Stitched Ovals
Whisper White Cardstock
Scrap for punching two ½” Circles & 2-1/4” Circle
Petal Pink Cardstock
Scrap for die-cutting inner ears
Scrap for punching ½” Circle (optional – cut in half for eyelids)
Pool Party Cardstock
Scraps for die-cutting two clusters of grass
Petal Pink Metallic-Edge Ribbon
About 6”
Here are more close-up photos of the boxes I demonstrated and/or shared in my video.
I hope you enjoyed what I shared today!
If you ARE on Facebook, I invite you to “like” then “follow” my page so you can get updates when I share and when I go live. My next FB Live will be on Wednesday, March 25th at 11 AM Central Time. Hope you can join me!
ORNATE GARDEN SUITE BEING RELEASED EARLY A beautiful new suite of products from the upcoming 2020-21 Annual Catalog is being released early! You can get your hands on these products now (if you are a demonstrator or if you are getting the starter kit this month) or for sure by April 1st when they will be available for all. Click here for the informational flyer. And stay tuned so you can get your hands on an amazing Ornate Garden Mega Tutorial Bundle being that I will be offering soon!
Click here to shop my online store. Click here to access & view the current catalogs. Click here to subscribe to those fun Paper Pumpkin kits of creativity! Click here to learn about my Loyalty Rewards program. You can earn free stamps just for shopping with me! Click here for more information about joining my Online Paper Crafters’ Club. Earn even more goodies by joining a club! Click here to learn more about joining my Stampers With ART community. Get the MOST rewards including a discount on future products!
Follow me on social media! I share regularly on Pinterest, YouTube, and Facebook! Please subscribe to my blog, too!Click here and enter your email in the blue box (above the butterfly).
ORNATE GARDEN SUITE BEING RELEASED EARLY A beautiful new suite of products from the upcoming 2020-21 Annual Catalog is being released early! You can get your hands on these products now (if you are a demonstrator or if you are getting the starter kit this month) or for sure by April 1st when they will be available for all. Click here for the informational flyer. And stay tuned so you can get your hands on an amazing Ornate Garden Mega Tutorial Bundle being that I will be offering soon!
ALL STAR TUTORIALS I’m a designer with the All Stars, a group of globally recognized Stampin’ Up! demonstrators. And we are excited to share exclusively with our customers, paper crafting friends & team members in a series of five fabulous months! Our bundle of twelve March 2020 Parisian Blossoms Tutorials are now available! CLICK HERE for more information. Click here to get to my Tutorials for Sale page.
SALE-A-BRATION NEWS January 3 to March 31, 2020. Free products for all! Click here to learn more. (Second release products began March 3rd!!) FYI: the following products are sold out and no longer available… Metallic Baker’s Twine & Sequins Combo Pack (item 152314) Kerchief Card Kit (item 152319)
Golden Honey Designer Paper (item 152311)
COORDINATION PRODUCTS ARE HERE! February 4-March 31 is the perfect opportunity to purchase products that coordinate with our favorite products from the January–June 2020 Mini Catalog and Sale-A-Bration. Only available for a limited time or while supplies last. Click here for the visual flyer so you view the products! Click here for the coordination products list flyer. Click here to shop these products in my online store. FYI: the following product is sold out and no longer available… Birthday Dies (item 153590)
A PEEK AT APRIL’S PAPER PUMPKIN KIT The upcoming April 2020 Paper Pumpkin kit is “fam-tastic!” It’s a fun, family appreciation themed card kit that will make it easy for you to share your heart with those you love most: mom, dad, daughter, son, sister, brother, and anyone in your life who feels like family. April’s kit even includes Mother’s Day and Father’s Day sentiments! Click here to see the promotional video to learn more (and see peeks!). Coordinating Colors: Crushed Curry, Early Espresso, Melon Mambo, Mint Macaron, Pear Pizzazz, Shaded Spruce, Soft Sea Foam. Kit contains supplies for 8 cards and envelopes. Card size: 4-1/4″ x 5-1/2″
You won’t want to miss this kit! Click here to activate your subscription by April 10th for this April kit.
MY ONLINE PAPER CRAFTERS CLUB IS LOOKING FOR NEW MEMBERS We are looking for more to join our online Paper Crafters club. The commitment is to order at least $25 worth of Stampin’ Up! product in each of 6 consecutive months. In one of those months, you would reap the hosting rewards (free merchandise based on the club orders). And then you’d also be able to get in on monthly product perks that would be sent to you along with your monthly club cards.
I hope you haven’t put away those heart punches. As you can see from this card, they can be used year round.
Fellow demonstrator JoAnn Pollock shared some fun ideas with us this month in her February 2020 blog posts (I love her bride and groom card on 2/12/20, the paw print card on 2/13/20, and the strawberry card on 2/21/20.) And I was very inspired to make a couple punch art cards of my own using this Heart Punch Pack from the 2020 Spring Catalog, the Little Ladybug Stamp Set (the free bonus stamp set that can be earned with a $300 party order or single order), the coordinating Ladybug Dies, and the Christmastime Is Here Designer Paper which is still available. This may seem like a strange combination, but check out how well they work together in the following three cards.
This is my version of the strawberry card. I punched the two hearts from cardstocks that coordinated with the two shades of red in the designer paper (Poppy Parade and Cherry Cobbler). Then with another coordinating color, Mossy Meadow, I used the dies from the Ladybug Dies to create the tops of the berries. The seeds are stamped then colored in with the rain image in the Under My Umbrella Stamp Set.
Products I used… See below for a complete list of products I used linked to where you can find them in my online store.
PDF Tutorial…Click here to access and download a direction sheet for this card.
Just in time for St. Patrick’s Day, the heart punch makes a great four leaf clover. So I paired up the adorable ladybug image holding a clover with this giant one made with the hearts, added a stem (that I punched from the heart punch as well), and planted it in the ground made from the grass die in the Ladybug Dies.
Products I used… See below for a complete list of products I used linked to where you can find them in my online store.
PDF Tutorial…Click here to access and download a direction sheet for this card.
This last card makes me giggle. I was brainstorming what I’ve made with heart shapes in the past, and remembered some scrapbook pages I designed with the contents of a past Paper Pumpkin kit which I shared on January 30, 2016. Click here to view them. The Little Ladybug stamp set has a sentiment that pairs well with this bra, too. So that’s what inspired me to make this fancy underwear card.
Products I used… See below for a complete list of products I used linked to where you can find them in my online store.
PDF Tutorial…Click here to access and download a direction sheet for this card.
Click here to shop my online store. Click here to access & view the current catalogs. Click here to subscribe to those fun Paper Pumpkin kits of creativity! Click here to learn about my Loyalty Rewards program. You can earn free stamps just for shopping with me! Click here for more information about joining my Online Paper Crafters’ Club. Earn even more goodies by joining a club! Click here to learn more about joining my Stampers With ART community. Get the MOST rewards including a discount on future products!
Follow me on social media! I share regularly on Pinterest, YouTube, and Facebook! Please subscribe to my blog, too!Click here and enter your email in the blue box (above the butterfly).
ALL STAR TUTORIALS I’m a designer with the All Stars, a group of globally recognized Stampin’ Up! demonstrators. And we are excited to share exclusively with our customers, paper crafting friends & team members in a series of five fabulous months! Our bundle of twelve March 2020 Parisian Blossoms Tutorials are now available! CLICK HERE for more information. Click here to get to my Tutorials for Sale page.
SALE-A-BRATION NEWS January 3 to March 31, 2020. Free products for all! Click here to learn more. (Second release products begin March 3rd!!) FYI: the following products are sold out and no longer available…Metallic Baker’s Twine & Sequins Combo Pack (item 152314) & Kerchief Card Kit (item 152319).
COORDINATION PRODUCTS ARE HERE! February 4-March 31 is the perfect opportunity to purchase products that coordinate with our favorite products from the January–June 2020 Mini Catalog and Sale-A-Bration. Only available for a limited time or while supplies last. Click here for the visual flyer so you view the products! Click here for the coordination products list flyer. Click here to shop these products in my online store.
A PEEK AT MARCH’S PAPER PUMPKIN KIT March’s seven year anniversary Paper Pumpkin kit is just around the corner and will arrive in an exclusive, specially-designed box with supplies to make 12 note cards (4 of 3 designs). Because Paper Pumpkin is celebrating another milestone year, this kit will contain an extra bonus stamp set, too! Coordinating colors are: Balmy Blue, Basic Gray, Calypso Coral, Grapefruit Grove, Gray Granite, Pear Pizzazz, Petal Pink, Shaded Spruce, and So Saffron. Think daffodils, raindrops, and a fresh spring vibe. Then… Click here to activate your subscription by March 10th for this March kit.
MY ONLINE PAPER CRAFTERS CLUB IS LOOKING FOR NEW MEMBERS We are looking for more to join our online Paper Crafters club. The commitment is to order at least $25 worth of Stampin’ Up! product in each of 6 consecutive months. In one of those months, you would reap the hosting rewards (free merchandise based on the club orders). And then you’d also be able to get in on monthly product perks that would be sent to you along with your monthly club cards.
There is a new Mini Trimmer!! And guess what?! You can create full-size cards with it using a few simple tricks. So on Tuesday during my Online Paper Crafting Class on Facebook, I shared how to use this Mini Trimmer!) and I created a pair of Valentine cards featuring some fun new designer paper and the Peaceful Moments bundle (the Peaceful Moments Stamp Set and Poppy Moments Dies).
I uploaded the recorded version of my Facebook Live video to my YouTube channel (since I know not everyone is ON Facebook). And then I was able to share it here in my blog post. Be sure to watch the video (you can just click on this image below if you are already on my blog), scroll through the close-up photos, check out the products list below, and then let me know if you have any questions.
I hope you enjoyed what I shared in this video. Below are measurements, close-up photos, and a product list for the cards that I demonstrated.
Products I used… See below for a complete list of products linked to where you can find them in my online store.
Measurements for the pair of cards
Granny Apple Green Cardstock
4-1/4” x 8” scored parallel to short end at 5-1/2”
OR with Mini Trimmer…fold 8-1/2” x 11” halfway at 5-1/2”, cut in half at 4-1/4”, then open up and trim off 3” from one end
Petal Pink Cardstock
4-1/4” x 8” scored parallel to short end at 5-1/2”
OR with Mini Trimmer…fold 8-1/2” x 11” halfway at 5-1/2”, cut in half at 4-1/4”, then open up and trim off 3” from one end
Scraps for die-cutting little pieces
Lovely Lipstick Cardstock
4-1/2” x 3-1/4” (two pieces)
OR with Mini Trimmer… fold 8-1/2” x 11” halfway at 5-1/2”, use template to cut at 4-1/2”, then open up and trim off 3-1/4” from each end
Whisper White Cardstock
4-1/4”x 3” (two pieces)
OR with Mini Trimmer…fold 8-1/2” x 11” halfway at 5-1/2”, cut in half at 4-1/4”, then open up and trim off 3” from each end
Assorted 6×6 Designer Paper (free with Starter Kit order) – All Dressed Up DSP floral pattern
3” x 3” (two pieces)
Black Glittered Organdy Ribbon
14” and 12”
After I was done cutting the cardstock for those two cards, here is what I ended up with: 4 more folded card bases, and the small scraps of Lovely Lipstick and Whisper White. So there really wasn’t that much “waste” because these are all very usable pieces.
Click here to find Kylie’s card template tutorial.
Here are close-up photos of the cards I demonstrated and shared in my video.
The best offer ALWAYS if you are looking for a good deal on Stampin’ Up! products is the Starter Kit. And during Sale-a-Bration the Starter Kit offer is even better…the kit is $99 + tax for
up to $125 worth of product
a Mini Paper Cutter (only until March 31st)
a 6″ x 6″ Designer Paper Sampler (only until March 31st)
and a stamp set of your choice! (only until March 31st)
You choose that stamp set & what you want to get in your kit AND… you don’t pay shipping. You’ll also get free business supplies and a bonus Paper Pumpkin kit at no extra cost. Click here to learn more about the Mini Trimmer and Assorted 6×6 Designer Paper Pack with the Sale-a-Bration Starter Kit and to learn more about the other Sale-a-Bration deals. Click here to learn more about joining my community of stampers by purchasing the kit.
Looking to shop Stamp-n-Storage products? Click on the image below. ?
If you ARE on Facebook, I invite you to “like” then “follow” my page so you can get updates when I share and when I go live. My next FB Live will be on Wednesday, January 22nd at 11 AM Central Time. Hope you can join me!
Click here to shop my online store. Click here to access & view the current catalogs. Click here to subscribe to those fun Paper Pumpkin kits of creativity! Click here to learn about my Loyalty Rewards program. You can earn free stamps just for shopping with me! Click here for more information about joining my Online Paper Crafters’ Club. Earn even more goodies by joining a club! Click here to learn more about joining my Stampers With ART community. Get the MOST rewards including a discount on future products!
Follow me on social media! I share regularly on Pinterest, YouTube, and Facebook! Please subscribe to my blog, too!Click here and enter your email in the blue box (above the butterfly).
Product List
A set of card layer templates that you make yourself (Kylie’s PDF may help if you need more guidance than what I shared in my video.)
SALE-A-BRATION NEWS January 3 to March 31, 2020. Free products for all! Click here to learn more.
COORDINATION PRODUCTS COMING SOON February 4-March 31 is the perfect opportunity to purchase products that coordinate with our favorite products from the January–June 2020 Mini Catalog and Sale-A-Bration. Only available for a limited time or while supplies last. Click here for the visual flyer so you can plan ahead! Click here for the coordination products list flyer.
BETTER THAN FLAT TUTORIALS I’m so proud to be teamed up with five other super talented Stampin’ Up!® demonstrators so we can create Fun Fold cards & 3-D projects to share exclusively with our customers, paper crafting friends & team members each month! (Our January 2020 projects with a Valentine theme are now available!) CLICK HERE for more information.
A PEEK AT FEBRUARY’S PAPER PUMPKIN KIT February’s Paper Pumpkin kit, Lovely Day kit is versatile, elegant, and the perfect way to help celebrate birthdays and other grand occasions. It coordinates perfectly with the Happy Birthday to You Stamp Set (item 152308), which is available free as part of Stampin’ Up!’s Sale-A-Bration promotion. Makes nine 4-1/4” x 5-1/2” cards and envelopes. Coordinating colors are: Petal Pink, Pool Party, Pretty Peacock, Rich Razzleberry, Rococo Rose, and Old Olive. Click here to activate your subscription by February 10th for this February kit.
MY ONLINE PAPER CRAFTERS CLUB IS LOOKING FOR NEW MEMBERS We are looking for more to join our online Paper Crafters club. The commitment is to order at least $25 worth of Stampin’ Up! product in each of 6 consecutive months. In one of those months, you would reap the hosting rewards (free merchandise based on the club orders). And then you’d also be able to get in on monthly product perks that would be sent to you along with your monthly club cards.
Two more ideas for all of you who received the Something for Everything December 2019 Paper Pumpkin kit
I love the challenge each month of coming up with my final project design (a gift for 5 of my lucky subscribers) using my leftovers from what I’ve already created with my kit. And as you may guess from what I’ve made and shared already on December 21 and January 2, there weren’t that many supplies left over from my kit. But I did it!
I used the polka-dot pattern on the envelope flaps and the green circle stickers to punch out 5 pair of snowmen I needed 2 snowmen per project because they are back to back sandwiching the ribbon to make these bookworm bookmarks.
Here is the bookworm being used in my Outlander book. Can you see the snowman shape upside down in the body of the bookworm? I made and shared a version of these in my last Facebook Live on December 22nd. Below are the measurements and directions for making these bookmarks and holders with the Something for Everything kit supplies.
Products I used… See below for a complete list of extra products I used linked to where you can find them in my online store.
Measurements…
Whisper White Thick Cardstock
2-1/4” x 8-1/2″
Scrap for punching Starburst for sentiment piece
Basic Black Cardstock
Scrap for punching 2-1/4″ Circle for sentiment layer
Kit envelope flaps or circle stickers
Scraps for punching two snowman shapes
Kit gold sticker sheets
Scrap for punching heart from the Dog Builder Punch
1/8″ x 2-1/4″ strip
Kit card base
2-1/4″ x 2-1/4″
Gold Metallic-Edge Ribbon, Black Glittered Organdy Ribbon, or Old Olive/Pretty Peacock Reversible Ribbon
12″
Directions…
Punch two snowmen. (To get two from one circle sticker, cut the sticker in half equally. Then use a sticky note to guide them into the punch. This will help you to fit them in that amount of space better.)
Connect them together back-to-back using Tear & Tape Adhesive while sandwiching one end of the ribbon between.
Color small black circles in the centers of two large pearls to create eyes. Draw on the mouth and stick on the eyes to make the face for your bookworm.
Position the bookworm towards the top of the 2-1/4″ x 8-1/2″ Whisper White base. Then attach (with two Glue Dots on the outer edges) the Basic Black 2-1/4″ Circle so it becomes a pocket for the worm’s body. Then fold up the ribbon and attach (with Tear & Tape Adhesive along the outer edges) the bottom 2-1/4″ x 2-1/4″ card base piece so it becomes a pocket for the trailing ribbon.
Add the stamped sentiment, the gold heart, and the gold strip.
I shared the first one (on the right in the photo above) along with other alternate projects in a how-to video on December 21st. Click here to see that video and more photos of that card.
I didn’t list directions here for making this type of card since this card is better explained in a video. But because this green card is a little different, I’ve listed a couple tips to finish off this version of this card. You can also see this card shared in Stampin’ Up!’s December 2019 kit Facebook Live. Below are views of all the sides when the card is assembled.
Here are the details if you wish to recreate this.
Products I used… See below for a complete list of extra products I used linked to where you can find them in my online store.
Stamp off to get a lighter Terracotta Tile Orange ink for the trailing flowers.
Attach the sentiment piece with a Dimensional under the left edge and a Glue Dot under the right. Trim up the excess AFTER adding to the card.
Use an Embossing Buddy to get the “sticky” off the back of the flower and leaf stickers if you wish to raise them up onto Dimensionals. On my card my left flower and both leaves are up on Dimensionals.
Keep the decor within the triangular borders so you can fold your card in half to mail.
Product List… things you might need/want in addition to the December 2019 Paper Pumpkin kit to make this card
If you need more alternate project ideas using this kit, be sure to check out my posts on December 21 and January 2.
If you are not a Paper Pumpkin subscriber, I invite you to give it a try. CLICK HERE to learn more. CLICK HEREto sign up by January 10th (tomorrow!) for the next kit.
A PEEK AT JANUARY’S PAPER PUMPKIN KIT Paper Pumpkin’s first kit of 2020 is all about L-O-V-E. Whether you want handmade favors for Valentine’s Day, a bridal shower, or a remarkably romantic wedding, this month’s kit has everything you need to help you celebrate your favorite friendships and love stories. Makes 20 treat bags + 10 mini 3×3 cards and envelopes. Coordinating colors are: Crushed Curry, Highland Heather, Mint Macaron, and Rococo Rose. Click here to activate your subscription by January 10th for this January kit.
Click here to shop my online store. Click here to access & view the current catalogs. Click here to subscribe to those fun Paper Pumpkin kits of creativity! Click here to learn about my Loyalty Rewards program. You can earn free stamps just for shopping with me! Click here for more information about joining my Online Paper Crafters’ Club. Earn even more goodies by joining a club! Click here to learn more about joining my Stampers With ART community. Get the MOST rewards including a discount on future products!
Follow me on social media! I share regularly on Pinterest, YouTube, and Facebook! Please subscribe to my blog, too!Click here and enter your email in the blue box (above the butterfly).
SALE-A-BRATION NEWS January 3 to March 31, 2020. Free products for all! Click here to learn more.
COORDINATION PRODUCTS COMING SOON February 4-March 31 is the perfect opportunity to purchase products that coordinate with our favorite products from the January–June 2020 Mini Catalog and Sale-A-Bration. Only available for a limited time or while supplies last. Click here for the visual flyer so you can plan ahead! Click here for the coordination products list flyer.
BETTER THAN FLAT TUTORIALS I’m so proud to be teamed up with five other super talented Stampin’ Up!® demonstrators so we can create Fun Fold cards & 3-D projects to share exclusively with our customers, paper crafting friends & team members each month! (Our January 2020 projects with a Valentine theme are now available!) CLICK HERE for more information.
A PEEK AT JANUARY’S PAPER PUMPKIN KIT Paper Pumpkin’s first kit of 2020 is all about L-O-V-E. Whether you want handmade favors for Valentine’s Day, a bridal shower, or a remarkably romantic wedding, this month’s kit has everything you need to help you celebrate your favorite friendships and love stories. Makes 20 treat bags + 10 mini 3×3 cards and envelopes. Coordinating colors are: Crushed Curry, Highland Heather, Mint Macaron, and Rococo Rose. Click here to activate your subscription by January 10th for this January kit.
MY ONLINE PAPER CRAFTERS CLUB IS LOOKING FOR NEW MEMBERS We are looking for more to join our online Paper Crafters club. The commitment is to order at least $25 worth of Stampin’ Up! product in each of 6 consecutive months. In one of those months, you would reap the hosting rewards (free merchandise based on the club orders). And then you’d also be able to get in on monthly product perks that would be sent to you along with your monthly club cards.
#APaperPumpkinThing
Welcome to our monthly “A Paper Pumpkin Thing” blog hop! See what I have to share. Then check out all the other blogs in the hop to see additional creative alternate paper crafting project ideas that we each came up with using the contents of the December 2019 Something for Everything Paper Pumpkin kit. To follow the hop and see other creative project ideas, simply scroll down and click on the names of other hop participants.
Here is a photo of the intended projects from this month’s kit: 12 attractive all-occasion cards (4 of 3 designs).
I’ve already shared a few other alternate projects using the contents of this kit on December 21st.
Today I have for you two more projects: a beautiful birthday sampler framed décor piece and a super simple thank you/thinking of you card. I’ll start by sharing my card.
Products I used for these projects… See below for a complete list of extra products I used linked to where you can find them in my online store.
Measurements to prepare…
Basic Black Cardstock
3-1/2″ x 4-3/4″
Directions…
Adhere the Basic Black Cardstock to the front of the Gold Foil-Edged Card with SNAIL.
Use 2″ Circle Punch and punch as much of this shape as you can from the corner of a used up sticker sheet from the kit so that the circle includes the “branch cut-out.”
Stamp sentiment with Tuxedo Black Memento ink onto the banner piece from the kit.
Add this to the front of the card with Dimensionals from the kit. Add the gold 2″ diameter punched out partial circle above the sentiment so the flat edge meets up or tucks behind the sentiment banner. (Adding these at the same time will help with placement to make everything feel balanced on the card.)
Embellish with rhinestones from the kit. I noticed the one on the left on my card shifted a bit before I took the photos.
This is the second project I made: a beautiful birthday sampler framed décor piece.
I found the frame at Hobby Lobby. I can’t find a link to it online. Guessing it was a clearance item? It was originally this black frame with the wood background. And in the center were these welded wire words: boss babe. I removed the words which left the frame with 4 holes. So I attached my sampler to the front of this using the longest of my Metallic Brads.
I recommend adding the Basic Black Cardstock with the brands first and THEN building the designs on top of that. I didn’t do that. I made the sampler first and then found the frame.
Measurements to prepare…
Basic Black Cardstock
8-1/2″ x 8-1/2″
Call Me Clover striped card base from kit
solid green: 2-1/2″ x 5-1/4″
striped pattern: 2-1/2″ x 2-1/2″
Crushed Curry card base from kit
solid yellow: 2-1/2″ x 5-1/4″
polka-dot pattern: 2-1/2″ x 2-1/2″
Terracotta Tile floral card base from kit
solid dark orange: 2-1/2″ x 5-1/4″
floral pattern: 2-1/2″ x 2-1/2″
Directions…
Use SNAIL to adhere the cut card base pieces to the Basic Black 8-1/2″ x 8-1/2″ base.
Stamp the sentiments with Tuxedo Black Memento Ink, and trim ends.
Add two of the largest gold foliage stickers. Use one full one on the solid green section. Use 1/2 of one on the yellow section. And use the other 1/2 on the dark orange section about one inch from the left edge.
Add the gold swirl sticker in the middle.
Now add the sentiment pieces with Dimensionals.
Use the Embossing Buddy to pounce powder on the back sides of some large and small flowers and some leaves to remove the stickiness. And add flowers and leaves (the non-sticky ones with Dimensionals, the sticky ones just flat as is) to the sampler as shown.
Finally embellish with rhinestones.
I’m not sure if you made the connection already. But I got the inspiration for my scrapbook page that I shared on the 21st after making this sampler. Yes, I shared my scrapbook page first. But I had already made the sampler beforehand when I was planning for this blog hop and loved it so much that I had to turn it into a page, too.
I hope I inspired your creativity with what I shared today!
If you are not a Paper Pumpkin subscriber, I invite you to give it a try. CLICK HERE to learn more. CLICK HEREto sign up by January 10th for the next kit.
A PEEK AT JANUARY’S PAPER PUMPKIN KIT Paper Pumpkin’s first kit of 2020 is all about L-O-V-E. Whether you want handmade favors for Valentine’s Day, a bridal shower, or a remarkably romantic wedding, this month’s kit has everything you need to help you celebrate your favorite friendships and love stories. Makes 20 treat bags + 10 mini 3×3 cards and envelopes. Coordinating colors are: Crushed Curry, Highland Heather, Mint Macaron, and Rococo Rose. Click here to activate your subscription by January 10th for this January kit.
Click here to shop my online store. Click here to access & view the current catalogs. Click here to subscribe to those fun Paper Pumpkin kits of creativity! Click here to learn about my Loyalty Rewards program. You can earn free stamps just for shopping with me! Click here for more information about joining my Online Paper Crafters’ Club. Earn even more goodies by joining a club! Click here to learn more about joining my Stampers With ART community. Get the MOST rewards including a discount on future products!
Follow me on social media! I share regularly on Pinterest, YouTube, and Facebook! Please subscribe to my blog, too!Click here and enter your email in the blue box (above the butterfly).
Product List…things you might need/want in addition to the December 2019 Paper Pumpkin kit to make these projects
Something for Everything Full Kit
Frame large enough for the 8-1/2″ x 8-1/2″ sampler
SALE-A-BRATION NEWS This year it starts tomorrow and runs from January 3 to March 31, 2020. Free products for all! Click here to learn more.
YEAR-END CLOSEOUTS Today is the last day to grab up your retiring Holiday Catalog favorites! You’ll even get discounts on a few of these items. Supplies are limited and some have already sold out. This amazing sale ends on January 2. Click here and scroll down for more information.
BETTER THAN FLAT TUTORIALS I’m so proud to be teamed up with five other super talented Stampin’ Up!® demonstrators so we can create Fun Fold cards & 3-D projects to share exclusively with our customers, paper crafting friends & team members each month! (Our January 2020 projects with a Valentine theme are now available!) CLICK HERE for more information.
A PEEK AT JANUARY’S PAPER PUMPKIN KIT Paper Pumpkin’s first kit of 2020 is all about L-O-V-E. Whether you want handmade favors for Valentine’s Day, a bridal shower, or a remarkably romantic wedding, this month’s kit has everything you need to help you celebrate your favorite friendships and love stories. Makes 20 treat bags + 10 mini 3×3 cards and envelopes. Coordinating colors are: Crushed Curry, Highland Heather, Mint Macaron, and Rococo Rose. Click here to activate your subscription by January 10th for this January kit.
MY ONLINE PAPER CRAFTERS CLUB IS LOOKING FOR NEW MEMBERS We are looking for more to join our online Paper Crafters club. The commitment is to order at least $25 worth of Stampin’ Up! product in each of 6 consecutive months. In one of those months, you would reap the hosting rewards (free merchandise based on the club orders). And then you’d also be able to get in on monthly product perks that would be sent to you along with your monthly club cards.
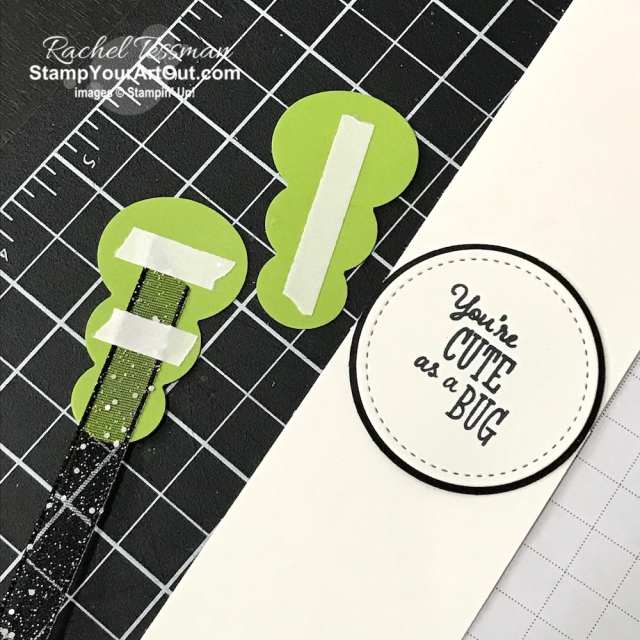
I’m very excited for the new 2020 Spring Catalog to debut on January 3rd! Last month I was enjoying creating with some of these new products and discovered how the “cute as a bug” sentiment in the new Little Ladybug stamp set worked so well with the worm shape you can get from the Snowman Builder Punch. I took these supplies and designed a few cards and bookworm bookmarks.
Then on Wednesday during my Online Paper Crafting Class on Facebook, I shared how to make one of the cards and the adorable bookmark and holder. I uploaded the recorded version of my Facebook Live video to my YouTube channel (since I know not everyone is ON Facebook). And then I was able to share it here in my blog post. Be sure to watch the video (you can just click on this image below if you are already on my blog), scroll through the close-up photos, check out the products list below the photos, and then let me know if you have any questions.
I hope you enjoyed what I shared in this video. Below are measurements, close-up photos, and a product list for the cards and bookmarks that I demonstrated.
Products I used… See below for a complete list of products linked to where you can find them in my online store.
Measurements for card…
Poppy Parade Cardstock
11” x 4-1/4” scored parallel to short end at 2-1/4” and 5-1/2”
Whisper White Cardstock
3” x 4”
2-1/4” x 4”
Scrap for stamping and punching 1-1/2” Circle
Granny Apple Green Cardstock
Scrap for punching two sets of leaves
Basic Black Cardstock
Scrap for punching 1-1/2” Circle
Peaceful Poppies Designer Series Paper (NEW)
2” x 4”
Here are close-up photos of the card I demonstrated and the other versions I shared in my video.
If you ARE on Facebook, I invite you to “like” then “follow” my page so you can get updates when I share and when I go live. My next FB Live will be on Wednesday, January 8th at 11 AM Central Time. Hope you can join me!
Click here to shop my online store. Click here to access & view the current catalogs. Click here to subscribe to those fun Paper Pumpkin kits of creativity! Click here to learn about my Loyalty Rewards program. You can earn free stamps just for shopping with me! Click here for more information about joining my Online Paper Crafters’ Club. Earn even more goodies by joining a club! Click here to learn more about joining my Stampers With ART community. Get the MOST rewards including a discount on future products!
Follow me on social media! I share regularly on Pinterest, YouTube, and Facebook! Please subscribe to my blog, too!Click here and enter your email in the blue box (above the butterfly).
YEAR-END CLOSEOUTS Through January 2 grab up your retiring Holiday Catalog favorites! You’ll even get discounts on a few of these items. Shop early to avoid missing out! Supplies are limited and popular items will sell out quickly. This amazing sale ends on January 2. Click here and scroll down for more information.
NEW SPRING CATALOG PRODUCT SHARES AVAILABLE! The 2019 Spring Catalog debuts January 3rd! That means it’s that time of year to get in on my popular product shares so you can gather up lots of new product for LESS! Sign up today by contacting me with your share choice/s. I’m taking orders for shares now through January 2nd, 2019. CLICK HERE for more information.
BETTER THAN FLAT TUTORIALS I’m so proud to be teamed up with five other super talented Stampin’ Up!® demonstrators so we can create Fun Fold cards & 3-D projects to share exclusively with our customers, paper crafting friends & team members each month! (Our December 2019 projects with a birthday them are now available!) CLICK HERE for more information.
A PEEK AT JANUARY’S PAPER PUMPKIN KIT Paper Pumpkin’s first kit of 2020 is all about L-O-V-E. Whether you want handmade favors for Valentine’s Day, a bridal shower, or a remarkably romantic wedding, this month’s kit has everything you need to help you celebrate your favorite friendships and love stories. Makes 20 treat bags + 10 mini 3×3 cards and envelopes. Coordinating colors are: Crushed Curry, Highland Heather, Mint Macaron, and Rococo Rose. Click here to activate your subscription by January 10th for this January kit.
MY ONLINE PAPER CRAFTERS CLUB IS LOOKING FOR NEW MEMBERS I’m forming a new Paper Crafters club that will begin mid-December (with orders due mid-month for January, February, March, April, May, and June). And we are looking for more to join us. The commitment is to order at least $25 worth of Stampin’ Up! product in each of those 6 months. In one of those months, you would reap the hosting rewards (free merchandise based on the club orders). And then you’d also be able to get in on monthly product perks that would be sent to you along with your monthly club cards.
Stamp Your Art Out! Rachel Tessman Independent Demonstrator 763-502-6813
This is the best way to enjoy all that Stampin' Up! has to offer. Plus it's fun to be on the demonstrator side of things!
Subscribe to our monthly Paper Pumpkin crafting kits through me to enjoy exclusive ideas shared in PDF tutorials from the our PP Creatives team of Stampin’ Up! demonstrators.
In the spirit of full disclosure, I am an affiliate with Stamp-n-Storage which means I may get commissions if you click on links I provide and decide to purchase anything from this company. I love their products and recommend them because I own several myself and believe my readers will benefit from them.
Recent Achievements
#5 Overall
#5 in Leadership
#11 in Sales
#4 in Team Building
2025 Incentive Trip Achiever (My 20th trip earned will be an Alaskan Cruise in 2026!)


 Metallic-Edge Ribbon")


 Circle Punch")

 Circle Punch")
 Circle Punch")


")


")


 Shimmer Ribbon")


")
")


 Glittered Organdy Ribbon")


 Reversible Ribbon")
 Metallic-Edge Ribbon")


 Circle Punch")


 Circle Punch")