#APaperPumpkinThing
Welcome to our monthly “A Paper Pumpkin Thing” blog hop! See what I have to share. Then check out all the other blogs in the hop to see additional creative alternate paper crafting project ideas that we each came up with using the contents of the September 2019 Bone Appétit Paper Pumpkin kit. To follow the hop and see other creative project ideas, simply scroll down and click on the names of other hop participants.
Here is a photo of the intended projects from this month’s Halloween-themed kit: 20 food-safe treat boxes with bone-chilling tags. Did you miss out on this kit? Right now as this post is published, the full and refill kits are available in the online store! (see below for links) So if you missed out, become an active subscriber and purchase the kit.
I’ve already shared a few other alternate projects using the contents of this kit on September 22nd.
Today I have for you a 12″ x 12″ scrapbook page spread focused on family/ancestral photos as the theme with Dia de los Muertos as its inspiration. Dia de los Meurtos (Day of the Dead) is a celebrated October 31 – November 2 and is a time to celebrate, pray for, and remember loved ones who have passed away. Common symbols for the holiday are the skull and skeletons which is why this paper pumpkin kit put this idea in my head. Flowers are important, too. And the colors are bright and vivid. So of course I brought in the Brights pack of cardstock. These colors are amazing against the black background!
I had a LOT of fun creating these pages using the Flourish Dies, the Hand-Lettered Prose Dies, the Snowman Builder Punch, and elements from the September 2019 kit. Here are the details and more close-up photos.
Products I used… See below for a complete list of extra products I used linked to where you can find them in my online store.
Measurements for extra products…
Poppy Parade Cardstock
12″ x 12″ (two pieces)
Scraps for die-cutting floral pieces
Basic Black Cardstock
11″ x 7-5/8″ (two pieces)
11″ x 4-1/4″ (two pieces)
Whisper White Cardstock
5-1/2″ x 4-1/8″ (three pieces)
3″ x 3-1/2″ (three pieces)
Scraps for punching 6 snowmen
Scraps for die-cutting letters
Basic Gray Cardstock
5-3/8″ x 4″ (three pieces)
2-7/8″ x 3-3/8″ (three pieces)
Granny Apple Green Cardstock
Scraps for die-cutting floral pieces
Daffodil Delight Cardstock
Scraps for die-cutting floral pieces
Flirty Flamingo Cardstock
Scraps for die-cutting floral pieces
Melon Mambo Cardstock
Scraps for die-cutting floral pieces
Coastal Cabana Cardstock
Scraps for die-cutting floral pieces
Bermuda Bay Cardstock
Scraps for die-cutting floral pieces
Gorgeous Grape Cardstock
Scraps for die-cutting floral pieces
Directions…
Punch snowmen, then trim them to create large and small skull shapes.
Use the Basic Black Dark Blends Marker to draw on eyes and noses.
Layer the Basic Gray photo mats onto the coordinating Whisper White pieces using SNAIL.
Die-cut LOTS of flowers and leaves in a variety of colors.
Die-cut the letters for your title.
Color the bones of your skeletons.
Adhere the Basic Black Cardstock pieces to the 12×12 Poppy Parade page bases. But don’t add adhesive close to the edges. This way when it comes time to trim up the floral die-cuts along the edges, it will be a bit easier to get at them.
Adhere layered photo mats using SNAIL.
Adhere skulls, tags and hands using SNAIL.
Layout the floral pieces, skeletons and letters for the page title. Then sponge a small amount of Multipurpose Liquid Glue across the back of each piece, and one by one add them to the page.
Trim up any flower die-cuts extending beyond the black cardstock
Add Glitter Enamel Dots for a bit of sparkle and to fill in areas that needed a little something.
I hope I inspired your creativity with what I shared today!
If you are not a Paper Pumpkin subscriber, I invite you to give it a try. CLICK HERE to learn more. CLICK HEREto sign up by October 10th for the next kit.
A PEEK AT OCTOBER’S & NOVEMBER’S PAPER PUMPKIN KITS Christmastime papercrafting with Paper Pumpkin has become an annual tradition! So to deliver more of what our subscribers love this holiday season, in October and November we are offering back-to-back coordinating kits, one with Christmas cards, the other with Christmas tags. Both kits make it easy for you to add a handmade, personal touch to your holiday giving—without a lot of fuss. It’s Christmas made easy with Paper Pumpkin! The October 2019 Paper Pumpkin kit makes ten 4-1/4″ x 5-1/2″ cards and includes envelopes. The November 2019 Paper Pumpkin kit makes 24 holiday-themed gift tags of 4 various sizes and designs. Both kits include coordinating colors: Early Espresso, Pool Party, Poppy Parade, and Shaded Spruce. The October and November kits coordinate; however, each kit is all-inclusive and can stand alone. Click here to get your subscription started by October 10th for the next kit.
Click here to shop my online store. Click here to access & view the current catalogs. Click here to subscribe to those fun Paper Pumpkin kits of creativity! Click here to learn about my Loyalty Rewards program. You can earn free stamps just for shopping with me! Click here for more information about joining my Online Paper Crafters’ Club. Earn even more goodies by joining a club! Click here to learn more about joining my Stampers With ART community. Get the MOST rewards including a discount on future products!
Follow me on social media! I share regularly on Pinterest, YouTube, and Facebook! Please subscribe to my blog, too!Click here and enter your email in the blue box (above the butterfly).
Product List… things you might need/want in addition to the September 2019 Paper Pumpkin kit to make these projects
(Right now as this post is published, the full and refill kits are available in the online store! So if you missed out, become an active subscriber and purchase the kit.)
BUY 3, GET 1 FREE DESIGNER PAPER SALE By popular demand, Stampin’ Up! brought back the Designer Series Paper Sale! From September 4–30, you can buy three packages of select Designer Series Paper, and get one FREE! Click here for more details. Click here for the informational flyer.
BETTER THAN FLAT TUTORIALS I’m so proud to be teamed up with five other super talented Stampin’ Up!® demonstrators so we can create Fun Fold cards & 3-D projects to share exclusively with our customers, paper crafting friends & team members each month! (Our September 2019 projects featuring new products from the Holiday Catalog are now available!) CLICK HERE for more information.
I’ve been a huge fan of impressionist art (in particular the work of the French impressionist painter, Claude Monet) since I was a young girl. And I about fell over backwards when I opened up my first pack of this beautiful designer series paper (yes, I’m on my 3rd pack already only 3 months into the catalog).
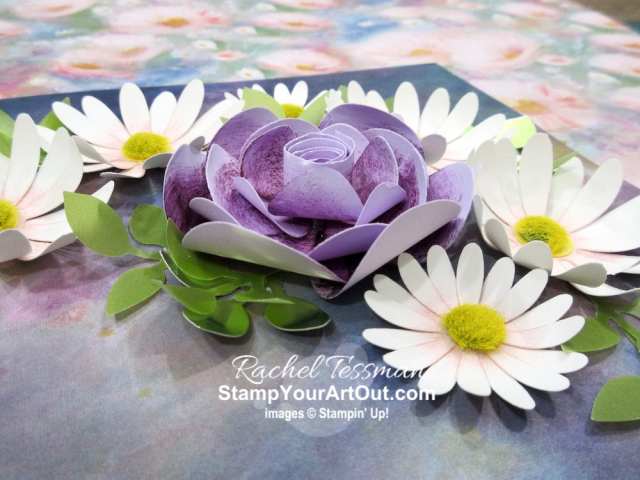
These are the four designs I framed for my living room. And below are close-up shots of the 3-D flowers I added in the 2nd frame.
Products I used… See below for a complete list of products linked to where you can find them in my online store.
For the smaller white flowers I used the Medium Daisy Punch. For the larger white flowers I used the Daisy Punch (the larger one). For each flower I punched two of them from Whisper White cardstock. Then I lightly brushed Blushing Bride ink from the middle out using a Sponge Dauber so that each petal had just a touch of pink. I glued then together, then curled the petals forward with a Bone Folder. I added a Daffodil Delight 1/2″ Circle to the center of the larger flowers. Then each flower got a Perennial Essence Floral Center in the middle.
For the purple flowers I used the 1-1/2″ Circle, the Balloon Bouquet Punch, the Magnolia Memories Dies (the skinnier 3-petal shape), and a very narrow (starting at 1/4″ and ending at 1/2″) and long (about 8″) strip of paper. After punching, die-cutting and hand-cutting the pieces from Purple Posy ink, I sponged on swipes of Blackberry Bliss ink – darker in the middle/center and lighter going out towards the end of the “petals.” I curled everything with the Bone Folder.
Then I started by building the outside of the flower by gluing 6 larger balloons/petals to the 1-1/2″ circle base so the tips of the balloons touch each other. Next I glued 6 smaller balloon “petals” on top of that. Again…so the tips of the balloons touched each other. Then I added two Magnolia Memories Die shapes using hot glue instead of just the Multipurpose Glue. And finally I added a tightly rolled up strip in the center using hot glue.
I did NOT use the Balloon Bouquet Punch for the small purple flower. But instead I started with three layered Magnolia Memories Die shapes and ended with a tightly rolled up strip in the center using hot glue.
They were easy to make using the punches and dies, but they did take a bit of time.
Finally I arranged them where I thought they looked best and glued them down. I punched out leaves from the Old Olive vellum and foil paper. I curled them with a Bone Folder and inserted them here and there with Glue Dots.
As we move into the fall season, this artwork on my wall will definitely bring some extra sunshine to those days as they grow colder. The kids are off for their first day of school and will be waking up soon. So I’m off to go help them get ready.
Click here to shop my online store. Click here to access & view the current catalogs. Click here to subscribe to those fun Paper Pumpkin kits of creativity! Click here to learn about my Loyalty Rewards program. You can earn free stamps just for shopping with me! Click here for more information about joining my Online Paper Crafters’ Club. Earn even more goodies by joining a club! Click here to learn more about joining my Stampers With ART community. Get the MOST rewards including a discount on future products!
Follow me on social media! I share regularly on Pinterest, YouTube, and Facebook! Please subscribe to my blog, too!Click here and enter your email in the blue box (above the butterfly).
BUY 3, GET 1 FREE DESIGNER PAPER SALE By popular demand, Stampin’ Up! is bringing back the Designer Series Paper Sale! During September 4–30, you can buy three packages of select Designer Series Paper, and get one FREE! Click here for more details. Click here for the informational flyer.
THE 2019 HOLIDAY CATALOG DEBUTS SEPTEMBER 4! Stay tuned!! New products are around the corner.
A PEEK AT SEPTEMBER’S PAPER PUMPKIN KIT The September 2019 Paper Pumpkin, Bone Appétit kit includes 20 food-safe treat boxes, a unique and exclusive Halloween stamp set, and a spooky, special-edition box. September’s kit also gives new meaning to the word “handmade.” Coordinating colors are: Basic Black, Gorgeous Grape, Pumpkin Pie, and Whisper White Click here to get your subscription started by September 10th for this next kit.
MY ONLINE PAPER CRAFTERS CLUB IS LOOKING FOR NEW MEMBERS I’m forming a new Paper Crafters club that will begin mid-September (with orders due mid-month for October, November, December, January, February & March). And we are looking for more to join us. The commitment is to order at least $25 worth of Stampin’ Up! product in each of those 6 months. In one of those months, you would reap the hosting rewards (free merchandise based on the club orders). And then you’d also be able to get in on monthly product perks that would be sent to you along with your monthly club cards.
BETTER THAN FLAT TUTORIALS I’m so proud to be teamed up with five other super talented Stampin’ Up!® demonstrators so we can create Fun Fold cards & 3-D projects to share exclusively with our customers, paper crafting friends & team members each month! (Our September 2019 projects featuring new products from the Holiday Catalog are now available!) CLICK HERE for more information.
#APaperPumpkinThing
Yay! I’m excited for our Paper Pumpkin blog hop today! See what I have to share. Then check out all the other blogs in the hop to see additional creative alternate paper crafting project ideas that we each came up with using the contents of the April 2019 Sentimental Rose Paper Pumpkin kit. To follow the hop and see other creative project ideas, simply scroll down and click on the names of other hop participants.
Here is a photo of the intended project from this month’s kit – 9 pretty note cards: 3 each of 3 designs and a coordinating gift box.
I shared a several ideas (cards with dimension mainly) with this kit yesterday, but today I have some fun bookmark ideas to show.
I even recorded how to make them in this video (my Facebook Live broadcast from yesterday). Watch the video first to get measurements, directions, and tips (you can just click on this image below if you are already on my blog). Then scroll down to see close-up photos, access the links that I mentioned at the beginning of my video, and see a list of extra supplies (linked to my online store) that I used to make my creations.
If you wish to recreate these monster bookmarks with your kit contents, here are the measurements and a few more close-up photos below.
Measurements for the two monster bookmarks:
Gray Granite Cardstock
3-1/2” x 3-1/2” then cut at the diagonal (only need one)
Scrap for punching one ¾” circle
Mint Macaron Cardstock
Scrap for punching two ¾” circles
Extra Stampin’ Up! Products I Used for ALL the bookmarks: See below for a full list of extra supplies linked to where you can find them in my online store.
Here are photos and tips for my other three bookmarks that I made.
THE ROSE CORNER BOOKMARK
Tips for this one:
Use the same measurements above. The printed floral paper in the kit is what I used for the main design. I just cut it to 3-1/4″ x 3-1/4″, cut it diagonally to get my piece, and then stamped the leaves. I cut my leaf stamp to get just one leaf! (Yep!! It sounds crazy, but I did. And then when I want to stamp the three leaves together another time I just mount my two stamps together on the block.) I punched the top corner with the Detailed Trio Punch and tied some twine through.
THE RECTANGULAR BOOKMARK
Tips for this one:
I stamped the rectangular piece the same way I stamped it for my kit card. I added the sentiment image, added the enamel dots, and then punched the top with the Detailed Trio Punch. I added the Mint Textile Ribbon and tied it together tight with some twine.
THE RIBBON BOOKMARK
Tips for this one:
I stamped my two label pieces…The sentiment one also has some really light (stamped off twice) Mint Macaron leaves. The floral side has two punched out Flirty Flamingo flowers added with Glue Dots over the top of the leaves. I attached these finished labels to the Silver Foil scallop circle pieces. Then I sandwiched the end of the Silver Metallic-Edge Ribbon between the two labels using Tear & Tape Adhesive.
I hope you enjoyed what I shared today!
If you are not a Paper Pumpkin subscriber, I invite you to give it a try. CLICK HERE to learn more. CLICK HEREto sign up by May 10th for the next kit.
A PEEK AT MAY’S PAPER PUMPKIN KIT
May’s Paper Pumpkin kit is going to be beautiful! It was designed with the help of Shelli Gardner, Stampin’ Up!’s board chair and cofounder. Shelli worked closely with designers and concept artists to create a Paper Pumpkin kit that is uniquely hers. It includes an exclusive photopolymer stamp set, paper, and crafting materials to create 12 mailable cards (3 cards of 4 unique designs), 12 exclusive, coordinating envelopes, and a Classic Stampin’ Spot. Coordinating colors: Crumb Cake, Early Espresso, Old Olive, Petal Pink, Pool Party, Pretty Peacock (a new 2019-21 In Color), Soft Suede, and Very Vanilla. Click here to see the video for even more information on this kit. Then click here to sign up by May 10th for this next kit.
Click here to shop my online store. Click here to access & view the current catalogs. Click here to subscribe to those fun Paper Pumpkin kits of creativity! Click here to learn about my Loyalty Rewards program. You can earn free stamps just for shopping with me! Click here for more information about joining my Online Paper Crafters’ Club. Earn even more goodies by joining a club! Click here to learn more about joining my Stampers With ART community. Get the MOST rewards including a discount on future products!
Follow me on social media! I share regularly on Pinterest, YouTube, and Facebook! Please subscribe to my blog, too!Click here and enter your email in the blue box (above the butterfly).
Product List
April 2019 Sentimental Rose Monthly Paper Pumpkin Kit (received by active subscribers only)
And Stampin’ Up! has posted its list of products that are now retiring from the current ones: the 2018-19 Annual Catalog and the 2019 Occasions Catalog. Be sure to take a good look at the retiring products lists so that you don’t miss out on getting items that you have wanted. Some things (like designer papers, ink pads and refills, cardstock…) sell out quickly! CLICK HERE for more detailed information, to access the lists and links, for dates about transitioning into the new catalog, AND to find out how you can get your hands on the new 2019-20 Annual Catalog.
THE 2019-20 ANNUAL CATALOG DEBUTS JUNE 4TH!
After attending the April 2019 OnStage event, I now have a copy of the awesome upcoming catalog!! CLICK HEREto find out how YOU can get your hands on the new 2019-20 Annual Catalog.
BETTER THAN FLAT TUTORIALS
I’m so proud to be teamed up with five other super talented Stampin’ Up!® demonstrators so we can create Fun Fold cards & 3-D projects to share exclusively with our customers, paper crafting friends & team members each month! (Our beautiful April feminine-themed projects are now available!) CLICK HEREto find out how you can get your hands on these great tutorials. (A new one is offered each month. May’s tutorials will feature masculine-themed projects.)
A PEEK AT MAY’S PAPER PUMPKIN KIT
May’s Paper Pumpkin kit is going to be beautiful! It was designed with the help of Shelli Gardner, Stampin’ Up!’s board chair and cofounder. Shelli worked closely with designers and concept artists to create a Paper Pumpkin kit that is uniquely hers. It includes an exclusive photopolymer stamp set, paper, and crafting materials to create 12 mailable cards (3 cards of 4 unique designs), 12 exclusive, coordinating envelopes, and a Classic Stampin’ Spot. Coordinating colors: Crumb Cake, Early Espresso, Old Olive, Petal Pink, Pool Party, Pretty Peacock (a new 2019-21 In Color), Soft Suede, and Very Vanilla. Click here to see the video for even more information on this kit. Then click here to sign up by May 10th for this next kit.
STORAGE BY STAMPIN’ UP
Stampin’ Up! is now offering new organizational products! Storage by Stampin’ Up!® for those of us who want to interchangeable, stackable, customizable storage solutions for your Stampin’ Up! ink pads, markers and more! Click here to learn more. Click here for a planning/configuration chart. Click here to access the informational flyer. CLICK HERE to view and shop for these items in my online store.
ANNUAL CATALOG NEWS
Due to recent supplier issues (and other factors), Stampin’ Up! will no longer be carrying the current die-cutting machine and trimmer: The Big Shot and Stampin’ Trimmer are retiring. These changes are giving Stampin’ Up! the opportunity to research and explore replacement options. But there will be a gap when we do not have a trimmer or die-cutting machine available. You will not see these items in the upcoming 2019-20 Annual Catalog that debuts June 4, 2019. Click here for more information.
I have more alternate project ideas to share with the January 2019 Be Mine Valentine Paper Pumpkin kit! Sometimes I get on a roll, and I just can’t put a kit aside. Hahaha! I hope you are inspired by these creations. If you didn’t get the January kit, I hope you are still able to apply these ideas to other products you may have on hand.
Rather than writing out all the details & directions for each of these creations, I shared them in my Wednesday’s Facebook Live broadcast. (I also shared upcoming new products that will be available February 15th and March 1st.) Then I uploaded the recorded version of this video to my YouTube channel (since I know not everyone is ON Facebook). Be sure to watch the video (you can just click on this image below if you are already on my blog), check out the measurements and full products list below, scroll through the close-up photos of what I created, and then let me know if you have any questions.
Here are close-up photos and the measurements you’ll need if you plan to recreate any of these projects.
FLIP FOLD WECOME BABY CARD
My three versions: With the top two I used the full kangaroo stamp image and matching dies from the coordinating Animal Expedition Suite in my kangroo underneath. In the bottom card I used no dies at all. Instead I used the Sprig Punch, fussy-cut the pouch area from the stamped Kangaroo image, and added it to another kangaroo piece from the kit.
Here are a couple photos I took while making these three cards. I didn’t like the harshness of all black ink, and I didn’t like the softness of all Smoky Slate ink.
I also didn’t like how the die-cut stamped kangaroo didn’t line up with the kangaroo in the kit (totally fine for making other projects, but not good for this flip-fold card where the cut outs needed to be stacked).
So this one (the bottom of the three) ended up being my favorite.
Measurements for card…
Whisper White Cardstock
11” x 4-1/4” scored 5-1/2” and folded in half
3/4” x 8-1/2”
Melon Mambo Cardstock
4-5/8” x 3-3/8”
Kit Box Base (Pool Party side)
4-1/2” x 3-1/4”
Lemon Lime Twist
Scraps for punching two sprigs
BUNNY TREAT
Measurements for Bunny…
Whisper White Cardstock
Scraps for punching two ¾” Circles
Scraps for punching 1-1/8” Scallop Circle
Basic Black Cardstock
Scraps for punching two 1/2” Circles
Kit Box Base
Ends of box base to trim out ears
Scrap for punching one ¾” Circle (opt.)
HEART BOX
Measurements for Heart Box…
Pool Party Cardstock
7/8” x 4-7/8” – scored parallel to the long edge at ¼” …scored parallel to the short edge at 1-1/2”, 3”, 4-1/2”
1” x 5-1/4” – scored parallel to the long edge at ¼” …scored parallel to the short edge at 1-5/8”, 3-1/4”, 4-7/8”
Below my signature are the rest of the links I mentioned in my video.
Are you ready to dive into the next kit? Get in on the fun of Paper Pumpkin! CLICK HERE to sign up by February 10th so you don’t miss out. Watch this video to see hints for what is in store.
If you ARE on Facebook, I invite you to “like” then “follow” my page so you can get updates when I share and when I go live. I broadcast live most every Wednesday morning at 11 AM Central Time. So my next broadcast will be February 13th.
Thank you for visiting today. I hope you enjoyed what I shared.
Click here to shop my online store. Click here to access & view the current catalogs. Click here to learn more about Sale-a-Bration, the awesome promotion going on right now. Click here to learn about my Loyalty Rewards program. You can earn free stamps just for shopping with me! Click here for more information about joining my Online Paper Crafters’ Club. Earn even more goodies by joining a club! Click here to learn more about joining my Stampers With ART community. Get the MOST rewards including a discount on future products!
Follow me on social media! I share regularly on Pinterest, YouTube, and Facebook! Please subscribe to my blog, too!Click here and enter your email in the blue box (above the butterfly).
Product List… things you might need/want in addition to the January 2019 Paper Pumpkin kit to make these projects
Do you find that you order at least $25 worth of Stampin’ Up! product each month? Do you want to get perks for those monthly orders? I’m forming a new Paper Crafters club that will kick off in March, and we are looking for just 2 more members. Click here to learn more. Then contact me with your questions &/or to sign up.
SALE-A-BRATION COORDINATION PRODUCTS
During the month of March (and only while supplies last), Stampin’ Up! will be offering six new exclusive products that coordinate with several of our 2019 Sale-a-Bration products! Unlike the Sale-a-Bration products though (free with qualifying orders), the Sale-a-Bration Coordination products will be available for purchase. Click here for the informational flyer with images of all the products.
Sale-A-Bration (January 3 – March 31, 2019) is one of THE best times of the Stampin’ Up! year. Earn free exclusive products! Earn more Stampin’ Rewards! Get a fabulous tote with one of the best kit offers ever!…CLICK HERE for more information & to find the links to the online brochures filled with fun free products. New Sale-a-Bration choices will be available on February 15!
“BETTER THAN FLAT” TUTORIALS
Five super talented Stampin’ Up!® demonstrators and I have joined together as the “Stampin’ Anonymous team” to create Fun Fold cards & 3-D (“better than flat”) projects to share exclusively with our customers, paper crafting friends & team members each month! (Our February projects are now available!) CLICK HEREto find out how you can get your hands on these great tutorials. A new one is offered each month.
PAPER PUMPKIN CLEAR CASE INSERTS
I’ve added a new section to my website where you can search up past paper pumpkin stamp sets AND print off the coordinating stamp set clear case insert. CLICK HERE to access that link. Or find “Stamp Set Case Inserts” by clicking on Paper Pumpkin in the menu at the top. Just download and print off the PDF. Then trim off the top and bottom so that the height measures 7 inches, and insert behind the plastic outer lining of your Clear Case. Now you have a labeled case for your Paper Pumpkin stamp set!
#APaperPumpkinThing
Yay! Today is the day where a creative team of us Stampin’ Up!® demonstrators bring to you our special “A Paper Pumpkin Thing” blog hop. See what I have to share. Then check out all the other blogs in the hop to see additional creative alternate paper crafting project ideas that we each came up with using the contents of the January 2019 “Be Mine Valentine” Paper Pumpkin kit. To follow the hop and see other creative project ideas, simply scroll down and click on the names of other hop participants.
This kit contained enough supplies (plus extras!) to make 24 of these cute Valentine treat boxes. (Click here to see the January 2019 kit video put out by Stampin’ Up!® where you can view how to put these treat boxes together.) I loved how generous Stampin’ Up! was with the consumables. There were a ton of extras left over to make into cards or other projects. AND this kit coordinates with Stampin’ Up! products from the Animal Expedition Suite. So the options are truly amazing for alternate project ideas.
I shared a few ideas on Tuesday, but today I have another card to share AND a Memories & More photo pocket page layout. I used the Beautifully Detailed Laser-Cut Paper for both of them bringing in more Petal Pink color to go with the enamel heart embellishments in the kit.
I thought this bunny page would be perfect for sharing photos of a new baby!
The hearts can be “bullet points” where the baby’s stats or gifts received are listed.
And the baby’s name could be written in the large heart as the title of the page.
But it could also be a fun layout for Easter photos.
If you wish to recreate the page layout with your kit contents, follow the measurements and tips below.
Measurements of extra products:
Basic Gray Cardstock (photo mats):
Three pieces that are 3″ x 4″
Two pieces that are 6″ x 4″
Petal Pink Cardstock:
6″ x 4″
Whisper White Cardstock:
6″ x 4″
Scrap to punch the 1-1/8″ scallop circle bunny tail
Measurements of kit products:
Box bases (two):
Cut two bunny ears from one base, then cut the remaining piece to 4″ x 3″
Cut the other base to 4″ x 4-1/4″
Extra Stampin’ Up! Products I Used: See below for a full list of extra supplies linked to where you can find them in my online store.
Tips:
Trim pieces desired from the laser-cut paper, sponge Multipurpose Glue on the back side, then adhere.
Punch the bunny’s head from an extra circle piece in the kit. Assemble bunny before attaching it to the page piece.
The bunny tail, the large heart, and the small hearts are all attached with Dimensionals. You may want to write on the large heart before adding the Dimensionals.
The laser-cut paper on the piece with the small hearts came from a border section. Cut that section a little longer than 4″ then cut in half down the middle to get the “mirroring” pieces.
The cards I created will be going out in the mail next week to a few of my subscribers. I love how Cherry Cobbler and Petal Pink look together, so the only extra products I used to make these cards are the laser-cut paper, Petal Pink cardstock for the inside layer in the card, Cherry Cobbler cardstock, and Cherry Cobbler ink.
Each card is a little unique because of the variety of pieces I cut from the other sheet (shown in front below) of laser-cut paper.
If you wish to recreate this card with your kit contents, follow the measurements and tips below.
Measurements of extra products:
Cherry Cobbler Cardstock:
11″ x 4-1/4″ scored at 5-1/2″ and folded in have for the card base
Petal Pink Cardstock:
3-1/2″ x 4-3/4″ for the inside layer
Extra Stampin’ Up! Products I Used: See below for a full list of extra supplies linked to where you can find them in my online store.
Tips:
Trim pieces desired from the laser-cut paper, sponge Multipurpose Glue on the back side, then adhere tucked under the heart. Don’t adhere heart until laser-cut pieces are added.
The sentiment layer, the heart on the inside, and the kangaroo are all attached with Dimensionals.
I hope you enjoyed what I shared today! If you are not a Paper Pumpkin subscriber, I invite you to give it a try. CLICK HERE to learn more. CLICK HEREto sign up by February 10th so you can get in on the next kit. Here is some information directly from Stampin’ Up! to give us a bit of insight on this upcoming February kit.
Click here to shop my online store. Click here to access & view the current catalogs. Click here to learn more about Sale-a-Bration, the awesome promotion going on right now. Click here to learn about my Loyalty Rewards program. You can earn free stamps just for shopping with me! Click here for more information about joining my Online Paper Crafters’ Club. Earn even more goodies by joining a club! Click here to learn more about joining my Stampers With ART community. Get the MOST rewards including a discount on future products!
Follow me on social media! I share regularly on Pinterest, YouTube, and Facebook! Please subscribe to my blog, too!Click here and enter your email in the blue box (above the butterfly).
Product List… things you might need/want in addition to the January 2019 Paper Pumpkin kit to make these projects
Sale-A-Bration (January 3 – March 31, 2019) is one of THE best times of the Stampin’ Up! year. Earn free exclusive products! Earn more Stampin’ Rewards! Get a fabulous tote with one of the best kit offers ever!…CLICK HERE for more information.
“BETTER THAN FLAT” TUTORIALS
Five super talented Stampin’ Up!® demonstrators and I have joined together as the “Stampin’ Anonymous team” to create Fun Fold cards & 3-D (“better than flat”) projects to share exclusively with our customers, paper crafting friends & team members each month! (Our January projects are now available!) CLICK HEREto find out how you can get your hands on these great tutorials. A new one is offered each month.
JOIN THE CLUB
Do you find that you order at least $25 worth of Stampin’ Up! product each month? Do you want to get perks for those monthly orders? I’m forming a new Paper Crafters club that will kick off in March, and we are looking for just 2 more members. Click here to learn more. Then contact me with your questions &/or to sign up.
CLING STAMPS ARE HERE!
Cling stamps just debuted in the 2019 Occasions catalog and Sale-A-Bration brochure! Click HERE for more information.
Oh, my goodness! I have two fun things to share with you today. The first is that Stampin’ Up! is having a flash sale for new Paper Pumpkin subscribers. If you’ve never tried these kits, click here to learn more. Then hurry & scroll down to take advantage of this Flash Sale. (The supply for this sale is limited.)) The second is that I saw a super cute idea from Jessica Cruz de Urrutiaon the Paper Pumpkin Fan Club. She turned the ghost from the September kit into a baby shark! It was so adorable, I HAD to CASE this idea and make a card of my own. A big cheers to Jessica!
I made my baby shark slightly different that the one that Jessica shares in her video. I didn’t have the Four-Petal Flower Punch and used the Leaf Punch for both the dorsal fin and the tail. Plus I made the shark’s teeth a little differently.
Products: See below for a full list of supplies linked to where you can find them in my online store.
Here are the steps I took to create my version.
Stamp the mouth (using the moon stamp) on a ghost from the kit in Flirty Flamingo ink.
Punch a 3/4″ Basic Black circle. Punch a Whisper White set of leaves.
Color the leaves and the shark with the Light Pool Party Stampin’ Blends marker as shown.
Punch a scrap of Whisper White first with the 1/2″ Circle Punch. Then encompass and punch this with the Starburst Punch by placing two “teeth” of this punch super close to the 1/2″ circle.
Angle in and snip out four “teeth.”
Adhere the 3/4″ black circle behind to make the eyes black.
Add the dorsal fin (the skinny leaf) coming out from behind the top of the head.
Add the two other leaves to form the tail.
Then glue on the teeth.
It’s rare that I share a Paper Pumpkin alternate project idea AND my supply list below includes a link to the full kit I used. Yes! Stampin’ Up! has extras of this September 2018 Frights & Delights Paper Pumpkin kit right now!! But you need to be an active subscriber to purchase any past kits. So keep that in mind if you’d like to get your hands on this full kit or any other past kits that are available.
PAPER PUMPKIN FLASH SALE!!!
That awesome deal for new subscribers is here! Click here to subscribe! The code for redeeming this offer is: FLASH1018
Paper Pumpkin has a LIMITED NUMBER of October kits to offer at this special introductory rate. The flash promotion starts today, October 8, 2018 and will continue until supplies run out or the October subscription period ends on October 10, whichever comes first.
If supplies run out of this fall-themed kit (featuring the colors: Cajun Craze, Coastal Cabana, Fresh Fig, Grapefruit Grove, and Night of Navy) before October 10, Stampin’ Up! will end the sale and automatically begin accepting new subscribers for November (which features our one-of-a-kind, exclusive holiday kit in a specially-designed box).
Not valid on prepaid subscriptions.
Discount applied to one kit per month for the first month of a new subscription. After the first month, the price for the subscription will return to $19.95(USD)/$26.95(CAD).
New customers must enter promo code FLASH1018 at paperpumpkin.com before the sale ends to receive the introductory price of $5(USD)/$7(CAD).
This offer is for new subscribers only.
Product List
toothpick
stamp set with fun sentiment (I used the stamp set that came with my April 2018 Paper Pumpkin kit.)
Do you find that you order at least $25 worth of Stampin’ Up! product each month? Do you want to get perks for those monthly orders? I’m forming a new Paper Crafters club, and we are looking for new members. Click here to learn more. Then contact me with your questions &/or to sign up. We are currently looking for 4 more members.
“BETTER THAN FLAT” TUTORIALS
Five super talented Stampin’ Up!® demonstrators and I have joined together as the “Stampin’ Anonymous team” to create Fun Fold cards & 3-D (“better than flat”) projects to share exclusively with our customers, paper crafting friends & team members each month! CLICK HERE to find out how you can get your hands on these great tutorials. A new one will be offered each month. October’s tutorials (peeks shown below) are ready!
Now that these accessories are here, they are staying! They will be rolling into next year’s 2019-20 Annual Catalog. And there’s more coming…Watch for the release of the Craft & Carry Stamparatus bag soon!
STAMP-N-STORAGE FALL SALE
Get 15% off storewide* October 1-8. This sale includes the latest products in their 2019 Catalog. I love how Stamp-n-Storage made my dream craft room come true. Click here to see what Stamp-n-Storage can do for YOUR crafting space. And remember to use the code: FALL2018
Stamp Your Art Out! Rachel Tessman Independent Demonstrator 763-502-6813
This is the best way to enjoy all that Stampin' Up! has to offer. Plus it's fun to be on the demonstrator side of things!
Subscribe to our monthly Paper Pumpkin crafting kits through me to enjoy exclusive ideas shared in PDF tutorials from the our PP Creatives team of Stampin’ Up! demonstrators.
In the spirit of full disclosure, I am an affiliate with Stamp-n-Storage which means I may get commissions if you click on links I provide and decide to purchase anything from this company. I love their products and recommend them because I own several myself and believe my readers will benefit from them.
Recent Achievements
#5 Overall
#5 in Leadership
#11 in Sales
#4 in Team Building
2025 Incentive Trip Achiever (My 20th trip earned will be an Alaskan Cruise in 2026!)


 Cardstock")
 Cardstock")


 Circle Punch")


 Vellum Cardstock")


 Circle Punch")


 Scallop Circle Punch")


 Scallop Circle Punch")


