
I just HAD to frame these beautiful Perennial Essence papers!
And even more so after seeing the samples on page 106 in the 2019-20 Annual Catalog.
I’ve been a huge fan of impressionist art (in particular the work of the French impressionist painter, Claude Monet) since I was a young girl. And I about fell over backwards when I opened up my first pack of this beautiful designer series paper (yes, I’m on my 3rd pack already only 3 months into the catalog).

These are the four designs I framed for my living room. And below are close-up shots of the 3-D flowers I added in the 2nd frame.

Products I used… See below for a complete list of products linked to where you can find them in my online store.
For the smaller white flowers I used the Medium Daisy Punch. For the larger white flowers I used the Daisy Punch (the larger one). For each flower I punched two of them from Whisper White cardstock. Then I lightly brushed Blushing Bride ink from the middle out using a Sponge Dauber so that each petal had just a touch of pink. I glued then together, then curled the petals forward with a Bone Folder. I added a Daffodil Delight 1/2″ Circle to the center of the larger flowers. Then each flower got a Perennial Essence Floral Center in the middle.
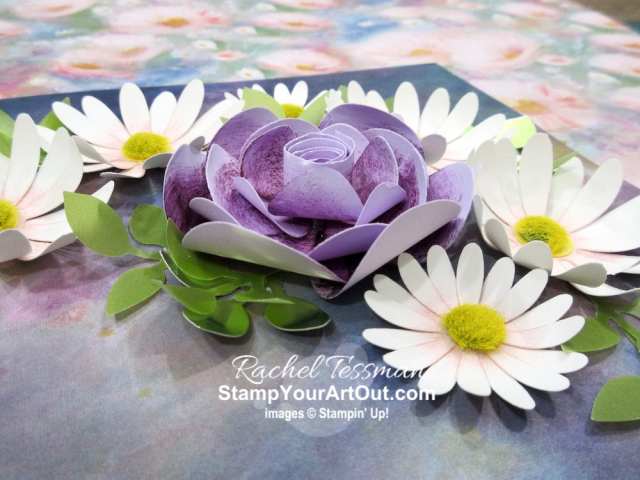
For the purple flowers I used the 1-1/2″ Circle, the Balloon Bouquet Punch, the Magnolia Memories Dies (the skinnier 3-petal shape), and a very narrow (starting at 1/4″ and ending at 1/2″) and long (about 8″) strip of paper. After punching, die-cutting and hand-cutting the pieces from Purple Posy ink, I sponged on swipes of Blackberry Bliss ink – darker in the middle/center and lighter going out towards the end of the “petals.” I curled everything with the Bone Folder.
Then I started by building the outside of the flower by gluing 6 larger balloons/petals to the 1-1/2″ circle base so the tips of the balloons touch each other. Next I glued 6 smaller balloon “petals” on top of that. Again…so the tips of the balloons touched each other. Then I added two Magnolia Memories Die shapes using hot glue instead of just the Multipurpose Glue. And finally I added a tightly rolled up strip in the center using hot glue.

I did NOT use the Balloon Bouquet Punch for the small purple flower. But instead I started with three layered Magnolia Memories Die shapes and ended with a tightly rolled up strip in the center using hot glue.

They were easy to make using the punches and dies, but they did take a bit of time.
Finally I arranged them where I thought they looked best and glued them down. I punched out leaves from the Old Olive vellum and foil paper. I curled them with a Bone Folder and inserted them here and there with Glue Dots.
As we move into the fall season, this artwork on my wall will definitely bring some extra sunshine to those days as they grow colder. The kids are off for their first day of school and will be waking up soon. So I’m off to go help them get ready.

Click here to shop my online store.
Click here to access & view the current catalogs.
Click here to subscribe to those fun Paper Pumpkin kits of creativity!
Click here to learn about my Loyalty Rewards program. You can earn free stamps just for shopping with me!
Click here for more information about joining my Online Paper Crafters’ Club. Earn even more goodies by joining a club!
Click here to learn more about joining my Stampers With ART community. Get the MOST rewards including a discount on future products!
Follow me on social media! I share regularly on Pinterest, YouTube, and Facebook!
Please subscribe to my blog, too! Click here and enter your email in the blue box (above the butterfly).
Product List
- small needle nose pliers may help
- hot glue glue


 Circle Punch")


 Vellum Cardstock")


 Circle Punch")


BUY 3, GET 1 FREE DESIGNER PAPER SALE
By popular demand, Stampin’ Up! is bringing back the Designer Series Paper Sale! During September 4–30, you can buy three packages of select Designer Series Paper, and get one FREE! Click here for more details. Click here for the informational flyer.

THE 2019 HOLIDAY CATALOG DEBUTS SEPTEMBER 4!
Stay tuned!! New products are around the corner.

A PEEK AT SEPTEMBER’S PAPER PUMPKIN KIT
The September 2019 Paper Pumpkin, Bone Appétit kit includes 20 food-safe treat boxes, a unique and exclusive Halloween stamp set, and a spooky, special-edition box. September’s kit also gives new meaning to the word “handmade.” Coordinating colors are: Basic Black, Gorgeous Grape, Pumpkin Pie, and Whisper White
Click here to get your subscription started by September 10th for this next kit.

MY ONLINE PAPER CRAFTERS CLUB IS LOOKING FOR NEW MEMBERS
I’m forming a new Paper Crafters club that will begin mid-September (with orders due mid-month for October, November, December, January, February & March). And we are looking for more to join us. The commitment is to order at least $25 worth of Stampin’ Up! product in each of those 6 months. In one of those months, you would reap the hosting rewards (free merchandise based on the club orders). And then you’d also be able to get in on monthly product perks that would be sent to you along with your monthly club cards.

BETTER THAN FLAT TUTORIALS
I’m so proud to be teamed up with five other super talented Stampin’ Up!® demonstrators so we can create Fun Fold cards & 3-D projects to share exclusively with our customers, paper crafting friends & team members each month! (Our September 2019 projects featuring new products from the Holiday Catalog are now available!) CLICK HERE for more information.


Gorgeous!! I am in Love with these papers as well!!
Thanks Annette! I know they typically only last the lifespan of the catalog. So I’m crossing my fingers that the designers have another version similar to this next year!
Amazing wall art – sometimes you just hate to cut the DP up because its so pretty!!
And this way you don’t have to! LOL Thanks so much Sue.