On June 9th I shared a card that I had made with the Coffee With Friends & Layering Leaves Stamp Sets. It was wasn’t exactly what I had in mind when I wanted to share how to turn one of the leaves images into coffee beans, but I wasn’t at the top of my game since at that time I was still recovering from COVID.
I don’t dislike the card, or I wouldn’t have shared it. In fact I received quite a few compliments (thank you). But it was a little more earthy and masculine than I wanted it to be. So soon after I created a brighter version of the coffee beans card – one that was more in line with what I had wanted to show you on June 9th.
I just showed live on YouTube and on Facebook about an hour ago step-by-step directions for creating this card which features a few fun techniques (heat embossing, watercoloring, punch art, using Daubers and Blends Markers,…). And now I’m sharing that video here in my blog post. Be sure to watch the video by clicking here (or you can just click on this image below if you are already on my blog post), scroll through the close-up photos that follow, check out the measurements & products list below, and then let me know if you have any questions.
Products I used… See below for a complete list of products linked to where you can find them in my online store.
Click here to access and download a printable “measurements & supplies” sheet.
Measurements …
Basic White Thick Cardstock
4-1/4” x 11” scored parallel to short side at 5-1/2”
4” x 5-1/4”
Scraps for stamping and punching leaves and coffee beans
Early Espresso Cardstock
Scraps for punching & die-cutting circles
Distressed Gold Specialty Paper
½” x 1”
(2) 3/8” x ¾”
Scraps for punching circles
Here are photos of the finished card.
I hope you enjoyed what I shared today!
OH! And to shop products from The Country Hive, click here.
Winners: After live winners from last week’s live… Laurie Turner & Lori Mantovi This week’s live winners… B Perkins & Tina Pysh
Congratulations to these individuals!! If your name is above, be sure to reach out to me at stampyourartout@comcast.net to claim your prize.
Tune into my events on my Facebook Page to see notices of my upcoming Lives. Or subscribe to my YouTube channel. And then click on the bell next to the subscribe button and set notifications to “all” so you can get updates when I share and when I go live. My next Live will be on Thursday, July 20 at 11 AM Central Time. I hope you can join me!
Click here to shop my online store. Click here to access & view the current catalogs. Click here to shop My Favorite Extras. Click here to subscribe to those fun Paper Pumpkin kits of creativity! Click here to learn about my Loyalty Rewards program. You can earn free stamps just for shopping with me! Click here to learn more about joining my Stampers With ART community. Get the MOST rewards including a discount on future products! Follow me on social media! I share regularly on Pinterest, YouTube, Instagram, my Facebook Page, and my Facebook Group! Please subscribe to my blog, too!Click here and enter your email in the blue box (above the butterfly).
BONUS DAYS! When you shop July 6 – 31 and spend $50 USD you will earn a $5 USD coupon to redeem in August! Make sure you save all your coupons (you can earn as many as you’d like) because you can redeem them (and we mean ALL of them) between August 1 – 31! Click here for more details.
CLEARANCE RACK REFRESH Additional items appeared in the Clearance Rack section of the Online Store 7/6/23. Click here to shop great deals on these returning & discounted retired products.
KITS COLLECTION: BLOSSOM WISHES KIT ADDED This kit is special for its trendy, slimline card design, and includes all the precut paper pieces for a fun card for a friend! This new kit is part of the Kits Collection and is now available. Click here and scroll down for more details.
A PEEK AT AUGUST’S PAPER PUMPKIN KIT Discover beautiful watercolor forget-me-nots and lotuses in the August Paper Pumpkin Kit! This kit includes 8 cards, 4 each of 2 designs, and 8 coordinating envelopes. The kit is special because of the way it uses the meaning of flowers. On each card, you’ll find a small inscription of what the flowers represent. As you craft with the included vellum and watercolor paper pieces, you’ll know you’re sending a message of encouragement/hope and loyalty. And anyone who subscribes to this month’s kit will get a BONUS Distinktive stamp set! Coordinating Stampin’ Up! colors: Bubble Bath, Crushed Curry, Garden Green, Melon Mambo, Misty Moonlight, Orchid Oasis, Pretty Peacock (ink spot color), Tahitian Tide If you are not a Paper Pumpkin subscriber, I invite you to give it a try. CLICK HERE to learn more. CLICK HERE to sign up by August 10th for this next kit.
ALL STAR VIDEO CLASSES I’m a designer with the All Stars, a group of globally recognized Stampin’ Up! demonstrators. And we are excited to share exclusively with our customers, paper crafting friends & team members our July 2023 Earthen Elegance Suite Video Class Bundle which is now available. CLICK HERE for more information. Click here to get to my Tutorials/Classes for Sale page to see others that have been offered. The next one featuring the Bright & Beautiful Suite from the 2023-24 Annual Catalog will be available August 1st.
Today is the last day to make sure you have an active Paper Pumpkin subscription so you can get your hands on the July kit titled Fun In The Sun. PP subscribers don’t ever see the kits ahead of time. The mystery makes it that much more exciting! But here are hints about what we will get in our mailboxes come mid-month.
JULY’S PAPER PUMPKIN KIT… “Say hello to summer and get crafting under the sun with this month’s kit! With beach designs, fun accordion-fold cards, and with sentiments to support, encourage, say hello, and more, wave at those you love through uplifting cards and send family and friends oceans of kind words all summer long! This kit includes all the supplies you need to create 9 cards: 3 each of 3 designs. It also includes coordinating envelopes, an all-occasion stamp set, Iridescent Sequin Embellishments, and Tear & Tape Adhesive. Coordinating Stampin’ Up! colors: Azure Afternoon, Basic Gray, Crumb Cake, Daffodil Delight (the ink spot color), Flirty Flamingo, Granny Apple Green, Melon Mambo, Pool Party.”
If you are not a Paper Pumpkin subscriber, I invite you to give it a try. CLICK HERE to learn more. CLICK HERE to sign up by today, July 10th for this next kit. (To renew your subscription, click here and login to reactivate.)
Shown below are the beautiful cards the June 2023 Welcome Inn kit made (as per the included kit instructions)…
I like to think outside the box with kits though. I don’t create the intended projects. Instead I change up the supplies and create new ideas. The ones I’ve created with this June kit can be found on my blog on June 23rd and on July 7th. I have one more project idea for you today though.
I usually create a page or page layout with every kit, but I didn’t finish this one in time to share on July 7th. Just like the card and hospitality thank you gift shared that day, this page has strips of patterned papers placed either side-by-side or at right angles from each other. You’ll want to look back on that post for details and progression photos for building the strips design.
Products I used… Besides the kit, I used a few other extra items. See below for a complete list of extra products I used linked to where you can find them in my online store.
Measurements…
Night of Navy Cardstock
12″ x 12″
Navy card base from the kit (the white side for photo mats)
4-1/4″ x 5-1/2″
4-1/4″ x 4-1/4″
Boho Blue Cardstock
8″ x 12″
Basic White Cardstock
(2) 1/2″ x 12″
Blue printed card base from the kit
1/2″, 3/4″, and 1″ strips
Coral printed card base from the kit
3/4″ and 1″ strips
Countryside Inn Designer Paper (dark with foxes)
3/4″, 1″, and 1-1/4″ strips
Parakeet Party Cardstock
Scraps for punching Bough Punch shapes
White Glittered Organdy Ribbon
(2) 6″
5″ (cut down the center for one narrow ribbon)
Refer to the tips on the July 7th post for tips on building the strips design on the Boho Blue Cardstock. Once that design is done and the extra ends from the strips are trimmed up, attach the Basic White 1/2″ x 12″ strips so they are peeking out the top and bottom edges. Then adhere this to the 12″ x 12″ Navy base about 1-1/2″ from the bottom edge.
Stamp the floral border 1/2″ in along the bottom and a couple times in from the left at the top.
Use Daubers to add Balmy Blue and Calypso Coral ink to add shading to the white sides of two vases from the kit. Punch leaf shapes. Attach a few so they appear to be coming out the top of these pots. Add Dimensionals to the back sides of the leaves, pots and photo frame pieces (one in each corner is plenty). Then add all of these to the page.
Tie a bow with the narrow ribbon. Use a Glue Dot to add the bow to the tallest pot. Embellish that area with Iridescent Pearls.
Tuck and adhere with Multipurpose Liquid Glue a couple more punched leaves under the left corner of the square photo mat.
Cut the two remaining lengths of ribbon at angles that match to coral kit banner. Then attach with a strip of Tear & Tape Adhesive from the kit going down the middle of the banner. Trim off the excess ribbon, attach to the page with Seal. Then add a few Iridescent Pearls.
That’s it. 🙂 I ran out of time. But if you want to make a full layout (a matching page), I recommend repeating the strip background and either doing a reverse of the other elements and have everything symmetrical OR have some of the same extra elements but positioned a bit differently (maybe a wider horizontal photo mat instead of square and one or three vases instead of two placed a little lower). I added no page title or journaling. But my thinking is that I’ll die-cut some words in white from the Alphabet a la Mode dies.
I hope I inspired your creativity with what I shared today! If you did not get this kit, I hope you can apply these ideas to products you already own.
Click here to shop my online store. Click here to access & view the current catalogs. Click here to shop My Favorite Extras. Click here to subscribe to those fun Paper Pumpkin kits of creativity! Click here to learn about my Loyalty Rewards program. You can earn free stamps just for shopping with me! Click here to learn more about joining my Stampers With ART community. Get the MOST rewards including a discount on future products! Follow me on social media! I share regularly on Pinterest, YouTube, Instagram, my Facebook Page, and my Facebook Group! Please subscribe to my blog, too!Click here and enter your email in the blue box (above the butterfly).
Product List – things you might need/want in addition to the contents of the June 2023 Welcome Inn Paper Pumpkin kit…
BONUS DAYS IS BACK When you shop July 6 – 31 and spend $50 USD you will earn a $5 USD coupon to redeem in August! Make sure you save all your coupons (you can earn as many as you’d like) because you can redeem them (and we mean ALL of them) between August 1 – 31! Click here for more details.
CLEARANCE RACK REFRESH Additional items appeared in the Clearance Rack section of the Online Store 7/6/23. Click here to shop great deals on these returning & discounted retired products.
KITS COLLECTION: BLOSSOM WISHES KIT ADDED This kit is special for its trendy, slimline card design, and includes all the precut paper pieces for a fun card for a friend! This new kit is part of the Kits Collection and is now available. Click here and scroll down for more details.
A PEEK AT JULY’S PAPER PUMPKIN KIT Say hello to summer and get crafting under the sun with this month’s kit! With beach designs, fun accordion-fold cards, and with sentiments to support, encourage, say hello, and more, wave at those you love through uplifting cards and send family and friends oceans of kind words all summer long! This kit includes all the supplies you need to create 9 cards: 3 each of 3 designs. It also includes coordinating envelopes, an all-occasion stamp set, Iridescent Sequin Embellishments, and Tear & Tape Adhesive. Coordinating Stampin’ Up! colors: Azure Afternoon, Basic Gray, Crumb Cake, Daffodil Delight (the ink spot color), Flirty Flamingo, Granny Apple Green, Melon Mambo, Pool Party. If you are not a Paper Pumpkin subscriber, I invite you to give it a try. CLICK HERE to learn more. CLICK HERE to sign up by July 10th for this next kit.
ALL STAR VIDEO CLASSES I’m a designer with the All Stars, a group of globally recognized Stampin’ Up! demonstrators. And we are excited to share exclusively with our customers, paper crafting friends & team members our July 2023 Earthen Elegance Suite Video Class Bundle which is now available. CLICK HERE for more information. Click here to get to my Tutorials/Classes for Sale page to see others that have been offered. The next one featuring the Bright & Beautiful Suite from the 2023-24 Annual Catalog will be available August 1st.
Welcome to our monthly APPT blog hop to showcase Paper Pumpkin kit alternate projects! This time we are highlighting the June 2023Welcome InnPaper Pumpkin kit. See what I have to share. Then check out all the other blogs in the hop for additional creative ideas my fellow Stampin’ Up! demonstrator friends shared. To follow the hop and see these other creative project ideas, simply scroll down and click on the names of the other hop participants. (If you are receiving this blog post by email, click HERE to see the hop.)
Here are the cards the kit instructs how to make. (Click here for a link to Stampin’ Up!’s how-to video to help you assemble these as intended.)
I’ve already shared some other alternate projects using the contents of this kit on June 23rd – seven unique cards from the supplies of three, the Bough Punch, and a bit of extra cardstock. Today I am sharing a thank you card & coordinating gift. Both of them have a base design built from strips of patterned papers placed either side-by-side or at right angles from each other. Let’s start with the card.
Products I used… Besides the kit, I used a few other extra items. See below for a complete list of extra products I used linked to where you can find them in my online store.
This is a fun pattern to make when you have left over strips from other projects. The strips can be the same width or vary as mine have. You can place them any way you like. But I love the look of them coming from different directions.
Measurements…
Navy card base from the kit
5-1/2″ x 8-1/2″ scored at 4-1/4″
Blue envelope paper from the kit
3-3/4″ x 5″
Basic White Cardstock
3-7/8″ x 5-1/8″
Patterned envelope paper from the kit
1/2″ strips
Coral printed card base from the kit
1/2″, 3/4″, and 1″ strips
Countryside Inn Designer Paper (dark with foxes)
3/4″ and 1″ strips
Coral banner from the kit
3″
White Glittered Organdy Ribbon
(2) 3-1/4″
When starting your patterns for your strips, use cardstock or other flat item with a 90 degree angle to guide you in the initial placement.
Then just continue to add strips.
Once covered, turn the layer over and trim off the excess.
Then layer this onto another piece to frame it. I layered mine onto Basic White Cardstock and then added all this to the card base with Dimensionals.
The sentiment piece is also added with Dimensionals. But before adding it to the front of the card, be sure you have added the ribbon (cut at the left ends to match the angle of the banner) and trimmed off the excess. The “hello friend” mini banner is also added with a Dimensional strip from the kit and covers the adhesive underneath that is holding the ribbons in place. Oh! And add a few Iridescent Rhinestones.
The gift is a cake mix with a decorative partial wrap. I only added Seal Adhesive at the very top. The ribbon around it all holds the wrap in place quite well and hides the pre-existing score line.
Measurements…
Navy card base from the kit
4-3/4″ x 8-1/2″ scored parallel to the short side at 1-3/4″
Blue envelope paper from the kit
2-3/4″ x 4-3/4″
Basic White Cardstock
2-7/8″ x 4-3/4″
Patterned envelope paper from the kit
1/2″ and 3/4″ strips
Coral printed card base from the kit
3/4″ strips
Countryside Inn Designer Paper (dark with foxes)
1″ strips
Coral banner from the kit
2-1/4″
White Glittered Organdy Rib
18″
Create the decorate strip panel the same way you would for the card above. And add to the bottom portion of the navy wrap with Dimensionals. Add the blue kit vase (flipped over to the white side) with a Dimensional at the top and toward the bottom so it’s not touching the ribbon. Then slide the ribbon over towards the vase. Fussy-cut the flowers and add them so they appear to be coming out of the vase. Stamp the sentiment banner and add it. Then embellish with Iridescent Rhinestones.
Ta-da!
I hope I inspired your creativity with what I shared today! If you did not get this kit, I hope you can apply these ideas to products you already own.
If you are not a Paper Pumpkin subscriber, I invite you to give it a try. CLICK HERE to learn more. CLICK HERE to sign up by July 10th for this next kit…
A PEEK AT JULY’S PAPER PUMPKIN KIT Say hello to summer and get crafting under the sun with this month’s kit! With beach designs, fun accordion-fold cards, and with sentiments to support, encourage, say hello, and more, wave at those you love through uplifting cards and send family and friends oceans of kind words all summer long! This kit includes all the supplies you need to create 9 cards: 3 each of 3 designs. It also includes coordinating envelopes, an all-occasion stamp set, Iridescent Sequin Embellishments, and Tear & Tape Adhesive. Coordinating Stampin’ Up! colors: Azure Afternoon, Basic Gray, Crumb Cake, Daffodil Delight (the ink spot color), Flirty Flamingo, Granny Apple Green, Melon Mambo, Pool Party.
We just returned from celebrating the 4th of July holiday at the cabin. This is a photo of my teenagers Nick & Luke posing with tiny sparklers and enjoying their summer.
They are growing up way too fast! In just a couple months Nick will be a senior and Luke will be a junior in high school.
Thanks for visiting! Now I invite you to visit the blogs of my fellow demonstrators.
Click here to shop my online store. Click here to access & view the current catalogs. Click here to shop My Favorite Extras. Click here to subscribe to those fun Paper Pumpkin kits of creativity! Click here to learn about my Loyalty Rewards program. You can earn free stamps just for shopping with me! Click here to learn more about joining my Stampers With ART community. Get the MOST rewards including a discount on future products! Follow me on social media! I share regularly on Pinterest, YouTube, Instagram, my Facebook Page, and my Facebook Group! Please subscribe to my blog, too!Click here and enter your email in the blue box (above the butterfly).
BONUS DAYS IS BACK When you shop July 6 – 31 and spend $50 USD you will earn a $5 USD coupon to redeem in August! Make sure you save all your coupons (you can earn as many as you’d like) because you can redeem them (and we mean ALL of them) between August 1 – 31! Click here for more details.
CLEARANCE RACK REFRESH Additional items appeared in the Clearance Rack section of the Online Store 7/6/23. Click here to shop great deals on these returning & discounted retired products.
KITS COLLECTION: BLOSSOM WISHES KIT ADDED This kit is special for its trendy, slimline card design, and includes all the precut paper pieces for a fun card for a friend! This new kit is part of the Kits Collection and is now available. Click here and scroll down for more details.
A PEEK AT JULY’S PAPER PUMPKIN KIT Say hello to summer and get crafting under the sun with this month’s kit! With beach designs, fun accordion-fold cards, and with sentiments to support, encourage, say hello, and more, wave at those you love through uplifting cards and send family and friends oceans of kind words all summer long! This kit includes all the supplies you need to create 9 cards: 3 each of 3 designs. It also includes coordinating envelopes, an all-occasion stamp set, Iridescent Sequin Embellishments, and Tear & Tape Adhesive. Coordinating Stampin’ Up! colors: Azure Afternoon, Basic Gray, Crumb Cake, Daffodil Delight (the ink spot color), Flirty Flamingo, Granny Apple Green, Melon Mambo, Pool Party. If you are not a Paper Pumpkin subscriber, I invite you to give it a try. CLICK HERE to learn more. CLICK HERE to sign up by July 10th for this next kit.
ALL STAR VIDEO CLASSES I’m a designer with the All Stars, a group of globally recognized Stampin’ Up! demonstrators. And we are excited to share exclusively with our customers, paper crafting friends & team members our July 2023 Earthen Elegance Suite Video Class Bundle which is now available. CLICK HERE for more information. Click here to get to my Tutorials/Classes for Sale page to see others that have been offered. The next one featuring the Bright & Beautiful Suite from the 2023-24 Annual Catalog will be available August 1st.
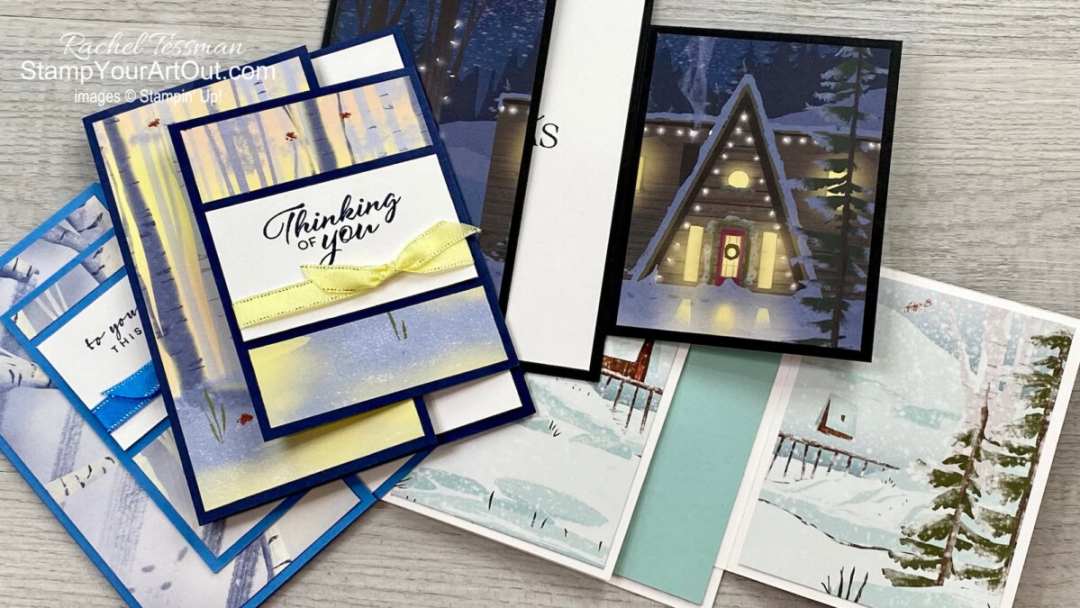
I wanted to show off every bit of that paper that I could on one card without converting back to an accordion card or my 3-Panel Scenery Z-Fold. So I started looking through my swaps and gifted cards for inspiration. And ta-da!! Thanks to Michelle Carlson’s Joy Fold swap card and a bit of math, I was able to get started.
I made one and then kept going… eventually creating a Joy Fold card with every paper design in the pack. Some are made with one full sheet to keep the beautiful scenery intact. Some are made like a traditional Joy Fold card, using a couple patterns per card. And now if I just create 3 more of each I will have used up my whole pack of designer paper AND I’ll be set with 48 Christmas/winter cards!
I just showed live on YouTube and on Facebook about an hour ago step-by-step directions for creating these cards with the Brightest Glow Stamp Set, the Layering Leaves Stamp Set, and that new One Horse Open Sleigh 6×6 Designer Paper. And now I’m sharing that video here in my blog post. Be sure to watch the video by clicking here (or you can just click on this image below if you are already on my blog post), scroll through the close-up photos that follow, check out the measurements & products list below, and then let me know if you have any questions.
Products I used… See below for a complete list of products linked to where you can find them in my online store.
Click here to access and download a printable “measurements & supplies” sheet.
Measurements using the house card as an example…
Basis Black cardstock
5-1/2” x 7-1/4” scored parallel to the short side at 3″
4-1/4″ x 4-1/4″ scored in on one side at 1″
Basic White cardstock
4” x 5-1/4”
1-3/4” x 3”
One Horse Open Sleigh Designer Paper
3” x 6” cut into ¾” x 3”, 3” x 4” and 1-3/4” x 3” for the right panels
2-3/4” x 6 with 1/8” cut from top and 5/8” cut from bottom for the left panel
3/8” Sheer Ribbon Combo Pack (Lemon Lolly)
3”
4-1/2”
Here are photos of the finished cards.
I hope you enjoyed what I shared today!
Winners: After live winners from last week’s live… Stephanie Lee & Terri Johnson Edeen This week’s live winners… Julie Poindexter & Donna Shelton
Congratulations to these individuals!! If your name is above, be sure to reach out to me at stampyourartout@comcast.net to claim your prize.
Tune into my events on my Facebook Page to see notices of my upcoming Lives. Or subscribe to my YouTube channel. And then click on the bell next to the subscribe button and set notifications to “all” so you can get updates when I share and when I go live. My next Live will be on Wednesday, July 12 at 11 AM Central Time. I hope you can join me!
BLOSSOM WISHES KIT ADDED Celebrate your friends with special slimline cards from the Blossom Wishes Kit! With vellum blossoms and foiled details, you can quickly put together a fun paper craft! This kit also comes with precut sentiments in Dutch, English, French, and German, so you can send a card and say hello to friends near and far. This new kit is part of the Kits Collection and is now available as of July 6, 2023 (while supplies last).
Cost is $13 USD
Use item number 162431 when ordering
Click here to watch the unboxing video by Sara Douglass
Click here to shop my online store. Click here to access & view the current catalogs. Click here to shop My Favorite Extras. Click here to subscribe to those fun Paper Pumpkin kits of creativity! Click here to learn about my Loyalty Rewards program. You can earn free stamps just for shopping with me! Click here to learn more about joining my Stampers With ART community. Get the MOST rewards including a discount on future products! Follow me on social media! I share regularly on Pinterest, YouTube, Instagram, my Facebook Page, and my Facebook Group! Please subscribe to my blog, too!Click here and enter your email in the blue box (above the butterfly).
Product List…
Shop The Country Hive for affordable quality crafting storage needs. 😊
BONUS DAYS IS BACK When you shop July 6 – 31 and spend $50 USD you will earn a $5 USD coupon to redeem in August! Make sure you save all your coupons (you can earn as many as you’d like) because you can redeem them (and we mean ALL of them) between August 1 – 31! Click here for more details.
CLEARANCE RACK REFRESH Additional items appeared in the Clearance Rack section of the Online Store today, 7/6/23. Click here to shop great deals on these returning & discounted retired products.
KITS COLLECTION: BLOSSOM WISHES KIT ADDED This kit is special for its trendy, slimline card design, and includes all the precut paper pieces for a fun card for a friend! This new kit is part of the Kits Collection and is now available. Click here and scroll down for more details.
A PEEK AT JULY’S PAPER PUMPKIN KIT Say hello to summer and get crafting under the sun with this month’s kit! With beach designs, fun accordion-fold cards, and with sentiments to support, encourage, say hello, and more, wave at those you love through uplifting cards and send family and friends oceans of kind words all summer long! This kit includes all the supplies you need to create 9 cards: 3 each of 3 designs. It also includes coordinating envelopes, an all-occasion stamp set, Iridescent Sequin Embellishments, and Tear & Tape Adhesive. Coordinating Stampin’ Up! colors: Azure Afternoon, Basic Gray, Crumb Cake, Daffodil Delight (the ink spot color), Flirty Flamingo, Granny Apple Green, Melon Mambo, Pool Party. If you are not a Paper Pumpkin subscriber, I invite you to give it a try. CLICK HERE to learn more. CLICK HERE to sign up by July 10th for this next kit.
ALL STAR VIDEO CLASSES I’m a designer with the All Stars, a group of globally recognized Stampin’ Up! demonstrators. And we are excited to share exclusively with our customers, paper crafting friends & team members our July 2023 Earthen Elegance Suite Video Class Bundle which is now available. CLICK HERE for more information. Click here to get to my Tutorials/Classes for Sale page to see others that have been offered. The next one featuring the Bright & Beautiful Suite from the 2023-24 Annual Catalog will be available August 1st.
I love pottery. And I love how this suite’s imagery, paper patterns, and dies allow for creating so many different pots and vases. I couldn’t stop creating and wanted to share a variety of them all in one card, So I put them on display in this Joy Fold Card.
The front right flap has a front and an inside.
And the next layer… the left flap has a front and an inside.
Below are measurements, more photos of the details, and a product list so you can purchase items in my online store and recreate this card if you’d like.
By the way, this stamp set (and thus the bundle and suite) is available in French AND Spanish as well! 😃
Measurements …
Basic Black Cardstock
5-1/2” x 7-1/4” scored parallel to the short side at 3″
4-1/4″ x 4-1/4″ scored in on one side at 1″
Scraps for die-cutting pot and pot decoration
Earthen Elegance Designer Paper (the pattern with the drips)
Scraps for die-cutting pots and pot handles
Earthen Elegance Designer Paper (the pattern with the ombré stripes)
(2) 2-3/4″ x 5-1/4″
Scraps for die-cutting pots
Earthen Elegance Designer Paper (the more solid blue pattern)
(2) 3″ x 4″
Distressed Gold Paper
Scraps for die-cutting foliage, pot, and pot decoration
Basic White Cardstock
4” x 5-1/4”
5/8” x 2-1/2”
Scraps for stamping and die-cutting foliage
Old Olive Cardstock
Scraps for die-cutting foliage
Gray Granite Cardstock
Scraps for die-cutting foliage
These top two pots are cut from the designer papers & added with Dimensionals. I tucked in Gray Granite, Old Olive and Distressed Gold foliage with Multipurpose Liquid Glue. Then I added a few rhinestones I had colored with the Moody Mauve Blends Markers and the sentiment strip across the top with Seal adhesive under the left side and a Dimensional under the right.
The inside pots and foliage are all added flat with Seal or Multipurpose Liquid Glue.
The one above AND the one below are both cut from Basic Black & Old Olive Cardstocks and Distressed Gold Paper.
These last two pots are cut from the designer papers. I then stamped the feathery foliage image with Moody Mauve ink on Basic White Cardstock, cut it with the coordinating framing die, and added that into one of the pots with a Gray Granite die-cut foliage.
Tomorrow, July 6 I’ll be live at 11 AM Central Time when I’ll share the process of putting together even more Joy Fold Cards. Those cards will feature the beautiful new One Horse Open Sleight scenic designer paper debuting that day as part of the new Online Exclusive products.
Did you get your hands on this month’s bundle of video classes featuring products in the Earthen Elegance Suite? Each month’s Video Class Bundle includes photos, imperial and metric measurements, complete product lists, and links to instructional videos for twelve projects designed by our team of Stampin’ Up! demonstrators from around the world. And they are exclusive to those who earn them or purchase them.
Here are peeks of the amazing projects in this January 2023 bundle. Click here and scroll down to find information for how to get your hands on this month’s bundle. Plus this month is the start of a new 6-month series. So if you are purchasing, you can subscribe and save.
I hope you enjoyed what I shared! Now be sure to scroll down and click on the names of other hop participants in our team to follow the hop and see other creative project ideas featuring the Earthen Elegance Suite. (If you are receiving this blog post by email, click HERE to see links and follow the hop.) I hope our ideas in this hop inspire your creativity!
Tomorrow marks the start of Bonus Days, the debut of additional Online Exclusives products, and a refresh of the Clearance Rack (see below for details and links for each).
It also marks the starts of a Paper Pumpkin 48-Hour Sale! All current Paper Pumpkin subscribers can save up to 50% on Paper Pumpkin past kits, refills, and add-ons! Click here to learn more about Paper Pumpkin kits and how to subscribe. Click here to shop these products online July 6th and 7th.
Click here to shop my online store. Click here to access & view the current catalogs. Click here to shop My Favorite Extras. Click here to subscribe to those fun Paper Pumpkin kits of creativity! Click here to learn about my Loyalty Rewards program. You can earn free stamps just for shopping with me! Click here to learn more about joining my Stampers With ART community. Get the MOST rewards including a discount on future products! Follow me on social media! I share regularly on Pinterest, YouTube, Instagram, my Facebook Page, and my Facebook Group! Please subscribe to my blog, too!Click here and enter your email in the blue box (above the butterfly).
BONUS DAYS IS BACK When you shop July 6 – 31 and spend $50 USD you will earn a $5 USD coupon to redeem in August! Make sure you save all your coupons (you can earn as many as you’d like) because you can redeem them (and we mean ALL of them) between August 1 – 31! Click here for more details.
MORE ONLINE EXCLUSIVES COMING IN JULY New products are coming to the online store* July 6, 2023! You won’t find these products in any catalog, but you can download this flyer which gives you a peek at a few of the new ones. *this link will reveal the newer products on 7/6/23. Click here for more details.
CLEARANCE RACK REFRESH Additional items will appear in the Clearance Rack section of the Online Store tomorrow, 7/6/23. Click here on that day to shop great deals on these returning & discounted retired products.
PAPER PUMPKIN 48-HOUR SALE! All current Paper Pumpkin subscribers can save up to 50% on Paper Pumpkin past kits, refills, and add-ons! Click here to learn more about Paper Pumpkin kits and how to subscribe. Click here to shop these products online July 6th and 7th.
KITS COLLECTION: BOHO BEACH KIT ADDED It’s time to sit back, relax, and take family and friends to the beach from the comfort of your home with our latest kit: Boho Beach Kit! This new kit is part of the Kits Collection and is now available. Click here and scroll down for more details.
A PEEK AT JULY’S PAPER PUMPKIN KIT Say hello to summer and get crafting under the sun with this month’s kit! With beach designs, fun accordion-fold cards, and with sentiments to support, encourage, say hello, and more, wave at those you love through uplifting cards and send family and friends oceans of kind words all summer long! This kit includes all the supplies you need to create 9 cards: 3 each of 3 designs. It also includes coordinating envelopes, an all-occasion stamp set, Iridescent Sequin Embellishments, and Tear & Tape Adhesive. Coordinating Stampin’ Up! colors: Azure Afternoon, Basic Gray, Crumb Cake, Daffodil Delight (the ink spot color), Flirty Flamingo, Granny Apple Green, Melon Mambo, Pool Party. If you are not a Paper Pumpkin subscriber, I invite you to give it a try. CLICK HERE to learn more. CLICK HERE to sign up by July 10th for this next kit.
ALL STAR VIDEO CLASSES I’m a designer with the All Stars, a group of globally recognized Stampin’ Up! demonstrators. And we are excited to share exclusively with our customers, paper crafting friends & team members our July 2023 Earthen Elegance Suite Video Class Bundle which is now available. CLICK HERE for more information. Click here to get to my Tutorials/Classes for Sale page to see others that have been offered. The next one featuring the Bright & Beautiful Suite from the 2023-24 Annual Catalog will be available August 1st.
We are enjoying our Independence Day holiday at the lake with family. So I thought I’d share this fishing-themed card today. It’s a retirement card because of the words I’ve chosen, but you could always change out the sentiments and turn this card into a birthday, thank you, or even Happy 4th card.
I used the sentiments from the Gone Fishing Stamp Set, the hooks from the Gone Fishing Dies, and the Let’s Go Fishing Designer Paper (all from the Let’s Go Fishing Suite) along with the Splatters Embossing Folder, the 2-3/8″ Circle Punch, the Stylish Shapes dies, and the Mirrored Charcoal Silver Foil. (See below for a complete list of products linked to where you can find them in my online store.)
The most difficult part of this card is probably getting the angle cut correct. But I’ve got tips for you to make it quite simple.
Measurements
Boho Blue Cardstock
5-1/2″ x 8-1/2″ scored parallel to short side at 4-1/4”
Gone Fishing Designer Paper
4” x 4”
Basic White Cardstock
4-1/8” x 5-3/8”
Scrap for stamping and punching sentiment
Silver Foil Specialty Paper (Mirrored Charcoal)
Scrap for die-cutting sentiment layer
(2) 1/2″ x 4-1/2″
Scrap for die-cutting hooks
Directions
Cut the bottom off of the 4″ x 4″ designer paper at a slight angle. Now take the bottom designer paper piece and place it on the bottom front of the folded card front. Then use a pencil to trace the angle. Remove the paper and cut along that line either with a long-bladed scissors, Paper Snips, or Paper Trimmer.
Add the Mirrored Charcoal Foil paper so it’s peeking out from under both the upper and lower designer paper pieces along the angled edges.
Before adding any layers to the card base, open it up and emboss the lower half of the front.
Stamp the sentiments: ink them up with Misty Moonlight ink, then use a Dauber to add just a bit of Blackberry Bliss ink across a few letters. Remoisten the ink by exhaling on it, then stamp it down. Stamp the inside sentiment on the white inner layer and the front sentiment on the white scrap.
Punch out the front sentiment.
Die-cut the stitched circle and hooks. (To save on foil, you could die-cut the hooks from the center of the circle.) Layer the punched circle sentiment onto the die-cut foil circle.
Add the top designer paper layered piece to the front of the card with Dimensionals.
Add the bottom designer paper layered piece to the bottom of the inner white layer. Add the inner white layer to the inside of the card.
Glue one of the hooks coming down from the inside sentiment.
Glue the other hook coming down from the stitched circle. Add this sentiment circle to the front of the card with Dimensionals on the bottom and Seal or glue on the top.
Enjoy your week. And if you are celebrating in the USA, have a happy 4th of July. 🇺🇸
Click here to shop my online store. Click here to access & view the current catalogs. Click here to shop My Favorite Extras. Click here to subscribe to those fun Paper Pumpkin kits of creativity! Click here to learn about my Loyalty Rewards program. You can earn free stamps just for shopping with me! Click here to learn more about joining my Stampers With ART community. Get the MOST rewards including a discount on future products! Follow me on social media! I share regularly on Pinterest, YouTube, Instagram, my Facebook Page, and my Facebook Group! Please subscribe to my blog, too!Click here and enter your email in the blue box (above the butterfly).
BONUS DAYS IS BACK When you shop July 6 – 31 and spend $50 USD you will earn a $5 USD coupon to redeem in August! Make sure you save all your coupons (you can earn as many as you’d like) because you can redeem them (and we mean ALL of them) between August 1 – 31! Click here for more details.
MORE ONLINE EXCLUSIVES COMING IN JULY New products are coming to the online store* July 6, 2023! You won’t find these products in any catalog, but you can download this flyer which gives you a peek at a few of the new ones. *this link will reveal the newer products on 7/6/23. Click here for more details.
KITS COLLECTION: BOHO BEACH KIT ADDED It’s time to sit back, relax, and take family and friends to the beach from the comfort of your home with our latest kit: Boho Beach Kit! This new kit is part of the Kits Collection and is now available. Click here and scroll down for more details.
A PEEK AT JULY’S PAPER PUMPKIN KIT Say hello to summer and get crafting under the sun with this month’s kit! With beach designs, fun accordion-fold cards, and with sentiments to support, encourage, say hello, and more, wave at those you love through uplifting cards and send family and friends oceans of kind words all summer long! This kit includes all the supplies you need to create 9 cards: 3 each of 3 designs. It also includes coordinating envelopes, an all-occasion stamp set, Iridescent Sequin Embellishments, and Tear & Tape Adhesive. Coordinating Stampin’ Up! colors: Azure Afternoon, Basic Gray, Crumb Cake, Daffodil Delight (the ink spot color), Flirty Flamingo, Granny Apple Green, Melon Mambo, Pool Party. If you are not a Paper Pumpkin subscriber, I invite you to give it a try. CLICK HERE to learn more. CLICK HERE to sign up by July 10th for this next kit.
ALL STAR VIDEO CLASSES I’m a designer with the All Stars, a group of globally recognized Stampin’ Up! demonstrators. And we are excited to share exclusively with our customers, paper crafting friends & team members our July 2023 Earthen Elegance Suite Video Class Bundle which is now available. CLICK HERE for more information. Click here to get to my Tutorials/Classes for Sale page to see others that have been offered. The next one featuring the Bright & Beautiful Suite from the 2023-34 Annual Catalog will be available August 1st.
Stamp Your Art Out!
Rachel Tessman
Independent Demonstrator 763-502-6813
Current Catalogs
Get My Posts
This is the best way to enjoy all that Stampin' Up! has to offer. Plus it's fun to be on the demonstrator side of things!
Subscribe to our monthly Paper Pumpkin crafting kits through me to enjoy exclusive ideas shared in PDF tutorials from the our PP Creatives team of Stampin’ Up! demonstrators.
In the spirit of full disclosure, I am an affiliate with Stamp-n-Storage which means I may get commissions if you click on links I provide and decide to purchase anything from this company. I love their products and recommend them because I own several myself and believe my readers will benefit from them.
Archives
Categories
Recent Achievements
#5 Overall
#5 in Leadership
#11 in Sales
#4 in Team Building
2024 Incentive Trip Achiever (My 19th trip earned will be Disney World in 2025!)


")
")
 Specialty Paper")


")

 Circle Punch")
 Circle Punch")
 Circle Punch")


")
")
")
")
")

 Designer Series Paper")


")
")
")

 Designer Series Paper")
 Specialty Pack")


