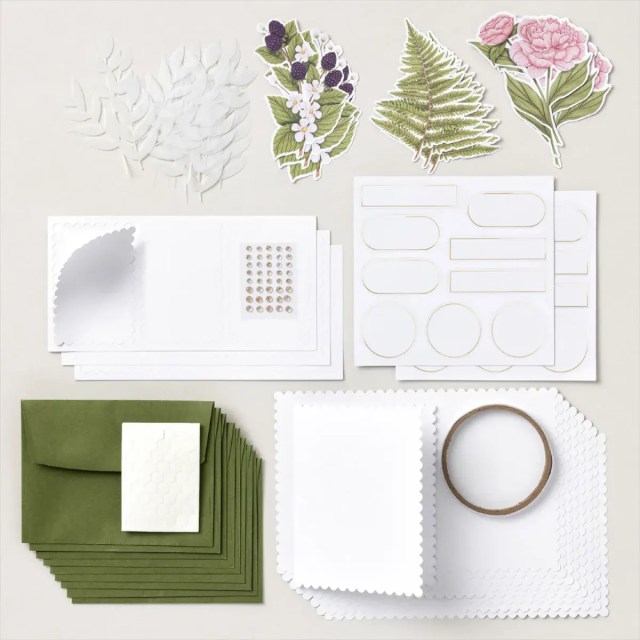
What a week! I’m starting to catch up again though. In today’s post you will see links to my two last Lives, photos of the cards I created and shared in my “Masking & Silhouette Stamping” Live, AND one more project that I created with the Farmhouse Florals August 2025 Paper Pumpkin kit – a 12×12 scrapbook page layout.
For those of you who follow me on Facebook, in my newsletters, and/or on my YouTube Lives, you know that our youngest Luke just had hernia repair surgery on Thursday. He is doing great and taking it easy as he heals from this before his big move to Los Angeles next month.
I also had a minor medical procedure Wednesday afternoon. So both of us are on the mend. And my mother-in-law is on hospice care. So my husband was out of town Friday through Sunday. Hence the reasons I’ve been behind in my blog postings. Thank you for your patience.
Here is the link to my Live Online Paper Crafting Class from last Wednesday, September 3rd. In that Live I mentioned that fantastic cards can be made with just “stamps, inks and paper.” And I demonstrated silhouette stamping and masking along with ink blending and splattering techniques. (Click here or on the image below to watch that Online Paper Crafting Class from 9/3/25.)
These are photos of the cards I shared during that Live. And at the bottom of my post you will find links to the products I used to make these cards.
Branching Out Stamp Set…Tuxedo Black, Azure Afternoon, Blueberry Bushel, Gorgeous Grape, White Craft, and Wink of Stella inks
Prairie Grass Stamp Set…Tuxedo Black, Timid Tiger, Cajun Craze, Crushed Curry, and Wink of Stella inks
Happy Place Stamp Set…Tuxedo Black, Crushed Curry, Pretty In Pink, Coastal Cabana, and Wink of Stella inks
Here is the link to my Live Broadcast from last Friday, September 5th. In that Live I mentioned shared LOTS of gifted cards that I’ve received since my last show & share on 8/6/25. (Click here or on the image below to watch that Live from 9/5/25.)
If you were someone who sent me one of these lovely creations, thank you! It’s so fun to see all the creativity. And I get a lot of inspiration from all of you. If you’d like to send me cards to share in my livestreams, the address is: 14275 Raven Street NW, Andover, MN 55304
And now I present my full two-page 12×12 scrapbook page layout that I created with the Farmhouse Florals August 2025 Paper Pumpkin kit. If you did not get this kit, I hope you can apply these ideas to products you already own. OR…become an active subscriber and get in on the refill kit while it’s available. The refill kit doesn’t contain the ink and stamp images. But you will at least gain the main pieces and can hopefully replace most of the stamp images I used with some of your own. And then…I encourage you to stay subscribed through September 10th so you can be in on the next kit (hints on the next kit can be found below).
The page bases are the light side (left) and dark (right) sides of the 12×12 Lost Lagoon Two-Toned Cardstock layered with 6×12 dark sides of Secret Sea Two-Toned Cardstock.
For the left page I layered sections of kit card bases together…upper right is 5-1/2″ x 5-1/2″, upper left is what was cut off 3″ x 5-1/2″, lower left is full card base, and lower right is 5-1/2″ x 5-1/2″.
After adding these to the base page with a 1/2″ border on the top and sides and overlapping the bottom right to cover up the bottom of the upper right, I used two envelope flaps, another kit card base (2-1/8″ x 5-1/2″) and some Mossy Meadow/Gold Ribbon for the title section.
I connected one envelope flap and the ribbon to the back side of the kit card layer. And then I attached this all with Dimensionals to conceal the bag and just show the flowers.
I cut out my letters from the second envelope flap and glued them (applying the glue with the Silicone Brush and/or the Precision Tip bottle) to the title area.
I stamped some extra flowers with Crushed Curry ink and dotted the centers with a dark brown Blends Marker. Then I embellished with extra kit flowers and some Adhesive-Backed Dragonflies and Birds.
For the right page I layered two envelopes and a couple sections of kit card bases together…a full 8-1/2″ x 5-1/2″ card with a 3″ x 5-1/2″ piece from other cut base on the left page.
After overlapping and adding these to the base page with a 1/2″ border on the top and sides to form a 10-1/4″ x 11″ rectangle, I cut a half bag/flowers image and two circles from another kit card. Then I placed the half bag/flowers and my photo mats in this way.
I attached the die-cut circles with Dimensionals to conceal the bag and just show the flowers. I stamped some extra flowers with Crushed Curry ink and dotted the centers with a dark brown Blends Marker. Then I embellished with extra kit flowers and some Adhesive-Backed Dragonflies and Birds.
This would be a perfect layout to feature friendship or other close relationship (engagement, prom, wedding, anniversary) photos.
I hope you gained some creative inspiration today. Thanks for visiting! By the way, I shared my first set of alternate project ideas on August 20th. Be sure to visit that page to see my how-to video, photos, and more for all my alternate card ideas.
If you are not a Paper Pumpkin subscriber, I invite you to give it a try. CLICK HERE to learn more about Paper Pumpkin kits of creativity. CLICK HERE to start your subscription (or be sure you have an active account) by September 10th to be in on this next kit…
A PEEK AT SEPTEMBER’S PAPER PUMPKIN KIT Fall for Toile: Design elegant cards with metallic foil and rich autumnal imagery. Makes 9 cards: 3 each of 3 designs. The kit also includes precut paper pieces, printed sentiment labels, metallic foil details, and grosgrain ribbon trim. It also coordinates with the Autumn Toile Suite Collection (item 165904) available September 3rd! Cajun Craze (Classic Stampin’ Spot), Crumb Cake, Darling Duckling, Early Espresso, Pecan Pie, Timid Tiger. Click here for a flyer showing peeks of the July – September kits. And don’t miss the special add-on that coordinates with all three months: the Circle of Seasons (#167277) — made available June 11th and only while supplies last!
Do you want even more ideas? I now parter with a team of talented Stampin’ Up! demonstrators to create alternate projects each month using the contents of the Paper Pumpkin kits. These exclusive projects are within printable PDF tutorials and include measurements, supply lists, photos and directions. They are shared as a FREE bonus gift to our Paper Pumpkin kit subscribers and team members. And you can purchase them as early as the 1st of each month that follows the release of each kit. So the August 2025 Farmhouse Florals exclusives are now available.
Click here to shop my online store. Click here to access & view the current catalogs. Click here to shop My Favorite Extras. Click here to subscribe to those fun Paper Pumpkin kits of creativity! Click here to learn about my Loyalty Rewards program. You can earn free stamps just for shopping with me! Click here to learn more about joining my Stampers With ART community. Get the MOST rewards including a discount on future products! Follow me on social media! I share regularly on Pinterest, YouTube, Instagram, my Facebook Page, and my Facebook Group! Please subscribe to my blog, too!Click here and enter your email in the blue box (above the butterfly).
Products for the Silhouette Stamping/Masking Cards…
FREE SHIPPING FEBRUARY 18-20! This Wednesday, Thursday and Friday you can take advantage of FREE shipping with orders of $75 or more (before shipping and tax). Click here for the details. Then click HERE to shop and save during the promotion period!
THE NEW STAMPIN’ POSITIONER & GREAT JOIN OFFER IS HERE! From Feb 3 to Mar 2 this tool will be added as a free gift to all Starter Kit orders!!! It’s a great time to join! Click here for an informative flyer. Click here for an even more informative video. Click here for more information on my website. And click HERE to purchase your amazing Starter Kit! Yay!
REDEEM THOSE BONUS DAYS COUPONS! If you earned Bonus Days coupons from your purchase/s January 6 through February 2, you may now redeem those coupons! Shop between February 3 and 28 and add your coupon codes to save. Click here for the flyer with a more detailed explanation. Click here to watch Stampin’ Up!’s promotion video.
PRODUCT OF THE MONTH Introducing Stampin’ Up!’s February 2026 POM: PAINTED ILLUSIONS DESIGNER PAPER. Add this to your shopping cart for just $5 when you place a $75+ orderduring this month of February 2026! Click here for details. Click HERE to shop my online store and place your order online. Because the POM items are some of the best Stampin’ Up! has to offer and because there will be a limited quantity, they are likely to sell out quickly. Once they’re sold out, they’re gone for good! (The March POM will release March 3.)
LAST CHANCE PRODUCTS Every two months retiring products get added to the Last Chance Products List in the Online Store. Some are not discounted, but some are and can be up to 60% off. I encourage you to shop today to see what is leaving, because once an item from this section is sold out, it is gone for good. Items were added on February 3rd!
ONLINE EXCLUSIVES NEWS So MANY fantastic products are only available in the Online Exclusives section of the Online Store! You won’t find Online Exclusives products in any catalog. New products release every two months. The next set of products will debut March 3.
NEWKITS FROM THE KITS COLLECTION! New kits are added to the Kits Collection at the start of each month. Visit the Kits Collection to see the most recent additions.
A PEEK AT MARCH’S PAPER PUMPKIN KIT Fluttering Garden: Create charming cards with a hummingbird motif for Mother’s Day and more! Makes 9 cards: 3 each of 3 designs with 9 coordinating envelopes. The kit also includes precut paper pieces & sentiments, textured white card bases, and an EXTRA free stamp stamp (which has become a tradition with the March kits – a kit you never want to miss!). Coordinating Colors: Basic Gray (Classic Stampin’ Spot), Coastal Cabana, Early Espresso, Gorgeous Grape, Old Olive, Peach Pie, Pretty Peacock. Click here for a flyer showing peeks of the January – March kits. And don’t miss the special add-on that coordinates with all three months: the Beautiful Blooms Dies (#168666) — made available December 11th and only while supplies last! If you are not a Paper Pumpkin subscriber, I invite you to give it a try. CLICK HERE to learn more about Paper Pumpkin kits of creativity. CLICK HERE to sign up by March 10th for this next kit.
PAPER PUMPKIN CREATIVES TUTORIAL BUNDLES Our Paper Pumpkin Creatives Design Team is excited to share that our January 2026 Special Delivery Bundle of Tutorials is now available. Visit HERE for more information. Visit HERE to get to my Tutorials/Classes for Sale page to purchase and to see others offered. (The next one featuring the Celebrate Spring kit will be available March 1st.)
ALL STAR VIDEO CLASS BUNDLES Our All Star Design Team is excited to share that our February 2026 Lovely & Beautiful Video Class Bundle is now available. Visit HERE for more information. Visit HERE to get to my Tutorials/Classes for Sale page to purchase and to see others offered. (The next one featuring the Cute As a Bug Suite will be available March 1st.)
PRODUCT CHANGES ARE HERE The cling stamp line (red rubber stamp line) is being phased out. Stampin’ Up! is transitioning into sleeker, slimmer packaging for stamps and dies. More details about these changes can be found here. Two videos where I share tips/ideas for the new stamp & die packaging can be found here.
Stampin’ Up!® Products Available to Even More Crafters Throughout the World Stampin’ Up! products are now available to “Non-Open Stampin’ Up! Countries.” Effective immediately, and under specific conditions, current Stampin’ Up! products can now be purchased by crafters in most countries where we do not currently conduct business. It’s so exciting that we can now make a positive difference in the lives of even more people around the world through creativity and connection. You can find the full details and conditions here.
The Beautiful Blues Kit from the Kits Collection has the perfect imagery for this new fun fold card. So I pulled this kit out again and assembled today’s card. I’m calling it the Museum Gallery Fold because when open it looks like there are three panels of artwork set back behind protective barriers. These “barriers” actually help to hold the card upright and give the card added unique dimension. The pattened card bases and other elements in this kit worked great for the artwork, the sentiment layer in the middle and the sentiment and accent foliage on the lower left (on the front of the card when closed).
I actually created two other cards with the Beautiful Gallery Designer Paper prior to assembling this sample card. But this one is more simplified, so I thought I’d share it with you first.
Be sure to watch my instructional video by clicking here* (or you can just click on this image below if you are already here in my blog post and can view it), scroll through the photos that follow, check out the measurements & products list below, and then let me know if you have any questions.
*My video goes live at 11 AM Central Time. So if you click the link early, you’ll have to wait. But by releasing my blog post early, it also gives you the chance to join the me during the Live if you are able.
I hope you enjoyed what I shared in this video.
Below are photos of my card, a visual list of products (each linked to where you can find them in my online store), and measurements for what I demonstrated. Subscribe to my YouTube channel then click on the bell next to the subscribe button and set notifications to “all” so you can get updates when I share and when I go live. Click here if you want to become a member of my YouTube channel.
Click here to access and download a printable “measurements & supplies” sheet.
Measurements…
White Willow Cardstock
5-1/2” x 10-1/2” scored at 3-1/2” and 7”
(2) 1-1/4” x 7” scored at 1-3/4”, 2-1/2”, 4-1/4″, 6” and 6-3/4”
1-1/4” x 5” scored at 3/4”, 2-1/2” and 4-1/4”
Night of Navy Cardstock
3-1/4” x 5-1/4”
Silver Foil
(2) 3-1/4” x 5-1/4
3/4” x 3-1/8”
Kit card floral layers
3-1/8” x 5-1/8” (1 with light background, 2 with dark background)
Here are close-up photos of the finished card. This first photo shows the card closed at 4-1/4″ wide by 5-1/2″ tall – the perfect size for our A2 medium envelopes (which you would get in the Beautiful Blues kit. Notice that this is where the accents with lift and dimension would be.
But watch where you glue things down.
Here is a bottom view of the card folded.
And here is the gorgeous artwork panel space that you can fit in this creative fold! Be sure to subscribe to my posts so that you can see more of these Museum Gallery Fold cards that I’ll be sharing soon.
I just love how they are free standing.
And you could either sign the card along the white strips here or on the back sides.
Thanks for tuning in today. I hope I inspired your creativity.
Click here to shop my online store. Click here to access & view the current catalogs. Click here to shop My Favorite Extras. Click here to subscribe to those fun Paper Pumpkin kits of creativity! Click here to learn about my Loyalty Rewards program. You can earn free stamps just for shopping with me! Click here to learn more about joining my Stampers With ART community. Get the MOST rewards including a discount on future products! Follow me on social media! I share regularly on Pinterest, YouTube, Instagram, my Facebook Page, and my Facebook Group! Please subscribe to my blog, too!Click here and enter your email in the blue box (above the butterfly).
(FYI…The manufacturer of our Paper Snips Scissors (103579) is no longer making this product and it has sold out. Stampin’ Up!® is currently exploring alternative manufacturing options and hope to bring this or a similar product back in the future.)
FREE SHIPPING FEBRUARY 18-20! This Wednesday, Thursday and Friday you can take advantage of FREE shipping with orders of $75 or more (before shipping and tax). Click here for the details. Then click HERE to shop and save during the promotion period!
THE NEW STAMPIN’ POSITIONER & GREAT JOIN OFFER IS HERE! From Feb 3 to Mar 2 this tool will be added as a free gift to all Starter Kit orders!!! It’s a great time to join! Click here for an informative flyer. Click here for an even more informative video. Click here for more information on my website. And click HERE to purchase your amazing Starter Kit! Yay!
REDEEM THOSE BONUS DAYS COUPONS! If you earned Bonus Days coupons from your purchase/s January 6 through February 2, you may now redeem those coupons! Shop between February 3 and 28 and add your coupon codes to save. Click here for the flyer with a more detailed explanation. Click here to watch Stampin’ Up!’s promotion video.
PRODUCT OF THE MONTH Introducing Stampin’ Up!’s February 2026 POM: PAINTED ILLUSIONS DESIGNER PAPER. Add this to your shopping cart for just $5 when you place a $75+ orderduring this month of February 2026! Click here for details. Click HERE to shop my online store and place your order online. Because the POM items are some of the best Stampin’ Up! has to offer and because there will be a limited quantity, they are likely to sell out quickly. Once they’re sold out, they’re gone for good! (The March POM will release March 3.)
LAST CHANCE PRODUCTS Every two months retiring products get added to the Last Chance Products List in the Online Store. Some are not discounted, but some are and can be up to 60% off. I encourage you to shop today to see what is leaving, because once an item from this section is sold out, it is gone for good. Items were added on February 3rd!
ONLINE EXCLUSIVES NEWS So MANY fantastic products are only available in the Online Exclusives section of the Online Store! You won’t find Online Exclusives products in any catalog. New products release every two months. The next set of products will debut March 3.
NEWKITS FROM THE KITS COLLECTION! New kits are added to the Kits Collection at the start of each month. Visit the Kits Collection to see the most recent additions.
A PEEK AT MARCH’S PAPER PUMPKIN KIT Fluttering Garden: Create charming cards with a hummingbird motif for Mother’s Day and more! Makes 9 cards: 3 each of 3 designs with 9 coordinating envelopes. The kit also includes precut paper pieces & sentiments, textured white card bases, and an EXTRA free stamp stamp (which has become a tradition with the March kits – a kit you never want to miss!). Coordinating Colors: Basic Gray (Classic Stampin’ Spot), Coastal Cabana, Early Espresso, Gorgeous Grape, Old Olive, Peach Pie, Pretty Peacock. Click here for a flyer showing peeks of the January – March kits. And don’t miss the special add-on that coordinates with all three months: the Beautiful Blooms Dies (#168666) — made available December 11th and only while supplies last! If you are not a Paper Pumpkin subscriber, I invite you to give it a try. CLICK HERE to learn more about Paper Pumpkin kits of creativity. CLICK HERE to sign up by March 10th for this next kit.
PAPER PUMPKIN CREATIVES TUTORIAL BUNDLES Our Paper Pumpkin Creatives Design Team is excited to share that our January 2026 Special Delivery Bundle of Tutorials is now available. Visit HERE for more information. Visit HERE to get to my Tutorials/Classes for Sale page to purchase and to see others offered. (The next one featuring the Celebrate Spring kit will be available March 1st.)
ALL STAR VIDEO CLASS BUNDLES Our All Star Design Team is excited to share that our February 2026 Lovely & Beautiful Video Class Bundle is now available. Visit HERE for more information. Visit HERE to get to my Tutorials/Classes for Sale page to purchase and to see others offered. (The next one featuring the Cute As a Bug Suite will be available March 1st.)
PRODUCT CHANGES ARE HERE The cling stamp line (red rubber stamp line) is being phased out. Stampin’ Up! is transitioning into sleeker, slimmer packaging for stamps and dies. More details about these changes can be found here. Two videos where I share tips/ideas for the new stamp & die packaging can be found here.
Stampin’ Up!® Products Available to Even More Crafters Throughout the World Stampin’ Up! products are now available to “Non-Open Stampin’ Up! Countries.” Effective immediately, and under specific conditions, current Stampin’ Up! products can now be purchased by crafters in most countries where we do not currently conduct business. It’s so exciting that we can now make a positive difference in the lives of even more people around the world through creativity and connection. You can find the full details and conditions here.
Dies that only partially cut are so amazing and can bring so much unique texture and beauty to your paper crafting projects. I used these dies to make some simple and elegant greeting cards. And today I went live on YouTube to share how I made them. I used the Beautiful Motifs Dies, Scenic Adventure Dies, Extraordinary Flora Dies and Washi Tape, Pearls & Rhinestones altered with Blends Markers, sentiments from The Right Words Stamp Set, and other Stampin’ Up!® product.
And now I’m sharing that video here in my blog post. Be sure to watch the video by clicking here (or you can just click on this image below if you can view it), scroll through the photos that follow, check out the measurements & products list below, and then let me know if you have any questions.
I hope you enjoyed what I shared in this video.
Below are photos of my cards, a visual list of products (each linked to where you can find them in my online store), and measurements for what I demonstrated. Please subscribe to my YouTube channel so you can get updates when I share and go live.
Click here to access and download a printable “measurements & supplies” sheet.
Measurements…
Basic White Cardstock:
5-1/2” x 8-1/2” scored parallel to the short side at 4-1/4”
(2) 4-1/8” x 5-3/8”
A quarter sheet of cardstock scrap for the washi tape images
Any scraps for sentiments
I hope you enjoyed what I shared today! Subscribe to my YouTube channel then click on the bell next to the subscribe button and set notifications to “all” so you can get updates when I share and when I go live. Click here if you want to become a member of my YouTube channel.
I share videos (Lives or pre-recorded) one or two times a week – Wednesdays at 11 AM Central Time and typically either Fridays or Saturdays. Here are next ones I have on my calendar:
June 14, Saturday at 10 AM* – —short break because of crafting sale—
June 25, Wednesday at 11 AM* –
June 28, Friday at 10 AM* – YouTube Members-Only Live (for aRT Supporter members)
July 2, Wednesday at 11 AM* –
*Central Time
STAMP-N-STORAGE JUNE 2025 MEGA SALE!
Stamp-n-Storage is hosting a Mega Sale today, June 11th through June 16th!! This is a great time to bring more organization to your crafting space.
*Free Shipping applies to orders in the domestic 48 US states and excludes the Craft Island, Stamp Case Tower, and Die Cutting & Embossing Station
Click here to shop my online store. Click here to access & view the current catalogs. Click here to shop My Favorite Extras. Click here to subscribe to those fun Paper Pumpkin kits of creativity! Click here to learn about my Loyalty Rewards program. You can earn free stamps just for shopping with me! Click here to learn more about joining my Stampers With ART community. Get the MOST rewards including a discount on future products! Follow me on social media! I share regularly on Pinterest, YouTube, Instagram, my Facebook Page, and my Facebook Group! Please subscribe to my blog, too!Click here and enter your email in the blue box (above the butterfly).
FREE SHIPPING FEBRUARY 18-20! This Wednesday, Thursday and Friday you can take advantage of FREE shipping with orders of $75 or more (before shipping and tax). Click here for the details. Then click HERE to shop and save during the promotion period!
THE NEW STAMPIN’ POSITIONER & GREAT JOIN OFFER IS HERE! From Feb 3 to Mar 2 this tool will be added as a free gift to all Starter Kit orders!!! It’s a great time to join! Click here for an informative flyer. Click here for an even more informative video. Click here for more information on my website. And click HERE to purchase your amazing Starter Kit! Yay!
REDEEM THOSE BONUS DAYS COUPONS! If you earned Bonus Days coupons from your purchase/s January 6 through February 2, you may now redeem those coupons! Shop between February 3 and 28 and add your coupon codes to save. Click here for the flyer with a more detailed explanation. Click here to watch Stampin’ Up!’s promotion video.
PRODUCT OF THE MONTH Introducing Stampin’ Up!’s February 2026 POM: PAINTED ILLUSIONS DESIGNER PAPER. Add this to your shopping cart for just $5 when you place a $75+ orderduring this month of February 2026! Click here for details. Click HERE to shop my online store and place your order online. Because the POM items are some of the best Stampin’ Up! has to offer and because there will be a limited quantity, they are likely to sell out quickly. Once they’re sold out, they’re gone for good! (The March POM will release March 3.)
LAST CHANCE PRODUCTS Every two months retiring products get added to the Last Chance Products List in the Online Store. Some are not discounted, but some are and can be up to 60% off. I encourage you to shop today to see what is leaving, because once an item from this section is sold out, it is gone for good. Items were added on February 3rd!
ONLINE EXCLUSIVES NEWS So MANY fantastic products are only available in the Online Exclusives section of the Online Store! You won’t find Online Exclusives products in any catalog. New products release every two months. The next set of products will debut March 3.
NEWKITS FROM THE KITS COLLECTION! New kits are added to the Kits Collection at the start of each month. Visit the Kits Collection to see the most recent additions.
A PEEK AT MARCH’S PAPER PUMPKIN KIT Fluttering Garden: Create charming cards with a hummingbird motif for Mother’s Day and more! Makes 9 cards: 3 each of 3 designs with 9 coordinating envelopes. The kit also includes precut paper pieces & sentiments, textured white card bases, and an EXTRA free stamp stamp (which has become a tradition with the March kits – a kit you never want to miss!). Coordinating Colors: Basic Gray (Classic Stampin’ Spot), Coastal Cabana, Early Espresso, Gorgeous Grape, Old Olive, Peach Pie, Pretty Peacock. Click here for a flyer showing peeks of the January – March kits. And don’t miss the special add-on that coordinates with all three months: the Beautiful Blooms Dies (#168666) — made available December 11th and only while supplies last! If you are not a Paper Pumpkin subscriber, I invite you to give it a try. CLICK HERE to learn more about Paper Pumpkin kits of creativity. CLICK HERE to sign up by March 10th for this next kit.
PAPER PUMPKIN CREATIVES TUTORIAL BUNDLES Our Paper Pumpkin Creatives Design Team is excited to share that our January 2026 Special Delivery Bundle of Tutorials is now available. Visit HERE for more information. Visit HERE to get to my Tutorials/Classes for Sale page to purchase and to see others offered. (The next one featuring the Celebrate Spring kit will be available March 1st.)
ALL STAR VIDEO CLASS BUNDLES Our All Star Design Team is excited to share that our February 2026 Lovely & Beautiful Video Class Bundle is now available. Visit HERE for more information. Visit HERE to get to my Tutorials/Classes for Sale page to purchase and to see others offered. (The next one featuring the Cute As a Bug Suite will be available March 1st.)
PRODUCT CHANGES ARE HERE The cling stamp line (red rubber stamp line) is being phased out. Stampin’ Up! is transitioning into sleeker, slimmer packaging for stamps and dies. More details about these changes can be found here. Two videos where I share tips/ideas for the new stamp & die packaging can be found here.
Stampin’ Up!® Products Available to Even More Crafters Throughout the World Stampin’ Up! products are now available to “Non-Open Stampin’ Up! Countries.” Effective immediately, and under specific conditions, current Stampin’ Up! products can now be purchased by crafters in most countries where we do not currently conduct business. It’s so exciting that we can now make a positive difference in the lives of even more people around the world through creativity and connection. You can find the full details and conditions here.
Yesterday I went Live on YouTube and shared how I altered the Beautiful Blues Kits Collection Kit to get almost three times as many cards.
And now I’m sharing that video here in my blog post. Be sure to watch the video by clicking here (or you can just click on this image below if you can view it), scroll through the photos that follow, check out the measurements & products list below, and then let me know if you have any questions.
I hope you enjoyed what I shared in this video.
Below are some photos, a visual list of products (each linked to where you can find them in my online store), and measurements for what I demonstrated. Please subscribe to my YouTube channel so you can get updates when I share and go live.
Click here to access and download a printable “measurements & supplies” sheet.
Measurements for one set of 8 cards (made from one set of the three kit cards)…
Night of Navy Cardstock
(6) 5-1/2” x 8-1/2” scored at 4-1/4”
(2) 4-1/4” x 5-1/2”
Kit envelopes
(2) flaps trimmed to 5-3/8”
Fussy-cut images from another flap
(2) 4-1/8” x 5-3/8” white layers
(2) 4-1/8” x 2-3/4”
(3) 3-1/4” x 4-1/2”
Lighter/brighter blue kit card
4-1/4” x 4-1/4”
1/2” x 4-1/4”
3/8” x 4-1/4”
3-1/2” x 5-1/2”
3/4” x 5-1/2”
Kit card with white flowers on blue
(2) 4-1/4” x 5-1/2”
Kit card with blue flowers on white
2-1/2” x 8-1/2”
3” x 8-1/2”
Here are photos of the finished cards.
Altering the parts and pieces from a pre-choreographed kit of cards to make different or additional cards is one of my favorite creative activities! I hope you enjoyed what I shared!
Subscribe to my YouTube channel then click on the bell next to the subscribe button and set notifications to “all” so you can get updates when I share and when I go live. Click here if you want to become a member of my YouTube channel. I share videos (Lives or pre-recorded) one to two times a week – Wednesdays at 11 AM Central Time and sometimes either Fridays or Saturdays. Click here for my calendar to see the when my next ones are scheduled.
INTRODUCING STAMPIN’ UP’S DEBUT VIRTUAL ALBUM RETREAT 2025
Introducing a fun, new event…the Virtual Album Retreat 2025, a three-day event hosted by Stampin’ Up! where we will create 12 scrapbook spreads using the Month by Month Album Retreat 2025 kit, learn new techniques, and connect and create with fellow crafters and Stampin’ Up! staff. There will also be some fun giveaways! I’m attending. Will you join me?
When: July 16–18, 2025, 2:00–10:30 p.m. (MT)
Where: Private Facebook Group
After the Event: You can access the recorded event videos on the Virtual Album Retreat Facebook group page any time you want (lifetime access) & even watch over and over if desired.
Registration: There is no registration for this event! Instead…by purchasing the Month by Month Album Retreat 2025 kit (167338), you’ll get access to an exclusive Facebook group where the live event will stream.
Price of Month by Month Album Retreat 2025 kit: $250 USD | $340 CAD
Includes: Exclusive stamp sets, designed precut sheets, cardstock, embellishments, and more to make 12 two-page layouts
Language of Event: This event will be presented in English only.
🎉 Bonuses for purchasing through me: Five Loyalty Reward points, access to either the May or the June All Star Video Class Bundle, and an entry to win either the D-Ring Album or the Post Album. (Winner chooses which one they want….one album drawn for every 5 attendees purchasing through me, so that gives each person a 20% chance of winning!) AND keep in mind you will earn 10% ($25) in Stampin’ Rewards to put towards a future order!!
Ordering Begins: May 28, 2025 (Kits are only available while supplies last, so be sure to order ASAP! And you’ll want to order early to make sure you get your products in time for the event, right! Here is a list of additional tools and supplies you will need)
Reach out if you have any questions.
*This kit does not include an album.
STAMP-N-STORAGE MEMORIAL DAY SALE!
Now is a great time to put added organization into your crafting space. Take advantage of Stamp-n-Storage‘s Memorial Day Sale to save 10% storewide and 20% on all carousels! Click here to shop and save. But hurry sale only lasts May 23-26, 2025.
Click here to shop my online store. Click here to access & view the current catalogs. Click here to shop My Favorite Extras. Click here to subscribe to those fun Paper Pumpkin kits of creativity! Click here to learn about my Loyalty Rewards program. You can earn free stamps just for shopping with me! Click here to learn more about joining my Stampers With ART community. Get the MOST rewards including a discount on future products! Follow me on social media! I share regularly on Pinterest, YouTube, Instagram, my Facebook Page, and my Facebook Group! Please subscribe to my blog, too!Click here and enter your email in the blue box (above the butterfly).
FREE SHIPPING FEBRUARY 18-20! This Wednesday, Thursday and Friday you can take advantage of FREE shipping with orders of $75 or more (before shipping and tax). Click here for the details. Then click HERE to shop and save during the promotion period!
THE NEW STAMPIN’ POSITIONER & GREAT JOIN OFFER IS HERE! From Feb 3 to Mar 2 this tool will be added as a free gift to all Starter Kit orders!!! It’s a great time to join! Click here for an informative flyer. Click here for an even more informative video. Click here for more information on my website. And click HERE to purchase your amazing Starter Kit! Yay!
REDEEM THOSE BONUS DAYS COUPONS! If you earned Bonus Days coupons from your purchase/s January 6 through February 2, you may now redeem those coupons! Shop between February 3 and 28 and add your coupon codes to save. Click here for the flyer with a more detailed explanation. Click here to watch Stampin’ Up!’s promotion video.
PRODUCT OF THE MONTH Introducing Stampin’ Up!’s February 2026 POM: PAINTED ILLUSIONS DESIGNER PAPER. Add this to your shopping cart for just $5 when you place a $75+ orderduring this month of February 2026! Click here for details. Click HERE to shop my online store and place your order online. Because the POM items are some of the best Stampin’ Up! has to offer and because there will be a limited quantity, they are likely to sell out quickly. Once they’re sold out, they’re gone for good! (The March POM will release March 3.)
LAST CHANCE PRODUCTS Every two months retiring products get added to the Last Chance Products List in the Online Store. Some are not discounted, but some are and can be up to 60% off. I encourage you to shop today to see what is leaving, because once an item from this section is sold out, it is gone for good. Items were added on February 3rd!
ONLINE EXCLUSIVES NEWS So MANY fantastic products are only available in the Online Exclusives section of the Online Store! You won’t find Online Exclusives products in any catalog. New products release every two months. The next set of products will debut March 3.
NEWKITS FROM THE KITS COLLECTION! New kits are added to the Kits Collection at the start of each month. Visit the Kits Collection to see the most recent additions.
A PEEK AT MARCH’S PAPER PUMPKIN KIT Fluttering Garden: Create charming cards with a hummingbird motif for Mother’s Day and more! Makes 9 cards: 3 each of 3 designs with 9 coordinating envelopes. The kit also includes precut paper pieces & sentiments, textured white card bases, and an EXTRA free stamp stamp (which has become a tradition with the March kits – a kit you never want to miss!). Coordinating Colors: Basic Gray (Classic Stampin’ Spot), Coastal Cabana, Early Espresso, Gorgeous Grape, Old Olive, Peach Pie, Pretty Peacock. Click here for a flyer showing peeks of the January – March kits. And don’t miss the special add-on that coordinates with all three months: the Beautiful Blooms Dies (#168666) — made available December 11th and only while supplies last! If you are not a Paper Pumpkin subscriber, I invite you to give it a try. CLICK HERE to learn more about Paper Pumpkin kits of creativity. CLICK HERE to sign up by March 10th for this next kit.
PAPER PUMPKIN CREATIVES TUTORIAL BUNDLES Our Paper Pumpkin Creatives Design Team is excited to share that our January 2026 Special Delivery Bundle of Tutorials is now available. Visit HERE for more information. Visit HERE to get to my Tutorials/Classes for Sale page to purchase and to see others offered. (The next one featuring the Celebrate Spring kit will be available March 1st.)
ALL STAR VIDEO CLASS BUNDLES Our All Star Design Team is excited to share that our February 2026 Lovely & Beautiful Video Class Bundle is now available. Visit HERE for more information. Visit HERE to get to my Tutorials/Classes for Sale page to purchase and to see others offered. (The next one featuring the Cute As a Bug Suite will be available March 1st.)
PRODUCT CHANGES ARE HERE The cling stamp line (red rubber stamp line) is being phased out. Stampin’ Up! is transitioning into sleeker, slimmer packaging for stamps and dies. More details about these changes can be found here. Two videos where I share tips/ideas for the new stamp & die packaging can be found here.
Stampin’ Up!® Products Available to Even More Crafters Throughout the World Stampin’ Up! products are now available to “Non-Open Stampin’ Up! Countries.” Effective immediately, and under specific conditions, current Stampin’ Up! products can now be purchased by crafters in most countries where we do not currently conduct business. It’s so exciting that we can now make a positive difference in the lives of even more people around the world through creativity and connection. You can find the full details and conditions here.
My December Paper Pumpkin kit arrived Wednesday afternoon, and I designed my first set of alternate projects yesterday using the contents of this card kit and a bit of other coordinating product! I’ll share three ideas today. I’ll share more on January 10th for the “A Paper Pumpkin Thing.” And one more idea I’m keeping exclusive to contribute to the collection of exclusives my Paper Pumpkin Creatives Team is currently compiling…projects we will share just with our personal Paper Pumpkin subscribers and team members (more details below).
Here are the consumable supplies (minus the stamp set and ink) that come with this kit.
This kit has enough supplies to make 9 beautiful cards (3 of 3 kinds). Do you want to make them as intended? Click here for a link to Stampin’ Up!’s how-to video.
But I never assemble my kits as is, because I like to show kit recipients other ways to use their supplies. I like to think outside the box, see what else I can come up with, and create alternate cards, scrapbook pages, and more. So today I’m sharing with you three fun fold cards.
Watch my videohere to get to get measurements, directions, and tips (or you can just click on this image below if you are already in my blog post). Scroll down to see close-up photos, access the links that I mentioned in my video, and see a list of extra supplies (linked to my online store) that I used to make my creations. Then be sure to visit my blog again soon, because I’ll have many more alternate projects that I’ll be sharing in future posts!
I hope you enjoyed what I shared and gained some creative inspiration! Below are close-up photos of the alternate projects I made and shared in my video. (Remember to watch my video first to get measurements, tips and directions.)
**Products that I’ve shared or mentioned are shown/listed below and are currently linked to my online store.
Bend Open Pocket Card
(This is the one I demonstrated in the live video.)
Split Window Card
(This is the one I demonstrated in the live video. I ended up trimming both sides to equal out the look and “correct” my mistake.)
SquareColumn Fold Card
(This is the one I demonstrated in the live video for those who don’t own a die-cutting and embossing machine.)
If you did not get this kit, I hope you can apply these ideas to products you already own. OR…become an active subscriber and get in on the refill kit. (The refill typically shows up in the online store soon after the 20th.) It doesn’t contain the ink and stamp images. But you will at least gain the main pieces and can hopefully replace most of the stamp images I used with some of your own.
If you are not a Paper Pumpkin subscriber, I invite you to give it a try. CLICK HERE to learn more. CLICK HERE to sign up by January 10th for this next kit.
A PEEK AT JANUARY’S PAPER PUMPKIN KIT Hearts For You: Create heartfelt cards for Valentine’s Day, Galentine’s Day, and beyond! Makes 9 cards: 3 of 3 designs. The kit also includes heart-shaped precut pieces and stickers, twine, and heart gem embellishments. Coordinating colors: Flirty Flamingo, Petal Pink, Real Red (Classic Stampin’ Spot). Click here for a flyer showing peeks of the January – March kits. And don’t miss the special add-on that coordinates with all three months: the Spring Is in the Air Dies (#166237) — made available December 11th and only while supplies last!
I am partnering with ALL these talented Stampin’ Up! demonstrators to create alternate projects each month using the contents of the Paper Pumpkin kits. These exclusive projects are within printable PDF tutorials and include measurements, supply lists, photos and directions. They are shared as a FREE bonus gift to our Paper Pumpkin kit subscribers and team members.
Our Sept-Dec 2024 Paper Pumpkin Creatives team includes:
I’m planning my next Online Paper Crafting Classes to be:
Friday, December 20, 2024 at 11 AM Central Time
Nothing next Wednesday
Saturday, December 28, 2024 at 10 AM (YouTube channel supporters only)
Thursday, January 2, 2024 at 11 AM Central Time
Click here to shop my online store. Click here to access & view the current catalogs. Click here to shop My Favorite Extras. Click here to subscribe to those fun Paper Pumpkin kits of creativity! Click here to learn about my Loyalty Rewards program. You can earn free stamps just for shopping with me! Click here to learn more about joining my Stampers With ART community. Get the MOST rewards including a discount on future products! Follow me on social media! I share regularly on Pinterest, YouTube, Instagram, my Facebook Page, and my Facebook Group! Please subscribe to my blog, too!Click here and enter your email in the blue box (above the butterfly).
Products…things you might need/want in addition to the December 2024 Paper Pumpkin kit
LAST CHANCE PRODUCTS There is now a new section called Last Chance Products in the Online Store and it includes all retiring products from any online releases and any catalogs including the outgoing September-December 2024 Mini Catalog. If you don’t see an item from that catalog in that section, it could be that the item is either already sold out OR that the item will continue to be made available and has instead been added to the Online Exclusives products.
DESIGNER PAPER RETURNS WITH FRESH NEW COLORS! Stampin’ Up! is offering three previously released Designer Series Papers with fresh, new colors – some of our best-selling colors! The products debuted in the Online Exclusives section of the Online Store on December 3rd and are available while supplies last. Click here for the downloadable flyer. Click here and scroll down for a bit more detail.
ONLINE EXCLUSIVES NEWS– MORE NEW ITEMS ARE COMING SOON! You won’t find Online Exclusives products in any catalog or publication. So be sure to visit this link to shop today. New items were just released November 5th. AND… every 2 months you’ll see even MORE added. In fact, here is a teaser flyer sharing peeks at some of the new products debuting on January 7th. (All Online Exclusives products are always available while supplies last.)
A PEEK AT JANUARY’S PAPER PUMPKIN KIT Hearts For You: Create heartfelt cards for Valentine’s Day, Galentine’s Day, and beyond! Makes 9 cards: 3 of 3 designs. The kit also includes heart-shaped precut pieces and stickers, twine, and heart gem embellishments. Coordinating colors: Flirty Flamingo, Petal Pink, Real Red (Classic Stampin’ Spot). Click here for a flyer showing peeks of the January – March kits. And don’t miss the special add-on that coordinates with all three months: the Spring Is in the Air Dies (#166237) — made available December 11th and only while supplies last! If you are not a Paper Pumpkin subscriber, I invite you to give it a try. CLICK HERE to learn more. CLICK HERE to sign up by January 10th for this next kit.
KITS COLLECTION: PERPETUAL BEAUTY CALENDAR & CHERRY BLOSSOM TREAT BOXESKITS ADDED These are the kits that were most recently added to the Kits Collection! Click here and scroll down for more details.
ALL STAR VIDEO CLASSES I’m a designer with the All Stars, a group of globally recognized Stampin’ Up! demonstrators. And we are excited to share exclusively with our customers, paper crafting friends & team members our December 2024 Regal Winter Suite Video Class Bundle which is now available. Click here for more information. Click here to get to my Tutorials/Classes for Sale page to see others that have been offered. The next one featuring the Marbled Elegance Suite from the Online Exclusives products will be available January 1st.
The card I put together to share with you today shows off the beauty of this set by making it a strong focal point on the card. Not only is the image standing within a triple-layered white circle, but the embellishments (ribbon and rhinestones) draw your eyes in. And then I made sure to ink the Distinktive image carefully with both colors (see tips below).
Products I used… See below for a complete list of products linked to where you can find them in my online store.
Measurements
Basic White Thick Cardstock
4-1/4” x 11″ scored parallel to short side at 5-1/2”
Scrap for stamping and punching a 2-3/8″ Circle
Scraps for die-cutting a 2-1/2″ and 3″ stitched circles.
Softly Stippled Designer Paper
4” x 5-1/4”
Night of Navy Cardstock
3/8″ x 4”
Silver & White Sheer Ribbon
(2) 3″
8″
Directions
First test your inks with the stamp image. As you can see in my 12/13/23 “product peeks” video around the 1:04:40 mark, I found that my Shaded Spruce ink was pretty perfectly inked. I was able to ink that half of the image directly with the pad lining up the base of the ground with the edge of the pad. But my Misty Moonlight ink pad was a bit juicier. So I applied that blue color afterwards with a Dauber.
Remoisten the ink on the stamp by exhaling onto it. Then stamp the two-toned image onto your scrap of Basic White and punch it out with the 2-3/8″ Circle Punch.
Die-cut the 2-1/2″ and 3″ stitched circles using the Stylish Shapes Dies.
Stamp the sentiment images inside the base card piece. Using Seal Adhesive adhere the designer paper to the front, the largest stitched circle on top of that (about 1″ from the base and 1/4″ in from the right of the designer paper layer), and the Night of Navy strip (so it passes horizontally through the middle of the circle).
Wrap the long ribbon from the inside of the card across the front (over the top of the navy strip), and tape the ends down in the center of the large circle with a couple pieces of Tear & Tape.
Adhere with Seal or Tear & Tape the shorter two strands of ribbon so they go beyond the white circle. Trim the ends at angles.
Conceal all the taped ribbon ends by adding the medium 2-1/2″ stitched circle on top of the larger one using Dimensionals. Attach the stamped circle to the 2-1/2″ one. Be sure the horizon runs parallel to the top and bottom edges of the card and parallel to the navy strip.
Finish by adding a few Rhinestones.
This is one of those sets that I will keep in my collection forever. I love all the sentiment options. And the imagery is just stunning. I hope you were inspired by what I shared. Need more inspiration from this stamp set? Check out what I’ve pinned and saved so far to my 2024 Jan-April Mini Catalogboard on Pinterest.
*Fewer than 1% of Stampin’ Up!’s demonstrators worldwide achieve this result.
Click here to shop my online store. Click here to access & view the current catalogs. Click here to shop My Favorite Extras. Click here to subscribe to those fun Paper Pumpkin kits of creativity! Click here to learn about my Loyalty Rewards program. You can earn free stamps just for shopping with me! Click here to learn more about joining my Stampers With ART community. Get the MOST rewards including a discount on future products! Follow me on social media! I share regularly on Pinterest, YouTube, Instagram, my Facebook Page, and my Facebook Group! Please subscribe to my blog, too!Click here and enter your email in the blue box (above the butterfly).
SALE-A-BRATION 2024! The Sale-a-Bration promotion is here and runs January 4th through February 29th! Click here for all the details. Click here to view the online version of this new publication.Click here to see these new products online.
THE NEW JAN-APRIL 2024 MINI CATALOG! The new Jan-April 2024 Mini Catalog featuring lots of new products is here! Click here to view the online version of this new publication. Click here to shop these new products online.
KITS COLLECTION: PANDA FRIENDS & ROCK LEGEND KITS ADDED Two kits have been recently added to the Kits Collection! Click here and scroll down for more details.
STAMP-N-STORAGE JANUARY SALE & CELEBRATION To celebrate their 15-year anniversary Stamp-n-Storage is offering 15% off storewide* through the month of January 2024!! Visit their site to shop. They are also giving away 15 Golden Tickets at random this month to those that order. So check your shipment box. A Golden Ticket might be yours! *Sale excludes the Craft-n-Go Mini.
ONLINE EXCLUSIVES NEWS You won’t find Online Exclusives products in any catalog or publication. So be sure to visit this link to shop today. All Online Exclusives products are available while supplies last. New products were added in November.
A PEEK AT JANUARY’S PAPER PUMPKIN KIT Lovely Lavender Kit: Make love-themed cards for special occasions, Valentine’s Day, anniversaries, and more! Makes 8 cards: 4 each of 2 designs with 8 coordinating envelopes, includes 4 bonus tags that punch out from the card front, precut paper pieces, and linen thread. Coordinates with the Perennial Lavender Suite Collection (item 162613) debuting January 4. Coordinating colors: Garden Green, Pretty Peacock, Lost Lagoon, Highland Heather, Gorgeous Grape (Classic Stampin’ Spot) & Berry Burst. And don’t miss the special add-on that coordinates with all three months: the Love of Spring Dies Add-On (item 164396) —available beginning 11 December and only while supplies last! Click here for a flyer showing peeks of the Jan-March kits.
If you are not a Paper Pumpkin subscriber, I invite you to give it a try. CLICK HERE to learn more. CLICK HERE to sign up by January 10th for this next kit.
ALL STAR VIDEO CLASSES I’m a designer with the All Stars, a group of globally recognized Stampin’ Up! demonstrators. And we are excited to share exclusively with our customers, paper crafting friends & team members our January 2024 Lighter Than Air Suite Video Class Bundle which is now available. CLICK HERE for more information. Click here to get to my Tutorials/Classes for Sale page to see others that have been offered. The next one featuring the Perennial Lavender Suite from the Jan-Apr 2024 Mini Catalog will be available Feb 1st.
Stamp Your Art Out! Rachel Tessman Independent Demonstrator 763-502-6813
This is the best way to enjoy all that Stampin' Up! has to offer. Plus it's fun to be on the demonstrator side of things!
Subscribe to our monthly Paper Pumpkin crafting kits through me to enjoy exclusive ideas shared in PDF tutorials from the our PP Creatives team of Stampin’ Up! demonstrators.
I am an affiliate with Stamp-n-Storage which means I may get commissions if you click on links I provide and decide to purchase anything from this company. But this does not cost you anything extra to shop this way. I love their products and recommend them because I own several myself and believe you will benefit from them.
Recent Achievements
#8 Overall
#8 in Leadership
#11 in Sales
#6 in Team Building
2025 Incentive Trip Achiever (My 20th trip earned will be an Alaskan Cruise in 2026!)


![Branching Out Photopolymer Stamp Set (English) [ 165771 ]](https://i0.wp.com/assets1.tamsnetwork.com/images/EC042017NF/165771s.jpg?w=100&ssl=1 "Branching Out Photopolymer Stamp Set (English) [ 165771 ]")
![Happy Place Cling Stamp Set (English) [ 165966 ]](https://i0.wp.com/assets1.tamsnetwork.com/images/EC042017NF/165966s.jpg?w=100&ssl=1 "Happy Place Cling Stamp Set (English) [ 165966 ]")
![Prairie Grass Cling Stamp Set (English) [ 166168 ]](https://i0.wp.com/assets1.tamsnetwork.com/images/EC042017NF/166168s.jpg?w=100&ssl=1 "Prairie Grass Cling Stamp Set (English) [ 166168 ]")
![Basic White 8 1/2" X 11" Cardstock [ 166780 ]](https://i0.wp.com/assets1.tamsnetwork.com/images/EC042017NF/166780s.jpg?w=100&ssl=1 "Basic White 8 1/2\" X 11\" Cardstock [ 166780 ]")
![Basic White 8 1/2" X 11" Thick Cardstock [ 159229 ]](https://i0.wp.com/assets1.tamsnetwork.com/images/EC042017NF/159229s.jpg?w=100&ssl=1 "Basic White 8 1/2\" X 11\" Thick Cardstock [ 159229 ]")
![Basic Black 8-1/2" X 11" Cardstock [ 121045 ]](https://i0.wp.com/assets1.tamsnetwork.com/images/EC042017NF/121045s.jpg?w=100&ssl=1 "Basic Black 8-1/2\" X 11\" Cardstock [ 121045 ]")
![Gold Foil Sheets [ 132622 ]](https://i0.wp.com/assets1.tamsnetwork.com/images/EC042017NF/132622s.jpg?w=100&ssl=1 "Gold Foil Sheets [ 132622 ]")
![Basic White Medium Envelopes [ 159236 ]](https://i0.wp.com/assets1.tamsnetwork.com/images/EC042017NF/159236s.jpg?w=100&ssl=1 "Basic White Medium Envelopes [ 159236 ]")
![Tuxedo Black Memento Ink Pad [ 132708 ]](https://i0.wp.com/assets1.tamsnetwork.com/images/EC042017NF/132708s.jpg?w=100&ssl=1 "Tuxedo Black Memento Ink Pad [ 132708 ]")
![Azure Afternoon Classic Stampin' Pad [ 161663 ]](https://i0.wp.com/assets1.tamsnetwork.com/images/EC042017NF/161663s.jpg?w=100&ssl=1 "Azure Afternoon Classic Stampin' Pad [ 161663 ]")
![Blueberry Bushel Classic Stampin' Pad [ 147138 ]](https://i0.wp.com/assets1.tamsnetwork.com/images/EC042017NF/147138s.jpg?w=100&ssl=1 "Blueberry Bushel Classic Stampin' Pad [ 147138 ]")
![Gorgeous Grape Classic Stampin' Pad [ 147099 ]](https://i0.wp.com/assets1.tamsnetwork.com/images/EC042017NF/147099s.jpg?w=100&ssl=1 "Gorgeous Grape Classic Stampin' Pad [ 147099 ]")
![Timid Tiger Classic Stampin' Pad [ 165278 ]](https://i0.wp.com/assets1.tamsnetwork.com/images/EC042017NF/165278s.jpg?w=100&ssl=1 "Timid Tiger Classic Stampin' Pad [ 165278 ]")
![Crushed Curry Classic Stampin' Pad [ 147087 ]](https://i0.wp.com/assets1.tamsnetwork.com/images/EC042017NF/147087s.jpg?w=100&ssl=1 "Crushed Curry Classic Stampin' Pad [ 147087 ]")
![Cajun Craze Classic Stampin' Pad [ 147085 ]](https://i0.wp.com/assets1.tamsnetwork.com/images/EC042017NF/147085s.jpg?w=100&ssl=1 "Cajun Craze Classic Stampin' Pad [ 147085 ]")
![Coastal Cabana Classic Stampin' Pad [ 147097 ]](https://i0.wp.com/assets1.tamsnetwork.com/images/EC042017NF/147097s.jpg?w=100&ssl=1 "Coastal Cabana Classic Stampin' Pad [ 147097 ]")
![Pretty In Pink Classic Stampin Pad [ 163807 ]](https://i0.wp.com/assets1.tamsnetwork.com/images/EC042017NF/163807s.jpg?w=100&ssl=1 "Pretty In Pink Classic Stampin Pad [ 163807 ]")
![Blending Brushes [ 153611 ]](https://i0.wp.com/assets1.tamsnetwork.com/images/EC042017NF/153611s.jpg?w=100&ssl=1 "Blending Brushes [ 153611 ]")
![Small Blending Brushes [ 160518 ]](https://i0.wp.com/assets1.tamsnetwork.com/images/EC042017NF/160518s.jpg?w=100&ssl=1 "Small Blending Brushes [ 160518 ]")
![Sponge Daubers [ 133773 ]](https://i0.wp.com/assets1.tamsnetwork.com/images/EC042017NF/133773s.jpg?w=100&ssl=1 "Sponge Daubers [ 133773 ]")
![Stampin' Up! Masking Paper [ 155480 ]](https://i0.wp.com/assets1.tamsnetwork.com/images/EC042017NF/155480s.jpg?w=100&ssl=1 "Stampin' Up! Masking Paper [ 155480 ]")
![Clear Wink Of Stella Glitter Brush [ 141897 ]](https://i0.wp.com/assets1.tamsnetwork.com/images/EC042017NF/141897s.jpg?w=100&ssl=1 "Clear Wink Of Stella Glitter Brush [ 141897 ]")
![Baker's Twine Essentials Pack [ 155475 ]](https://i0.wp.com/assets1.tamsnetwork.com/images/EC042017NF/155475s.jpg?w=100&ssl=1 "Baker's Twine Essentials Pack [ 155475 ]")
![2" (5.1 Cm) Circle Punch [ 133782 ]](https://i0.wp.com/assets1.tamsnetwork.com/images/EC042017NF/133782s.jpg?w=100&ssl=1 "2\" (5.1 Cm) Circle Punch [ 133782 ]")
![Water Painters [ 168253 ]](https://i0.wp.com/assets1.tamsnetwork.com/images/EC042017NF/168253s.jpg?w=100&ssl=1 "Water Painters [ 168253 ]")
![Stampin' Glass Mat Studio (Imperial) [ 163987 ]](https://i0.wp.com/assets1.tamsnetwork.com/images/EC042017NF/163987s.jpg?w=100&ssl=1 "Stampin' Glass Mat Studio (Imperial) [ 163987 ]")
![Paper Trimmer [ 152392 ]](https://i0.wp.com/assets1.tamsnetwork.com/images/EC042017NF/152392s.jpg?w=100&ssl=1 "Paper Trimmer [ 152392 ]")
![Stampin' Seal [ 152813 ]](https://i0.wp.com/assets1.tamsnetwork.com/images/EC042017NF/152813s.jpg?w=100&ssl=1 "Stampin' Seal [ 152813 ]")
![Bone Folder [ 102300 ]](https://i0.wp.com/assets1.tamsnetwork.com/images/EC042017NF/102300s.jpg?w=100&ssl=1 "Bone Folder [ 102300 ]")
![Mini Glue Dots [ 103683 ]](https://i0.wp.com/assets1.tamsnetwork.com/images/EC042017NF/103683s.jpg?w=100&ssl=1 "Mini Glue Dots [ 103683 ]")
![Stampin' Dimensionals [ 104430 ]](https://i0.wp.com/assets1.tamsnetwork.com/images/EC042017NF/104430s.jpg?w=100&ssl=1 "Stampin' Dimensionals [ 104430 ]")
![Whisper White Craft Stampin' Ink Refill [ 101780 ]](https://i0.wp.com/assets1.tamsnetwork.com/images/EC042017NF/101780s.jpg?w=100&ssl=1 "Whisper White Craft Stampin' Ink Refill [ 101780 ]")
![Farmhouse Florals Paper Pumpkin Refill [ 167279 ]](https://i0.wp.com/assets1.tamsnetwork.com/images/EC042017NF/167279s.jpg?w=100&ssl=1 "Farmhouse Florals Paper Pumpkin Refill [ 167279 ]")
![Lost Lagoon 12" X 12" (30.5 X 30.5 Cm) Two Tone Cardstock [ 166658 ]](https://i0.wp.com/assets1.tamsnetwork.com/images/EC042017NF/166658s.jpg?w=100&ssl=1 "Lost Lagoon 12\" X 12\" (30.5 X 30.5 Cm) Two Tone Cardstock [ 166658 ]")
![Secret Sea 12" X 12" (30.5 X 30.5 Cm) Two Tone Cardstock [ 166709 ]](https://i0.wp.com/assets1.tamsnetwork.com/images/EC042017NF/166709s.jpg?w=100&ssl=1 "Secret Sea 12\" X 12\" (30.5 X 30.5 Cm) Two Tone Cardstock [ 166709 ]")
![Stampin’ Blends Deep Combo Pack [ 158152 ]](https://i0.wp.com/assets1.tamsnetwork.com/images/EC042017NF/158152s.jpg?w=100&ssl=1 "Stampin’ Blends Deep Combo Pack [ 158152 ]")
![Mossy Meadow & Gold 1/4" (6.4 Mm) [ 166158 ]](https://i0.wp.com/assets1.tamsnetwork.com/images/EC042017NF/166158s.jpg?w=100&ssl=1 "Mossy Meadow & Gold 1/4\" (6.4 Mm) [ 166158 ]")
![Adhesive Backed Dragonflies & Birds [ 162743 ]](https://i0.wp.com/assets1.tamsnetwork.com/images/EC042017NF/162743s.jpg?w=100&ssl=1 "Adhesive Backed Dragonflies & Birds [ 162743 ]")
![Alphabet à La Mode Dies [ 160750 ]](https://i0.wp.com/assets1.tamsnetwork.com/images/EC042017NF/160750s.jpg?w=100&ssl=1 "Alphabet à La Mode Dies [ 160750 ]")
![Stylish Shapes Dies [ 159183 ]](https://i0.wp.com/assets1.tamsnetwork.com/images/EC042017NF/159183s.jpg?w=100&ssl=1 "Stylish Shapes Dies [ 159183 ]")
![Circle Of Seasons Dies [ 167277 ]](https://i0.wp.com/assets1.tamsnetwork.com/images/EC042017NF/167277s.jpg?w=100&ssl=1 "Circle Of Seasons Dies [ 167277 ]")
![Stampin' Cut & Emboss Machine [ 149653 ]](https://i0.wp.com/assets1.tamsnetwork.com/images/EC042017NF/149653s.jpg?w=100&ssl=1 "Stampin' Cut & Emboss Machine [ 149653 ]")
![Silicone Craft Sheet [ 127853 ]](https://i0.wp.com/assets1.tamsnetwork.com/images/EC042017NF/127853s.jpg?w=100&ssl=1 "Silicone Craft Sheet [ 127853 ]")
![Multipurpose Liquid Glue [ 110755 ]](https://i0.wp.com/assets1.tamsnetwork.com/images/EC042017NF/110755s.jpg?w=100&ssl=1 "Multipurpose Liquid Glue [ 110755 ]")


![Beautiful Blues Kit (English) [ 165658 ]](https://i0.wp.com/assets1.tamsnetwork.com/images/EC042017NF/165658s.jpg?w=100&ssl=1 "Beautiful Blues Kit (English) [ 165658 ]")
![White Willow 12" X 12" (30.5 X 30.5 Cm) Cardstock [ 166703 ]](https://i0.wp.com/assets1.tamsnetwork.com/images/EC042017NF/166703s.jpg?w=100&ssl=1 "White Willow 12\" X 12\" (30.5 X 30.5 Cm) Cardstock [ 166703 ]")
![Night Of Navy 8-1/2" X 11" Cardstock [ 100867 ]](https://i0.wp.com/assets1.tamsnetwork.com/images/EC042017NF/100867s.jpg?w=100&ssl=1 "Night Of Navy 8-1/2\" X 11\" Cardstock [ 100867 ]")
![Silver 12" X 12" (30.5 X 30.5 Cm) Foil Sheets [ 163387 ]](https://i0.wp.com/assets1.tamsnetwork.com/images/EC042017NF/163387s.jpg?w=100&ssl=1 "Silver 12\" X 12\" (30.5 X 30.5 Cm) Foil Sheets [ 163387 ]")
![Rhinestone Basic Jewels [ 144220 ]](https://i0.wp.com/assets1.tamsnetwork.com/images/EC042017NF/144220s.jpg?w=100&ssl=1 "Rhinestone Basic Jewels [ 144220 ]")
![Paper Snips [ 103579 ]](https://i0.wp.com/assets1.tamsnetwork.com/images/EC042017NF/103579s.jpg?w=100&ssl=1 "Paper Snips [ 103579 ]")
![Take Your Pick [ 144107 ]](https://i0.wp.com/assets1.tamsnetwork.com/images/EC042017NF/144107s.jpg?w=100&ssl=1 "Take Your Pick [ 144107 ]")
![Night Of Navy Classic Stampin' Pad [ 147110 ]](https://i0.wp.com/assets1.tamsnetwork.com/images/EC042017NF/147110s.jpg?w=100&ssl=1 "Night Of Navy Classic Stampin' Pad [ 147110 ]")
![Grid Paper [ 130148 ]](https://i0.wp.com/assets1.tamsnetwork.com/images/EC042017NF/130148s.jpg?w=100&ssl=1 "Grid Paper [ 130148 ]")


![The Right Words Cling Stamp Set (English) [ 165316 ]](https://i0.wp.com/assets1.tamsnetwork.com/images/EC042017NF/165316s.jpg?w=100&ssl=1 "The Right Words Cling Stamp Set (English) [ 165316 ]")
![Beautiful Motifs Dies [ 165205 ]](https://i0.wp.com/assets1.tamsnetwork.com/images/EC042017NF/165205s.jpg?w=100&ssl=1 "Beautiful Motifs Dies [ 165205 ]")
![Extraordinary Flora Die [ 165244 ]](https://i0.wp.com/assets1.tamsnetwork.com/images/EC042017NF/165244s.jpg?w=100&ssl=1 "Extraordinary Flora Die [ 165244 ]")
![Extraordinary Flora Washi Tape [ 165269 ]](https://i0.wp.com/assets1.tamsnetwork.com/images/EC042017NF/165269s.jpg?w=100&ssl=1 "Extraordinary Flora Washi Tape [ 165269 ]")
![Iridescent Pearl Basic Jewels [ 158987 ]](https://i0.wp.com/assets1.tamsnetwork.com/images/EC042017NF/158987s.jpg?w=100&ssl=1 "Iridescent Pearl Basic Jewels [ 158987 ]")
![Shy Shamrock Stampin’ Blends Combo Pack [ 163825 ]](https://i0.wp.com/assets1.tamsnetwork.com/images/EC042017NF/163825s.jpg?w=100&ssl=1 "Shy Shamrock Stampin’ Blends Combo Pack [ 163825 ]")
![Mossy Meadow Stampin' Blends Combo Pack [ 154890 ]](https://i0.wp.com/assets1.tamsnetwork.com/images/EC042017NF/154890s.jpg?w=100&ssl=1 "Mossy Meadow Stampin' Blends Combo Pack [ 154890 ]")
![Wild Wheat Stampin’ Blends Combo Pack [ 161661 ]](https://i0.wp.com/assets1.tamsnetwork.com/images/EC042017NF/161661s.jpg?w=100&ssl=1 "Wild Wheat Stampin’ Blends Combo Pack [ 161661 ]")
![Misty Moonlight Stampin' Blends Combo Pack [ 153108 ]](https://i0.wp.com/assets1.tamsnetwork.com/images/EC042017NF/153108s.jpg?w=100&ssl=1 "Misty Moonlight Stampin' Blends Combo Pack [ 153108 ]")
![Mini Stampin' Dimensionals [ 144108 ]](https://i0.wp.com/assets1.tamsnetwork.com/images/EC042017NF/144108s.jpg?w=100&ssl=1 "Mini Stampin' Dimensionals [ 144108 ]")
![Scenic Adventure Dies [ 165467 ]](https://i0.wp.com/assets1.tamsnetwork.com/images/EC042017NF/165467s.jpg?w=100&ssl=1 "Scenic Adventure Dies [ 165467 ]")


![Stampin' Pierce Mat [ 126199 ]](https://i0.wp.com/assets1.tamsnetwork.com/images/EC042017NF/126199s.jpg?w=100&ssl=1 "Stampin' Pierce Mat [ 126199 ]")
![2 3/8" (6 Cm) Circle Punch [ 161354 ]](https://i0.wp.com/assets1.tamsnetwork.com/images/EC042017NF/161354s.jpg?w=100&ssl=1 "2 3/8\" (6 Cm) Circle Punch [ 161354 ]")
![Cherry Cobbler Classic Stampin' Pad [ 147083 ]](https://i0.wp.com/assets1.tamsnetwork.com/images/EC042017NF/147083s.jpg?w=100&ssl=1 "Cherry Cobbler Classic Stampin' Pad [ 147083 ]")
![Cherry Cobbler & Gold 1/4" (6.4 Mm) Satin Ribbon [ 164028 ]](https://i0.wp.com/assets1.tamsnetwork.com/images/EC042017NF/164028s.jpg?w=100&ssl=1 "Cherry Cobbler & Gold 1/4\" (6.4 Mm) Satin Ribbon [ 164028 ]")
![Blackberry Bliss & Gold 1/2" (1.3 Cm) Textured Ribbon [ 164039 ]](https://i0.wp.com/assets1.tamsnetwork.com/images/EC042017NF/164039s.jpg?w=100&ssl=1 "Blackberry Bliss & Gold 1/2\" (1.3 Cm) Textured Ribbon [ 164039 ]")
![Mossy Meadow 8-1/2" X 11" Cardstock [ 133676 ]](https://i0.wp.com/assets1.tamsnetwork.com/images/EC042017NF/133676s.jpg?w=100&ssl=1 "Mossy Meadow 8-1/2\" X 11\" Cardstock [ 133676 ]")
![Fern 3 D Embossing Folder [ 158804 ]](https://i0.wp.com/assets1.tamsnetwork.com/images/EC042017NF/158804s.jpg?w=100&ssl=1 "Fern 3 D Embossing Folder [ 158804 ]")
![Clear Block D [ 118485 ]](https://i0.wp.com/assets1.tamsnetwork.com/images/EC042017NF/118485s.jpg?w=100&ssl=1 "Clear Block D [ 118485 ]")
![Clear Block C [ 118486 ]](https://i0.wp.com/assets1.tamsnetwork.com/images/EC042017NF/118486s.jpg?w=100&ssl=1 "Clear Block C [ 118486 ]")
![Blackberry Bliss Classic Stampin' Pad [ 147092 ]](https://i0.wp.com/assets1.tamsnetwork.com/images/EC042017NF/147092s.jpg?w=100&ssl=1 "Blackberry Bliss Classic Stampin' Pad [ 147092 ]")
![Versamark Pad [ 102283 ]](https://i0.wp.com/assets1.tamsnetwork.com/images/EC042017NF/102283s.jpg?w=100&ssl=1 "Versamark Pad [ 102283 ]")


")
 Designer Series Paper")

 Circle Punch")


 Sheer Ribbon")


