

#APaperPumpkinThing
Welcome to our monthly “A Paper Pumpkin Thing” blog hop! See what I have to share. Then check out all the other blogs in the hop to see additional creative alternate paper crafting project ideas that we each came up with using the contents of the August 2019 The Gift of Fall Paper Pumpkin kit. To follow the hop and see other creative project ideas, simply scroll down and click on the names of other hop participants.
Here is a photo of the intended projects from this month’s colorful, fall-themed kit which makes 6 gift bags and tags.

I’ve already shared a few other alternate projects using the contents of this kit on August 22nd.
- A 12×12 Scrapbook Page Layout
- A Treat Bag with a Window
- Two Alternate Greeting Cards (plus one that I didn’t design)
- and Two Monster Puppets
CLICK HERE to check them out for more ideas.
Today I have three more projects to inspire your creativity and help you think outside the box.
- A Circle Card
- Thanksgiving Day Personalized Dinner Notes
- and a Shirt Bag
All of these are super easy to make and only require a few extra tools and supplies. Products I used… See below for a complete list of extra products I used linked to where you can find them in my online store.
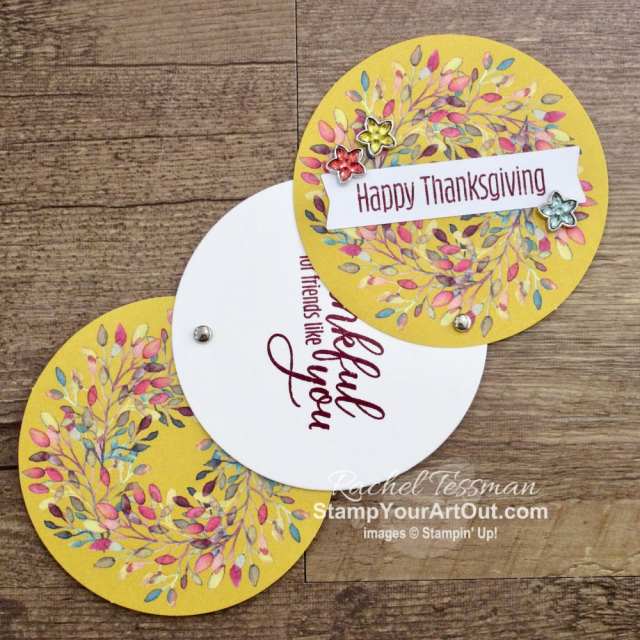
CIRCLE CARD

Circle cards are fun fold cards. They are made of circles layered on top of each other and connected with brads so the circles can rotate while the card extends open.


Here are photos of this one opening up…


They are simple to make, right!
Measurements for extra products…
- Whisper White Cardstock
- Scrap for die-cutting 3″ x 3″ Circle
Directions…
- Stamp sentiment onto white side of narrow banner piece. Then adhere to the center of a yellow circular wreath.
- Die-cut a 3″ x 3″ Whisper White circle.
- Position wreath piece with sentiment on top of Whisper White circle, pierce a hole through both in the bottom about 1/4″ from the edge, then add a brad.
- Twist top layer open. Layer the Whisper White circle on top of a second wreath piece. Pierce a hole through the white circle and the second wreath so that this hole is on the opposite side of where the first hole was made. Add a brad.
- Open card all the way open. Stamp inside sentiment.
- Embellish top circle with Flower Faceted Gems. Close the card back up after signing it, and give it in a 3″ x 3″ envelope.

THANKSGIVING DAY PERSONALIZED DINNER NOTES


Measurements for extra products for one note…
- Crumb Cake Cardstock
- 3″ x 3″
- Vellum Cardstock (or vellum scraps from the kit)
- Scrap for punching leaves
Directions…
- Stamp sentiment to the front of the envelope flap.
- Punch a set of leaves from the extra vellum in the kit or Vellum Cardstock.
- Attach the vellum leaves and the coordinating kit leaves to the underside of the flap of a 3″ x 3″ envelope using Glue Dots.
- Tie a couple strands of twine into a bow. Add to the front of the flap with a Glue Dot.
- Write a note telling your loved one why you are thankful for them on the Crumb Cake Cardstock and insert.
- Make one of these for each guest attending Thanksgiving Day dinner, and present them at their place settings.
SHIRT BAG

This is a fun one!!! When I saw the banner, I pictured it as a neck tie. And one thing led to another. This is the same technique for making shirt cards (which I just realized I’ve never shared with you… Click here to see my friend Julie’s tutorial). I just applied this technique to the bag.
Directions…
- Remove the handles and the extra layers of paper inside the bag.

- Flatten the bag. Measure one inch down from each of the top two corners and then one inch in. Draw a line on each side to connect these two measurements.


- Cut along the two lines. Fold the top corners diagonally in and down to connect the points together forming the shirt collar. (Don’t glue down yet.)

- Make the tie…Mark 3/4″ in from each side at the top of the tie. Mark 3″ down from on each side. Connect the dots as shown. Then cut out the tie.

- Stamp “enjoy” on the right side of one of the banners. Add this tie clip to the tie using a Glue Dot near the edge of the tie and a Dimensional at the end of the clip. Wrap the rest of the banner to the back and adhere or trim off the excess. Add a sequin if room.
- Adhere tie to the bag front..

- After stuffing bag with a gift or goody, glue the four flaps of the collar down with Glue Dots.

- And give as a gift.

My circle card and shirt bag were featured in Paper Pumpkin’s Facebook Live Tuesday night. But Cole didn’t know that my bag was a bag. ???♀️You’ll want to watch that live to see lots of other ideas and to see a HUGE SNEAK PEEK of the upcoming September kit! Cole made a haunted house from the kit contents!
I hope I inspired your creativity with what I shared today!
![]()
If you are not a Paper Pumpkin subscriber, I invite you to give it a try. CLICK HERE to learn more. CLICK HERE to sign up by September 10th for the next kit.
A PEEK AT SEPTEMBER’S PAPER PUMPKIN KIT
The September 2019 Paper Pumpkin, Bone Appétit kit includes 20 food-safe treat boxes, a unique and exclusive Halloween stamp set, and a spooky, special-edition box. September’s kit also gives new meaning to the word “handmade.” Coordinating colors are: Basic Black, Gorgeous Grape, Pumpkin Pie, and Whisper White
Click here to get your subscription started by September 10th for this next kit.

To renew your subscription, click here and login to reactivate. Are you on Facebook? Then be sure to join the 22,000+ members in the PAPER PUMPKIN FAN CLUB to get lots more inspiration: https://www.facebook.com/groups/1441979982783482/
Thanks for visiting!

Click here to shop my online store.
Click here to access & view the current catalogs.
Click here to subscribe to those fun Paper Pumpkin kits of creativity!
Click here to learn about my Loyalty Rewards program. You can earn free stamps just for shopping with me!
Click here for more information about joining my Online Paper Crafters’ Club. Earn even more goodies by joining a club!
Click here to learn more about joining my Stampers With ART community. Get the MOST rewards including a discount on future products!
Follow me on social media! I share regularly on Pinterest, YouTube, and Facebook!
Please subscribe to my blog, too! Click here and enter your email in the blue box (above the butterfly).
Product List… things you might need/want in addition to the August 2019 Paper Pumpkin kit to make these projects
- trimmer
- pencil
- ruler


 Envelopes")


MY ONLINE PAPER CRAFTERS CLUB IS LOOKING FOR NEW MEMBERS
I’m forming a new Paper Crafters club that will begin mid-September (with orders due mid-month for October, November, December, January, February & March). And we are looking for more to join us. The commitment is to order at least $25 worth of Stampin’ Up! product in each of those 6 months. In one of those months, you would reap the hosting rewards (free merchandise based on the club orders). And then you’d also be able to get in on monthly product perks that would be sent to you along with your monthly club cards.

ONSTAGE NOVEMBER 16
Demonstrators are now registering for the next Stampin’ Up!® convention, OnStage November 2019. Registration began August 20th. There are several locations to pick from: Atlanta*, Edmunton, Hartford, Lansing*, Las Vegas*, Portland (where I’ll be attending!), and Toronto. Become a demonstrator by purchasing your Starter Kit. Then join us in our excitement as we plan for this fun event. See the Extra, Extra! starter kit special below to learn more about the other perks that come along with being a demonstrator.
*Registration has reached capacity and is now closed, but you could request to be on the waiting list.

REDEEM BONUS DAYS COUPON CODES IN AUGUST
Your Bonus Days coupon codes that you earned in July may now be redeemed! (Every $50 spent July 1–31 before shipping and tax, earned a $5 Bonus Days coupon code. Check your emails for your code/s.) Codes can only be redeemed August 1–31. Click here to learn more about how to redeem your code/s. Click here for more information.

EXTRA, EXTRA!
From now until August 31, receive an additional $30 in product for free in your Starter Kit. So instead of $26 for free, you can get $56 in free product (and of course free shipping as always). Yep! Choose $155 worth of product for $99 + tax!! And if that wasn’t awesome enough, a $10 coupon code will be gifted to you the following month to use towards an order by October 31st. Click here for more information.

Plus you will be a part of my Stampers With ART community and receive discounts on future orders!!

BETTER THAN FLAT TUTORIALS
I’m so proud to be teamed up with five other super talented Stampin’ Up!® demonstrators so we can create Fun Fold cards & 3-D projects to share exclusively with our customers, paper crafting friends & team members each month! (Our Christmas in August projects are now available!) CLICK HERE for more information.


You are so creative. Love all the ideas you share can’t pick just one & your video was great. Thanks for sharing all the visuals of the measurements I’m definitely challenged in that area ?? maybe one day the ? will come on. Have a blessed week.
Aww…hugs to you JaNette! so glad you enjoyed what I shared. 😀
Ooh – I remember those circle cards! Clever use of the kit!!
It’s fun to revive those older ideas. Thanks so much Dawn! Loved your ideas, too. ?
SO CREATIVE – It’s a good thing I don’t have to choose a favorite!!!
I love these hops! I agree…so fun to see all the ideas everyone shares. Thanks Jeanna!