I shared two cards recently using the Layering Leaves Stamp Set images in unique and creative ways. The “flower on a stump easel card” I shared on March 10th. And the “bunny & carrots card” I shared on March 12. I knew I wanted to share one of them for today’s pre-recorded Wednesday Online Paper Crafting Class (I’m in Houston at a Stampin’ Up!® convention right now), but I couldn’t decide between the two cards. So I decided to share both in the video and then posts previews, measurements, and supply lists beforehand.
Either one of these is much easier to share directions, tips and tricks in video format. So I’m glad I did it this way. Be sure to watch the video by clicking here (or you can just click on this image below if you are already on my blog post). Then visit my March 10th and March 12th posts to scroll through the close-up photos, access the measurements & supply lists, and even download the reference PDF sheets.
Thanks for stopping by! I hope you had fun and got some creative inspiration from what I shared.
Tune into my events on my Facebook Page to see notices of my upcoming Lives. Or subscribe to my YouTube channel. And then click on the bell next to the subscribe button and set notifications to “all” so you can get updates when I share and when I go live. My next Live will be on Wednesday, March 20 at 11 AM Central Time. I hope you can join me!
Click here to shop my online store. Click here to access & view the current catalogs. Click here to shop My Favorite Extras. Click here to subscribe to those fun Paper Pumpkin kits of creativity! Click here to learn about my Loyalty Rewards program. You can earn free stamps just for shopping with me! Click here to learn more about joining my Stampers With ART community. Get the MOST rewards including a discount on future products! Follow me on social media! I share regularly on Pinterest, YouTube, Instagram, my Facebook Page, and my Facebook Group! Please subscribe to my blog, too!Click here and enter your email in the blue box (above the butterfly).
ONLINE EXCLUSIVES NEWS– NEW ITEMS ARE HERE! You won’t find Online Exclusives products in any catalog or publication. So be sure to visit this link to shop today. All Online Exclusives products are available while supplies last.
STAMP YOUR ART OUT LOGO MERCHANDISE Be sure to check out my newly released line of Stamp Your Art Out logo merchandise! From the menu at the top choose SHOP > TUTORIALS, LOGO ITEMS & MORE > LOGO ITEMS. Or just click here. Many of the items have more than one color option. Thanks for shopping!
KITS COLLECTION: YOUR DAY TO SHINE & FROG & FRIENDS KITS ADDED Two kits have been recently added to the Kits Collection! Click here and scroll down for more details.
A PEEK AT APRIL’S PAPER PUMPKIN KIT Delicate Wings Kit: Send elegant words of encouragement and support to those you love. Makes 9 cards (3 each of 3 designs) & includes coordinating envelopes. Kit also includes paper pieces, butterfly designs, Champagne foil images, sentiments, and labels. Coordinating colors: Lost Lagoon, Moody Mauve, Basic Beige, Basic Gray (Classic Stampin’ Spot), Basic Black, champagne foil. Click here for a flyer showing peeks of the April-June kits. And don’t miss the special add-on that coordinates with all three months: the Thanks & Beyond Dies (#164397) — made available March 11th and only while supplies last!
If you are not a Paper Pumpkin subscriber, I invite you to give it a try. CLICK HERE to learn more. CLICK HERE to sign up by April 10th for this next kit.
ALL STAR VIDEO CLASSES I’m a designer with the All Stars, a group of globally recognized Stampin’ Up! demonstrators. And we are excited to share exclusively with our customers, paper crafting friends & team members our March 2024 Rock & Roll Suite Video Class Bundle which is now available. CLICK HERE for more information. Click here to get to my Tutorials/Classes for Sale page to see others that have been offered. The next one featuring the Nature’s Sweetness Suite from the Jan-Apr 2024 Mini Catalog will be available April 1st.
Did you know that you can create bunnies and carrots with the Layering Leaves Stamp Set and Bough Punch? I added in a sentiment from the Excellent Eggs Stamp Set and the large egg die from the Excellent Eggs Dies to get this sweet bunny rabbit card. Change out the sentiment to get a baby card, an Easter card, a happy Spring card, and more.
I made quite a few of these.
And I brought 80 of them with me to Houston today.
I’ll be at Stampin’ Up!’s OnStage event, our big yearly convention for the next several days. These cards will be my swap cards. And of course I had to create something that featured my Layering Leaves Stamp Set in a fun and creative way, right? Now my hope is that this set will remain in the Annual Catalog for another year. I’ll find out in a couple days when the new 2024-25 Annual Catalog is revealed to all of us demonstrators attending.
I don’t have directions for you today, but tomorrow you’ll be able to access my how-to video. Make sure you are subscribed to my blog and/or my YouTube channel so you get notifications for when I share and post.
Below is a list of products I used to create this card. These products are linked to where you can find them in my online store to help you shop. I’ve also listed measurements here AND included a downloadable PDF for you.
Measurements…
Crumb Cake Cardstock
5-1/2” x 8-1/2” scored parallel to the short at 4-1/4”
Scraps for punching leaves and die-cutting circles for the bunny
Balmy Blue Cardstock
(2) 4-1/8” x 5-3/8”
Basic White Cardstock
(2) 4” x 5-1/4”
Scrap for die-cutting egg
Garden Green Cardstock
Scraps for stamping and punching leaves
Scraps for punching carrot tops
Pumpkin Pie Cardstock
Scraps for stamping and punching carrots
Balmy Blue Variegated Ribbon
18”
Click here to access and download a printable “measurements & supplies” sheet.
So remember to come back on Wednesday for the how-to video!
For more creative inspiration I’ve shared with the Layering Leaves set, put “layering leaves” in the search bar on my site, press enter, and scroll. I shared some links yesterday. And here are just a few more that you may want to check out.
A new flyer has been released sharing information for the April, May & June 2024 Paper Pumpkin kits! Click here to access that flyer & read about the new kits to come!
Click here to shop my online store. Click here to access & view the current catalogs. Click here to shop My Favorite Extras. Click here to subscribe to those fun Paper Pumpkin kits of creativity! Click here to learn about my Loyalty Rewards program. You can earn free stamps just for shopping with me! Click here to learn more about joining my Stampers With ART community. Get the MOST rewards including a discount on future products! Follow me on social media! I share regularly on Pinterest, YouTube, Instagram, my Facebook Page, and my Facebook Group! Please subscribe to my blog, too!Click here and enter your email in the blue box (above the butterfly).
ONLINE EXCLUSIVES NEWS– NEW ITEMS ARE HERE! You won’t find Online Exclusives products in any catalog or publication. So be sure to visit this link to shop today. All Online Exclusives products are available while supplies last.
STAMP YOUR ART OUT LOGO MERCHANDISE Be sure to check out my newly released line of Stamp Your Art Out logo merchandise! From the menu at the top choose SHOP > TUTORIALS, LOGO ITEMS & MORE > LOGO ITEMS. Or just click here. Many of the items have more than one color option. Thanks for shopping!
KITS COLLECTION: YOUR DAY TO SHINE & FROG & FRIENDS KITS ADDED Two kits have been recently added to the Kits Collection! Click here and scroll down for more details.
A PEEK AT APRIL’S PAPER PUMPKIN KIT Delicate Wings Kit: Send elegant words of encouragement and support to those you love. Makes 9 cards (3 each of 3 designs) & includes coordinating envelopes. Kit also includes paper pieces, butterfly designs, Champagne foil images, sentiments, and labels. Coordinating colors: Lost Lagoon, Moody Mauve, Basic Beige, Basic Gray (Classic Stampin’ Spot), Basic Black, champagne foil. Click here for a flyer showing peeks of the April-June kits. And don’t miss the special add-on that coordinates with all three months: the Thanks & Beyond Dies (#164397) — made available March 11th and only while supplies last!
If you are not a Paper Pumpkin subscriber, I invite you to give it a try. CLICK HERE to learn more. CLICK HERE to sign up by April 10th for this next kit.
ALL STAR VIDEO CLASSES I’m a designer with the All Stars, a group of globally recognized Stampin’ Up! demonstrators. And we are excited to share exclusively with our customers, paper crafting friends & team members our March 2024 Rock & Roll Suite Video Class Bundle which is now available. CLICK HERE for more information. Click here to get to my Tutorials/Classes for Sale page to see others that have been offered. The next one featuring the Nature’s Sweetness Suite from the Jan-Apr 2024 Mini Catalog will be available April 1st.
I love the Textured Timber images, purchased the set right away, and was inspired to create this card shown here which I also paired with the Layering Leaves stamp set.
The flower petals come from one of the Layering Leaves leaf branch images! Fun, right?
And it’s an easel card (the reason for the slit on the inside layer).
I don’t have directions for you today, but on Wednesday at 11 AM Central Time you’ll be able to access my how-to video. Make sure you are subscribed to my blog and/or my YouTube channel so you get notifications for when I share and post.
Below is a list of products I used to create this card. These products are linked to where you can find them in my online store to help you shop. I’ve also listed measurements here AND included a downloadable PDF for those of you who like to collect these one-page reference sheets.
Measurements…
Parakeet Party Cardstock
4-1/4” x 11” scored parallel to the short at 2-3/4” and 5-1/2”
Basic White Cardstock
(2) 3-3/4” x 5”
Scrap for stamping and cutting tree stump
Scraps for stamping and punching leaves and flower petals
Early Espresso Cardstock
(2) 3-7/8” x 5-1/8”
Click here to access and download a printable “measurements & supplies” sheet.
So remember to come back on Wednesday for the how-to video!
For more creative inspiration I’ve shared with the Layering Leaves set, put “layering leaves” in the search bar on my site, press enter, and scroll. Here are just a few that you may want to check out.
Just a reminder that today is the last day to make sure you have an active Paper Pumpkin account to get in on the March 2024 anniversary kit which includes imagery that coordinates with the Meandering Meadows Suite AND a bonus stamp set. (Scroll down to read more.)
If you are not a Paper Pumpkin subscriber, I invite you to give it a try. CLICK HERE & sign up by today!
Click here to shop my online store. Click here to access & view the current catalogs. Click here to shop My Favorite Extras. Click here to subscribe to those fun Paper Pumpkin kits of creativity! Click here to learn about my Loyalty Rewards program. You can earn free stamps just for shopping with me! Click here to learn more about joining my Stampers With ART community. Get the MOST rewards including a discount on future products! Follow me on social media! I share regularly on Pinterest, YouTube, Instagram, my Facebook Page, and my Facebook Group! Please subscribe to my blog, too!Click here and enter your email in the blue box (above the butterfly).
ONLINE EXCLUSIVES NEWS– NEW ITEMS ARE HERE! You won’t find Online Exclusives products in any catalog or publication. So be sure to visit this link to shop today. All Online Exclusives products are available while supplies last.
STAMP YOUR ART OUT LOGO MERCHANDISE Be sure to check out my newly released line of Stamp Your Art Out logo merchandise! From the menu at the top choose SHOP > TUTORIALS, LOGO ITEMS & MORE > LOGO ITEMS. Or just click here. Many of the items have more than one color option. Thanks for shopping!
KITS COLLECTION: YOUR DAY TO SHINE & FROG & FRIENDS KITS ADDED Two kits have been recently added to the Kits Collection! Click here and scroll down for more details.
A PEEK AT MARCH’S PAPER PUMPKIN KIT Memorable Meadows Kit: Share nature’s beauty with lovely all-occasion cards! Makes 9 cards: 3 each of 3 designs. Projects include printed cards & coordinating envelopes. Kit includes precut vellum pieces and wood embellishments. This kit coordinates with the Meandering Meadows Suite Collection (item 162745). And it includes an extra bonus stamp set! Coordinating colors: Granny Apple Green, Garden Green (Classic Stampin’ Spot), Balmy Blue, Night of Navy, Gorgeous Grape, and Fresh Freesia. Click here for a flyer showing peeks of the Jan-March kits. And don’t miss the special add-on that coordinates with all three months: the Love of Spring Dies Add-On (item 164396) — made available December 11th and only while supplies last!
If you are not a Paper Pumpkin subscriber, I invite you to give it a try. CLICK HERE to learn more. CLICK HERE to sign up by March 10th for this next kit.
ALL STAR VIDEO CLASSES I’m a designer with the All Stars, a group of globally recognized Stampin’ Up! demonstrators. And we are excited to share exclusively with our customers, paper crafting friends & team members our March 2024 Rock & Roll Suite Video Class Bundle which is now available. CLICK HERE for more information. Click here to get to my Tutorials/Classes for Sale page to see others that have been offered. The next one featuring the Nature’s Sweetness Suite from the Jan-Apr 2024 Mini Catalog will be available April 1st.
#APaperPumpkinThing Welcome to our monthly APPT blog hop to showcase Paper Pumpkin kit alternate projects! This time we are highlighting the February 2024 Sweet SpringtimePaper Pumpkin kit. See what I have to share. Then check out all the other blogs in the hop for additional creative ideas my fellow Stampin’ Up! demonstrator friends shared. To follow the hop and see these other creative project ideas, simply scroll down and click on the names of the other hop participants. (If you are receiving this blog post by email, click HERE to see the hop.)
Here are the items the kit instructs how to make. (Click here for a link to Stampin’ Up!’s how-to video to help you assemble these as intended.)
I’ve already shared some other alternate projects using the contents of this kit on February 24th.
Mini Easter Baskets (how to double the treat containers)
A Milk Carton with Window
A Circle Wreath Card
And a Unique Pocket Card
Click here to visit that post to see photos, a how-to video, measurements, and supplies used.
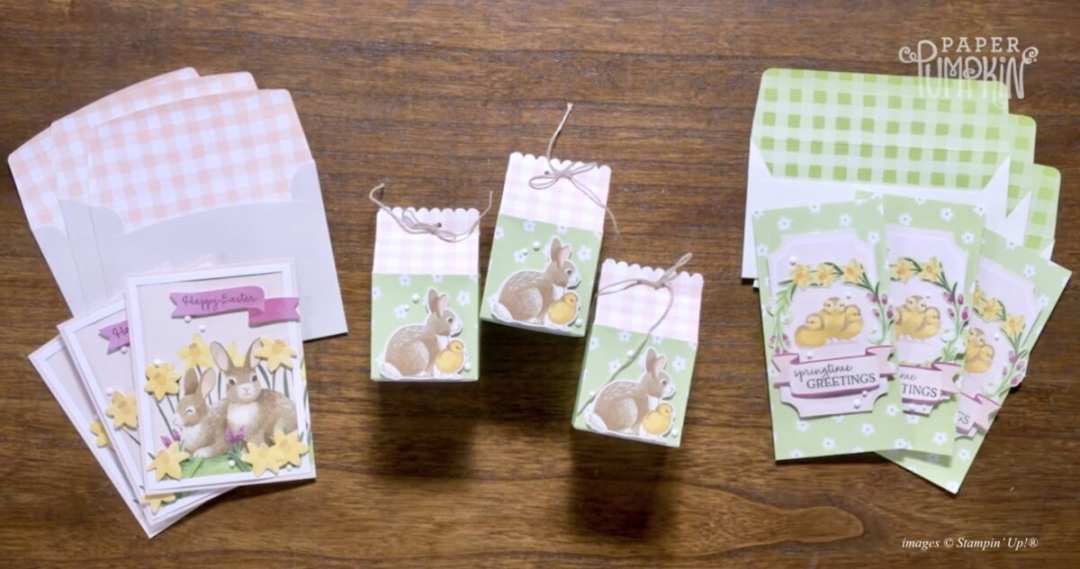
Today I am sharing four more ideas…
An Easter Cross Card
A “Four Fold” Baby Card
A Spring Themed 12×12 Scrapbook Page Layout
AND…A Springtime Greetings Card
Watch my video first by clicking here to get to get measurements, directions, and tips (or you can just click on this image below if you are already in my blog post). Scroll down to see close-up photos, access the links that I mentioned in my video, and see a list of extra supplies (linked to my online store) that I used to make my creations.
I hope you enjoyed what I shared! Here are close-up photos of the alternate projects I made and shared in my video. (Remember to watch my video first to get measurements, tips and directions.)
An Easter Cross Card
A “Four Fold” Baby Card
(This card below is the one I made in the video with the leaves die.)
A Spring Themed 12×12 Scrapbook Page Layout
AND…A Springtime Greetings Card
I hope I inspired your creativity with what I shared today! If you did not get this kit, I hope you can apply these ideas to products you already own.
If you are not a Paper Pumpkin subscriber, I invite you to give it a try. CLICK HERE to learn more. CLICK HERE to sign up by March 10th for this next kit…
A PEEK AT MARCH’S PAPER PUMPKIN KIT Memorable Meadows Kit: Share nature’s beauty with lovely all-occasion cards! Makes 9 cards: 3 each of 3 designs. Projects include printed cards & coordinating envelopes. Kit includes precut vellum pieces and wood embellishments. This kit coordinates with the Meandering Meadows Suite Collection (item 162745). And it includes an extra bonus stamp set! Coordinating colors: Granny Apple Green, Garden Green (Classic Stampin’ Spot), Balmy Blue, Night of Navy, Gorgeous Grape, and Fresh Freesia. Click here for a flyer showing peeks of the Jan-March kits. And don’t miss the special add-on that coordinates with all three months: the Love of Spring Dies Add-On (item 164396) — made available December 11th and only while supplies last!
Thanks for visiting! Now I invite you to visit the blogs of my fellow demonstrators.
TWO NEW ADDITIONS TO THE KITS COLLECTION
YOUR DAY TO SHINE KIT Say hello, happy birthday, or recognize someone with the Your Day to Shine Kit. Everyone will appreciate one of these pretty floral cards and matching envelopes. If you’re new to card making, you’ll love how this kit makes crafting super simple, because all of the pieces are printed, die cut, and ready to use—no stamping or cutting needed! If you’re an experienced crafter, you’ll love the artistic beauty of these card designs. Includes sentiments in English, Dutch, French, and German. This new kit is part of the Kits Collection and is now available as of March 7, 2024 (while supplies last).
Cost is $14 USD
Use item number 163875 when ordering
Click here to watch the unboxing video by Sara Douglass
Kit includes: * Predesigned projects * Step-by-step instructions * Precut pieces (No prep work! Get right to crafting) * Makes 9 cards: 3 each of 3 designs * Folded card sizes: 5-1/2″ x 4-1/4″ (14 x 10.8 cm), 3″ x 3″ (7.6 x 7.6 cm) * 9 preprinted envelopes * Enough adhesive to complete projects * Adhesive-backed iridescent rhinestones * Die-cut vellum pieces * Printed labels and die cut images * Printed sentiments in four languages: English, Dutch, French, German
FROG & FRIENDS KIT DIY a classic cup-and-ball game! With the Frog & Friends Kit, you can craft six cup-and-ball games in three designs: a fun frog, a flashy fish, and a silly shark. The kit includes everything you need to complete the toys, even googly eyes! It’s a great kit for crafting with kids, grandkids, nieces and nephews, play groups—kids and kids at heart! This new kit is part of the Kits Collection and is now available as of March 7, 2024 (while supplies last).
Cost is $12 USD
Use item number 163874 when ordering
Click here to watch the unboxing video by Sara Douglass
Kit includes: * Predesigned projects * Step-by-step instructions * Precut pieces (No prep work! Get right to crafting) * Makes 6 cup-and-ball games: 2 each of 3 designs * Finished size: 4-1/4″ x 7-1/4″ x 1-1/2″ (10.8 x 18.4 x 3.8 cm) * Enough adhesive to complete projects * Acrylic shapes * Stickers * Twine
Click here to shop my online store. Click here to access & view the current catalogs. Click here to shop My Favorite Extras. Click here to subscribe to those fun Paper Pumpkin kits of creativity! Click here to learn about my Loyalty Rewards program. You can earn free stamps just for shopping with me! Click here to learn more about joining my Stampers With ART community. Get the MOST rewards including a discount on future products! Follow me on social media! I share regularly on Pinterest, YouTube, Instagram, my Facebook Page, and my Facebook Group! Please subscribe to my blog, too!Click here and enter your email in the blue box (above the butterfly).
Products used…things you might need/want in addition to the January 2024 Paper Pumpkin kit
ONLINE EXCLUSIVES NEWS– NEW ITEMS ARE HERE! You won’t find Online Exclusives products in any catalog or publication. So be sure to visit this link to shop today. All Online Exclusives products are available while supplies last.
STAMP YOUR ART OUT LOGO MERCHANDISE Be sure to check out my newly released line of Stamp Your Art Out logo merchandise! From the menu at the top choose SHOP > TUTORIALS, LOGO ITEMS & MORE > LOGO ITEMS. Or just click here. Many of the items have more than one color option. Thanks for shopping!
KITS COLLECTION: YOUR DAY TO SHINE & FROG & FRIENDS KITS ADDED Two kits have been recently added to the Kits Collection! Click here and scroll down for more details.
A PEEK AT MARCH’S PAPER PUMPKIN KIT Memorable Meadows Kit: Share nature’s beauty with lovely all-occasion cards! Makes 9 cards: 3 each of 3 designs. Projects include printed cards & coordinating envelopes. Kit includes precut vellum pieces and wood embellishments. This kit coordinates with the Meandering Meadows Suite Collection (item 162745). And it includes an extra bonus stamp set! Coordinating colors: Granny Apple Green, Garden Green (Classic Stampin’ Spot), Balmy Blue, Night of Navy, Gorgeous Grape, and Fresh Freesia. Click here for a flyer showing peeks of the Jan-March kits. And don’t miss the special add-on that coordinates with all three months: the Love of Spring Dies Add-On (item 164396) — made available December 11th and only while supplies last!
If you are not a Paper Pumpkin subscriber, I invite you to give it a try. CLICK HERE to learn more. CLICK HERE to sign up by March 10th for this next kit.
ALL STAR VIDEO CLASSES I’m a designer with the All Stars, a group of globally recognized Stampin’ Up! demonstrators. And we are excited to share exclusively with our customers, paper crafting friends & team members our March 2024 Rock & Roll Suite Video Class Bundle which is now available. CLICK HERE for more information. Click here to get to my Tutorials/Classes for Sale page to see others that have been offered. The next one featuring the Nature’s Sweetness Suite from the Jan-Apr 2024 Mini Catalog will be available April 1st.
This is a fun one! Did you get in on the February 2024 Sweet Springtime Paper Pumpkin kit? It lives up to it’s name. The imagery is fresh & cheerful, and the animals look so sweet. I couldn’t stop creating with it and have already put together eight different projects to share…one is exclusive for my personal paper pumpkin subscribers, four I am sharing today, and the others (plus whatever else I create) will have to wait until March 8th.
This kit contained the supplies shown below to make nine projects (3 of 3): three standard size cards, three slimline cards, and three milk carton treat containers.
But I never assemble my kits as is, because I like to share other ways to use those supplies. I like to think outside the box…see what else I can come up with, and create alternate cards, scrapbook pages, and more. So today I’m sharing with you…
Mini Easter Baskets (how to double the treat containers)
A Milk Carton with Window
A Circle Wreath Card
And a Unique Pocket Card
Watch my video first by clicking here to get to get measurements, directions, and tips (or you can just click on this image below if you are already in my blog post). Scroll down to see close-up photos, access the links that I mentioned in my video, and see a list of extra supplies (linked to my online store) that I used to make my creations. Then be sure to visit again soon to see even more alternate projects!
Here are the items the kit instructs how to make. (Click here for a link to Stampin’ Up!’s how-to video to help you assemble these as intended.)
And here are close-up photos of the alternate projects I made and shared in my video. (Remember to watch my video first to get measurements, tips and directions.)
Mini Easter Baskets (how to double the treat containers)
A Milk Carton with Window
A Circle Wreath Card
And a Unique Pocket Card
I hope I inspired your creativity with what I shared today! If you did not get this kit, I hope you can apply these ideas to products you already own.
If you are not a Paper Pumpkin subscriber, I invite you to give it a try. CLICK HERE to learn more. CLICK HERE to sign up by March 10th for this next kit…
A PEEK AT MARCH’S PAPER PUMPKIN KIT Memorable Meadows Kit: Share nature’s beauty with lovely all-occasion cards! Makes 9 cards: 3 each of 3 designs. Projects include printed cards & coordinating envelopes. Kit includes precut vellum pieces and wood embellishments. This kit coordinates with the Meandering Meadows Suite Collection (item 162745). And it includes an extra bonus stamp set! Coordinating colors: Granny Apple Green, Garden Green (Classic Stampin’ Spot), Balmy Blue, Night of Navy, Gorgeous Grape, and Fresh Freesia. Click here for a flyer showing peeks of the Jan-March kits. And don’t miss the special add-on that coordinates with all three months: the Love of Spring Dies Add-On (item 164396) — made available December 11th and only while supplies last!
Click here to shop my online store. Click here to access & view the current catalogs. Click here to shop My Favorite Extras. Click here to subscribe to those fun Paper Pumpkin kits of creativity! Click here to learn about my Loyalty Rewards program. You can earn free stamps just for shopping with me! Click here to learn more about joining my Stampers With ART community. Get the MOST rewards including a discount on future products! Follow me on social media! I share regularly on Pinterest, YouTube, Instagram, my Facebook Page, and my Facebook Group! Please subscribe to my blog, too!Click here and enter your email in the blue box (above the butterfly).
Products…things you might need/want in addition to the Feb 2024 Paper Pumpkin Kit
SALE-A-BRATION 2024 – NOW MORE OPTIONS The Sale-a-Bration promotion is here and runs January 4th through February 29th! Click here for all the initial details. Click here to view the online version of this new publication. Please note: Additional offerings were added February 1st as some original items are anticipated to run out.Click here to see all the current products online.
KITS COLLECTION: BIRTHDAY SPARKLE & HAPPY HOUSEPLANTS KITS ADDED Two kits have been recently added to the Kits Collection! Click here and scroll down for more details.
*this link will reveal all the newer products on 3/5/24.
ONLINE EXCLUSIVES NEWS You won’t find Online Exclusives products in any catalog or publication. So be sure to visit this link to shop today. All Online Exclusives products are available while supplies last. New products will be added March 5.
A PEEK AT MARCH’S PAPER PUMPKIN KIT Memorable Meadows Kit: Share nature’s beauty with lovely all-occasion cards! Makes 9 cards: 3 each of 3 designs. Projects include printed cards & coordinating envelopes. Kit includes precut vellum pieces and wood embellishments. This kit coordinates with the Meandering Meadows Suite Collection (item 162745). And it includes an extra bonus stamp set! Coordinating colors: Granny Apple Green, Garden Green (Classic Stampin’ Spot), Balmy Blue, Night of Navy, Gorgeous Grape, and Fresh Freesia. Click here for a flyer showing peeks of the Jan-March kits. And don’t miss the special add-on that coordinates with all three months: the Love of Spring Dies Add-On (item 164396) — made available December 11th and only while supplies last!
If you are not a Paper Pumpkin subscriber, I invite you to give it a try. CLICK HERE to learn more. CLICK HERE to sign up by March 10th for this next kit.
ALL STAR VIDEO CLASSES I’m a designer with the All Stars, a group of globally recognized Stampin’ Up! demonstrators. And we are excited to share exclusively with our customers, paper crafting friends & team members our February 2024 Perennial Lavender Suite Video Class Bundle which is now available. CLICK HERE for more information. Click here to get to my Tutorials/Classes for Sale page to see others that have been offered. The next one featuring the Rock & Roll Suite from the Jan-Apr 2024 Mini Catalog will be available March 1st.
I’m hoping you are all having a wonderful weekend and a Happy Easter.
I’ve been playing with the Bough Punch a lot lately. I’ve also been cleaning my craft area. And I came across some boxes I had made and shared last year on April 13, 2022. Both of the critters’ bodies on the boxes are made with the Ladybug Builder Punch. The bunny’s ears and tail are also made with the Bough Punch.
And so with Spring in the air and these punches in hand, I made another bunny and added it to the front of this green card to create a Congrats card geared for someone expecting or someone who has just had a baby.
I had a lot of green on the card base layers already. And when I added the bunny, the leaves under it blended in too much. So I punched black leaves and gave them all a shadow layer.
Here are the details for recreating this card.
Products I used… See below for a complete list of products linked to where you can find them in my online store.
Measurements
Basic White Thick Cardstock
4-1/4” x 11″ scored parallel to short side at 5-1/2”
4-1/4″ x 5-1/2″ (for die-cutting the Flora layer)
Scraps for punching the bunny parts
3/4″ x 3-1/4″ strip for punching the sentiment layer
Parakeet Party Cardstock
3-7/8” x 5-1/8”
Garden Green Cardstock
3-3/4” x 5”
Granny Apple Green Cardstock
Scraps for punching the leaves
Basic Black Cardstock
Scraps for punching the leaves
Tips/Directions
Watch the video in my 4/13/22 blog post (starting at the 8.5 minute mark) for instructions for punching and assembling all the parts to form your bunnies (one for the inside and one for the outside). After assembling that bunnies, add the green leaves & one more layer of black leaves for the shadow to one of the bunnies. Set aside.
Die-cut the 4-1/4″ x 5-1/2″ white layer with the large die from the Two-Tone Flora Dies. Use large or small Blending Brushes to add color to the layer…Parakeet Party in the bottom right section, then Granny Apple Green further out, then Garden Green going light to dark. (You can swap these steps if you’d rather – blend the ink on the cardstock and then die-cut.)
Glue this to the Garden Green Cardstock layer. (I sponged it on with Multipurpose Liquid Glue.) Then trim up the overhanging sections.
Punch the ends of the sentiment strip piece. Stamp it so the word is off to the right a bit.
Assemble: Add the Parakeet Party Cardstock, add the Garden Green layer, add the bunny with the leaves and the sentiment strip with Dimensionals, and add the silver flower embellishments.
Open the card and add the other bunny with Glue Dots (so it has a small amount of dimension) and a few flowers.
Thanks for stopping by to see what I had to share today.
Click here to shop my online store. Click here to access & view the current catalogs. Click here to shop My Favorite Extras. Click here to subscribe to those fun Paper Pumpkin kits of creativity! Click here to learn about my Loyalty Rewards program. You can earn free stamps just for shopping with me! Click here to learn more about joining my Stampers With ART community. Get the MOST rewards including a discount on future products! Follow me on social media! I share regularly on Pinterest, YouTube, Instagram, my Facebook Page, and my Facebook Group! Please subscribe to my blog, too!Click here and enter your email in the blue box (above the butterfly).
2023 COLOR REFRESH! Stampin’ Up! prioritizes providing a compelling selection of high-quality craft supplies in coordinating colors and designs. That means evaluating and even refreshing current products. And this year SU is refreshing their full color collection! Click here and Here to learn more. Watch this video from Stampin’ Up! for a quick glimpse… https://www.youtube.com/watch?v=IOCUhUcuFHI
LAYERING LEAVES CLASS THROUGH THE MAIL COMING SOON! The new 2023-24 Annual Catalog debuts May 2nd. And in it (on page 96) you will see my Million Dollar Achiever stamp set, Layering Leaves!! I’ll be offering a class that will include the option to add in an autographed copy of the stamp set. I hope to have that information ready to share about a week or so before the release of the new catalog…so late April. Visit my 4/3/23 blog post for details on this card.
KITS COLLECTION: COLORFUL KALEIDOSCOPE KIT ADDED This latest kit contains everything you need to make a unique card for any occasion. Every card is filled with geometric shapes and unique kaleidoscopic patterns. This new kit is part of the Kits Collection and is now available. Click here and scroll down for more details.
A PEEK AT APRIL’S PAPER PUMPKIN KIT Optimism and Renewal is the theme of the April 2023 All the Little Things Paper Pumpkin kit! This kit includes supplies for making nine cards (three each of three designs) with elegant cherry blossom designs, bright colors, and iridescent foil (a detail that won’t go unnoticed). It also includes a Shaded Spruce ink spot and a stamp set with sentiments that celebrate the simple things and encourage growth and healing. Anyone who subscribes to this month’s kit will also get a FREE box organizer! This organizer with customizable compartments fits perfectly inside your Paper Pumpkin box and is great for keeping your supplies from past kits organized, so you know right where everything is! Coordinating Stampin’ Up! colors: Balmy Blue, Basic Black, Calypso Coral, Granny Apple Green, Petal Pink, Poppy Parade, Shaded Spruce. If you are not a Paper Pumpkin subscriber, I invite you to give it a try. CLICK HERE to learn more. CLICK HERE to sign up by April 10th for this next kit.
ALL STAR VIDEO CLASSES I’m a designer with the All Stars, a group of globally recognized Stampin’ Up! demonstrators. And we are excited to share exclusively with our customers, paper crafting friends & team members our April 2023 Regency Park Suite Video Class Bundle which is now available. CLICK HERE for more information. Click here to get to my Tutorials/Classes for Sale page to see others that have been offered. The next one featuring a new suite from the upcoming 2023-34 Annual Catalog will be available May 1st.
Stamp Your Art Out! Rachel Tessman Independent Demonstrator 763-502-6813
This is the best way to enjoy all that Stampin' Up! has to offer. Plus it's fun to be on the demonstrator side of things!
Subscribe to our monthly Paper Pumpkin crafting kits through me to enjoy exclusive ideas shared in PDF tutorials from the our PP Creatives team of Stampin’ Up! demonstrators.
In the spirit of full disclosure, I am an affiliate with Stamp-n-Storage which means I may get commissions if you click on links I provide and decide to purchase anything from this company. I love their products and recommend them because I own several myself and believe my readers will benefit from them.
Recent Achievements
#5 Overall
#5 in Leadership
#11 in Sales
#4 in Team Building
2025 Incentive Trip Achiever (My 20th trip earned will be an Alaskan Cruise in 2026!)


")

")
")


 Variegated Ribbon")


 Cardstock")
 Cardstock")
 Specialty Paper")


 Glittered Organdy Ribbon")

 Circle Punch")
 Circle Punch")


