When preparing supplies for my August 11th blog post, I put together a card base and a few layers for my metric version of that card. It helps me to do that when I write out measurements, because the metric measurements go with a completely different base cardstock size (A4 vs. Letter). Some people don’t realize that, but that is why you can’t just do a straight conversion from inches to centimeters or vise-versa.
Anyways, I decided to take those pieces and put together a cute mouse and cheese version of my Simple Slide-Out card as I was inspired by how Diana Gibbs turned that squirrel from the Nuts About Squirrels Stamp Set into a mouse in one of her recent cards. Click here to see it. (Thanks Diana for the fun idea!)
Products I used… See the bottom of my post for a complete list of products linked to where you can find them in my online store. Pictured here are a few of them.
Do you see how the squirrels became the mice? Too fun, right?
4-1/4” x 11” scored parallel to the short side at 5-1/2”
4″ x 5-1/4″
4″ x 4″
Basic White Cardstock
4” x 5-1/2″ scored parallel to the short side at 1-1/2″ from one end (the bottom) and 1″ from the other (the top)
1” x 4”
Scraps for stamping & cutting squirrels (which turn into the mice)
Beauty of the Earth Designer Paper
1” x 4”
4” x 4”
Black Glittered Organdy Ribbon
4″
12″
Metric Measurements…
So Saffron Cardstock
10.5 cm x 29.7 cm scored parallel to the short side at 14.8 cm
9.9 cm x 14.2 cm
9.9 cm x 9.9 cm
Basic White Cardstock
9.9 cm x 16.5 cm scored parallel to the short side at 4 cm from one end (the bottom) and 3.7 cm from the other (the top)
2.5 cm x 9.9 cm
Scraps for stamping & cutting squirrels (which turn into the mice)
Beauty of the Earth Designer Paper
2 cm x 9.9 cm
9.9 cm x 9.9 cm
Black Glittered Organdy Ribbon
9 cm
30 cm
Tips
Die-cut the circles from the So Saffron layer to make the cheese. Then use temporary adhesive (I used Dotto) to attach this piece to the smaller So Saffron layer, and use the Blending Brush to add Pale Papaya Ink within the circles which will also add a bit of color to the edges of the circles on the larger layer.
After stamping the squirrels onto Basic White scraps, use the Basic Black Stampin’ Write marker to draw a curved line along the inside of the lower portion of the bushy tail to make a skinnier mouse tail. Extend the whiskers a bit, too. After coloring with the Blends Markers, trim around the critters. Leave a white edge (much easier for cutting around the whiskers) and just come closer in when cutting away the lines from the original tails.
Remove the acorn from the one critter, then cut the portion of the acorn that shows the little hand.
Make a wedge of cheese with one of the leftover little circles from die-cutting the So Saffron piece, cut into the left arm of the mouse a bit, tuck the cheese in, and add that extra hand so it peeks out from behind. (Use the Multipurpose Glue to connect these pieces together.
Peel away the die-cut layer from the smaller So Saffron layer, and prepare all the other card layers: stamp sentiments, tie on ribbon, fold on score lines.
To make the pocket for the gift card, use a thin line of glue as shown below.
Attach all the inside layers. Watch my video for tips on the card assembly.
Add LOTS of Dimensionals to the backside of the cheese layer. (I even used the Mini Dimensionals.) Then attach to the front of the card.
Create little angle-cut strips from the small length of ribbon and the narrow designer paper, and tuck under the sentiment strip. Be careful to add this assembled strip just to the die-cut layer and avoid the holes.
Then just attach that other cute little mouse.
Add a gift card, and send it to someone special for their birthday!
Even your lactose Intolerant friends will get a kick out of this card.
A big happy birthday to anyone who shares this day with me! It’s Friday, but those of us who were born on the 13th of any month aren’t bothered by that, right? Tonight my husband and boys are celebrating with me by taking me out to dinner! I do love Panera (as you can see by the gift card in the photos), but we are trying out a new place. I’m excited!
Thanks for stopping by to see what I had to share today.
Click here to shop my online store. Click here to access & view the current catalogs. Click here to shop My Favorite Extras. Click here to subscribe to those fun Paper Pumpkin kits of creativity! Click here to learn about my Loyalty Rewards program. You can earn free stamps just for shopping with me! Click here to learn more about joining my Stampers With ART community. Get the MOST rewards including a discount on future products! Follow me on social media! I share regularly on Pinterest, YouTube, Instagram, my Facebook Page, and my Facebook Group! Please subscribe to my blog, too!Click here and enter your email in the blue box (above the butterfly).
NEW PRODUCTS ARE HERE! CLICK HERE to access the PDF of the new July-December 2021 Mini Catalog. CLICK HERE to access these new July-December 2021 Mini Catalog items in my online store. Enjoy shopping and seeing all the new ideas!
SALE-A-BRATION 2021 IS BACK – ROUND TWO This year Stampin’ Up! has split the annual Sale-A-Bration event in TWO seasons! The first season took place in January & February. And the second one is happening now… August 3 – September 30, 2021! Sale-A-Bration is one of the BEST times of the Stampin’ Up! Year. There are perks for those that purchase product, those that host parties (or purchase a lot of product), those that join the Stampin’ Up! family (purchase the Starter Kit), and those who are already demonstrators (including those that join early on during SAB). Click here for all the details.
A PEEK AT SEPTEMBER’S PAPER PUMPKIN KIT Hay, there! Experience everything the autumn season has to offer with the Haunts & Harvest Paper Pumpkin Kit! This month’s kit includes enough supplies to create 12 treat boxes—4 each of 3 designs. That means you can take your pick of apple, pumpkins, or jack-o-lantern treat boxes! Plus, the Paper Pumpkin box is designed to easily transform into a vintage wheelbarrow for you to display your harvest! Whether you’re thinking about crisp red apples or you’re ready to carve some spooky jack-o-lanterns (or both!), the Haunts & Harvest Paper Pumpkin Kit—designed in a vivid fall palette—is a hands-on crafting experience for all autumn lovers! Coordinating colors: Basic Black, Pale Papaya, Poppy Parade, Pumpkin Pie, Soft Succulent. If you are not a Paper Pumpkin subscriber, I invite you to give it a try. CLICK HERE to learn more. CLICK HERE to sign up by September 10th for this next kit.
ALL STAR TUTORIALS I’m a designer with the All Stars, a group of globally recognized Stampin’ Up! demonstrators. And we are excited to share exclusively with our customers, paper crafting friends & team members our bundle of twelve August 2021 Hand-Penned Suite Tutorials which are now available! CLICK HERE for more information. Click here to get to my Tutorials for Sale page to see the others that have been offered. The next one featuring the You’re a Peach Suite will be available September 1st! AND these tutorial bundles include links to instructional videos!
KITS COLLECTION BY STAMPIN’ UP!® A new line of affordably priced, versatile all-inclusive kits is here! Creativity made easy!Click here for more details.
There is a stamp set that debuted in the July-December 2021 Mini Catalog called Nuts About Squirrels. And the illustrated images are super adorable. I fell in love with it right away when I opened the publication.
In fact the Simple Slide-Out Card I am sharing today was one that I made right when all my new products showed up during preorder time last month. And I’m thrilled that I’m finally able to share it with you.
I just showed live on YouTube about an hour ago step-by-step directions for creating this interactive card featuring the Nuts About Squirrels Stamp Set, the Beauty of the Earth Designer Series Paper, and the Subtle Shimmer Sequins. And now I’m sharing that video here in my blog post. Be sure to watch the video by clicking here (or you can just click on this image below if you are already on my blog post), scroll through the close-up photos that follow, check out the measurements & products list below, and then let me know if you have any questions.
I hope you enjoyed what I shared in this video. Below are measurements, close-up photos, and a product list for what I demonstrated. (Please subscribe to my YouTube channel so you can get updates when I share and go live).
Products I used… See below for a complete list of products linked to where you can find them in my online store.
Click here to access and download a printable “measurements & supplies” sheet.
Imperial Measurements…
Early Espresso Cardstock
4-1/4” x 11” scored parallel to the short side at 5-1/2”
Basic White Cardstock
2-1/4” x 4”
4” x 4”
Scrap for stamping & cutting squirrel and extra nuts
Beauty of the Earth Designer Paper
3” x 4” (design #1 for front)
4” x 4” (design #2 for top inside)
3” x 4” scored parallel to the long side at 1” (design #3 for middle inside)
Metric Measurements…
Early Espresso Cardstock
10.5 cm x 29.7 cm scored parallel to the short side at 14.8 cm
Basic White Cardstock
5.8 cm x 9.9 cm
9.9 cm x 9.9 cm
Scrap for stamping & cutting squirrel and extra nuts
Beauty of the Earth Designer Paper
8.5 cm x 9.9 cm (design #1 for front)
9.9 cm x 9.9 cm (design #2 for top inside)
9.9 cm x 9.9 cm scored parallel to the long side at 3.7 cm (design #3 for middle inside)
Here are photos of the finished cards.
\
I hope you enjoyed what I shared!
I invite you to subscribe to my YouTube channel. And then click on the bell to the right of the subscribe button and set notifications to “all” so you can get updates when I share and when I go live. My next Live will be on Wednesday, August 18 at 11 AM Central Time. I hope you can join me!
Click here to shop my online store. Click here to access & view the current catalogs. Click here to shop My Favorite Extras. Click here to subscribe to those fun Paper Pumpkin kits of creativity! Click here to learn about my Loyalty Rewards program. You can earn free stamps just for shopping with me! Click here to learn more about joining my Stampers With ART community. Get the MOST rewards including a discount on future products! Follow me on social media! I share regularly on Pinterest, YouTube, Instagram, my Facebook Page, and my Facebook Group! Please subscribe to my blog, too!Click here and enter your email in the blue box (above the butterfly).
NEW PRODUCTS ARE HERE! CLICK HERE to access the PDF of the new July-December 2021 Mini Catalog. CLICK HERE to access these new July-December 2021 Mini Catalog items in my online store. Enjoy shopping and seeing all the new ideas!
SALE-A-BRATION 2021 IS BACK – ROUND TWO This year Stampin’ Up! has split the annual Sale-A-Bration event in TWO seasons! The first season took place in January & February. And the second one is happening now… August 3 – September 30, 2021! Sale-A-Bration is one of the BEST times of the Stampin’ Up! Year. There are perks for those that purchase product, those that host parties (or purchase a lot of product), those that join the Stampin’ Up! family (purchase the Starter Kit), and those who are already demonstrators (including those that join early on during SAB). Click here for all the details.
A PEEK AT SEPTEMBER’S PAPER PUMPKIN KIT Hay, there! Experience everything the autumn season has to offer with the Haunts & Harvest Paper Pumpkin Kit! This month’s kit includes enough supplies to create 12 treat boxes—4 each of 3 designs. That means you can take your pick of apple, pumpkins, or jack-o-lantern treat boxes! Plus, the Paper Pumpkin box is designed to easily transform into a vintage wheelbarrow for you to display your harvest! Whether you’re thinking about crisp red apples or you’re ready to carve some spooky jack-o-lanterns (or both!), the Haunts & Harvest Paper Pumpkin Kit—designed in a vivid fall palette—is a hands-on crafting experience for all autumn lovers! Coordinating colors: Basic Black, Pale Papaya, Poppy Parade, Pumpkin Pie, Soft Succulent. If you are not a Paper Pumpkin subscriber, I invite you to give it a try. CLICK HERE to learn more. CLICK HERE to sign up by September 10th for this next kit.
ALL STAR TUTORIALS I’m a designer with the All Stars, a group of globally recognized Stampin’ Up! demonstrators. And we are excited to share exclusively with our customers, paper crafting friends & team members our bundle of twelve August 2021 Hand-Penned Suite Tutorials which are now available! CLICK HERE for more information. Click here to get to my Tutorials for Sale page to see the others that have been offered. The next one featuring the You’re a Peach Suite will be available September 1st! AND these tutorial bundles include links to instructional videos!
KITS COLLECTION BY STAMPIN’ UP!® A new line of affordably priced, versatile all-inclusive kits is here! Creativity made easy!Click here for more details.
Welcome to our All Star Tutorial monthly blog hop for the Hand-Penned Suite!
Be ready to be immersed in this fantastic suite with all that we have to share. In addition to the suite products, you’ll also notice now that there is an addition pack of beautiful black & white designer paper now out there called Beautifully Penned. This paper coordinates well with this suite and is free with a qualifying order (in the US that amount is $50 not including shipping and tax). I didn’t use that paper in the card I’m sharing today, but I did in my exclusive tutorial project (see below for details on how you can get that tutorial bundle).
A few hours ago I shared live on YouTube step-by-step directions for how to make a Double Slider Card using the Hand-Penned Petals Stamp Set, the Penned Flowers Dies, the Hand-Penned Designer Series Paper, the Gold Metallic Specialty Paper, and the new Brushed Metallic Adhesive Backed Dots. It looks like a complicated card, but it’s done with a super simple mechanism – a loop of thin plastic! And now I’m sharing that video here in my blog post. Be sure to watch the video by clicking here (or you can just click on this image below if you are already on my blog post), scroll through the close-up photos that follow, check out the measurements & products list below, and then let me know if you have any questions.
I hope you enjoyed what I shared in this video (and the peek of the Beautifully Penned Designer Paper!). Below are measurements, close-up photos, and a product list for what I demonstrated. (Please subscribe to my YouTube channel so you can get updates when I share and go live).
Products I used… See below for a complete list of products linked to where you can find them in my online store.
Click here to access and download a printable “measurements & supplies” sheet.
Measurements …
Basic White Thick Cardstock
Two pieces that are 4-1/4” x 4-1/2”
4-1/8” x 4-3/8”
Two pieces that are 3” x 4-1/2”
Basic Black Cardstock
4-1/4” x 4-1/2”
Hand-Penned Designer Paper
4” x 4-1/4”
Two pieces that are 3” x 4”
Gold Metallic Specialty Paper
Scrap for die-cutting border pieces
Cello bag
~ 2-1/2” x 8
Here are photos of the finished card.
Did you get your hands on this month’s set of tutorials featuring products in the Hand-Penned Suite? These tutorials are designed by twelve Stampin’ Up! demonstrators from around the world. They are exclusive to those who earn them or purchase them. And they are complete with photos, video directions, supply lists, and both imperial and metric measurements.
Here are peeks of the fantastic projects in our August bundle focusing on the Hand-Penned Suite. (Click here to find information for how to get your hands on this month’s compilation.)
Our hop today offers MORE ideas than what we are offering in our bundle. I hope you enjoyed what I shared. Now be sure to scroll down and click on the names of other hop participants in our team to follow the hop and see other creative project ideas featuring the Hand-Penned Suite. (If you are receiving this blog post by email, click HERE to see links and follow the hop.) I hope our ideas in this hop inspire your creativity!
I also invite you to subscribe to my YouTube channel. And then click on the bell to the right of the subscribe button and set notifications to “all” so you can get updates when I share and when I go live. My next Live will be on Wednesday, August 11th at 11 AM Central Time. I hope you can join me!
Click here to shop my online store. Click here to access & view the current catalogs. Click here to shop My Favorite Extras. Click here to subscribe to those fun Paper Pumpkin kits of creativity! Click here to learn about my Loyalty Rewards program. You can earn free stamps just for shopping with me! Click here to learn more about joining my Stampers With ART community. Get the MOST rewards including a discount on future products! Follow me on social media! I share regularly on Pinterest, YouTube, Instagram, my Facebook Page, and my Facebook Group! Please subscribe to my blog, too!Click here and enter your email in the blue box (above the butterfly).
NEW PRODUCTS ARE HERE! CLICK HERE to access the PDF of the new July-December 2021 Mini Catalog. CLICK HERE to access these new July-December 2021 Mini Catalog items in my online store. Enjoy shopping and seeing all the new ideas!
SALE-A-BRATION 2021 IS BACK – ROUND TWO This year Stampin’ Up! has split the annual Sale-A-Bration event in TWO seasons! The first season took place in January & February. And the second one is happening now… August 3 – September 30, 2021! Sale-A-Bration is one of the BEST times of the Stampin’ Up! Year. There are perks for those that purchase product, those that host parties (or purchase a lot of product), those that join the Stampin’ Up! family (purchase the Starter Kit), and those who are already demonstrators (including those that join early on during SAB). Click here for all the details.
A PEEK AT AUGUST’S PAPER PUMPKIN KIT Empower yourself and others with the Hope Box Paper Pumpkin Kit! Created from the heart and soul of Stampin’ Up! cofounder, Shelli, the Hope Box Paper Pumpkin Kit reminds us why life is precious. It includes supplies to create nine encouraging 4-1/4″ x 5-1/2″ cards in a specially designed box designed to be a keepsake box—keep mementos of cherished memories or reminders of what’s yet to come. Collect treats and trinkets (letters, song lyrics, inspiring quotes, photographs, etc.) that represent what hope means to you in your Hope Box and look inside for inspiration or share it with a friends who could use some uplifting! For more inspiration on how to build your Hope Box, watch Shelli herself put one together in this video. Coordinating colors: Bermuda Bay, Blackberry Bliss, Bumblebee, Melon Mambo, Petal Pink, Pool Party, Poppy Parade. If you are not a Paper Pumpkin subscriber, I invite you to give it a try. CLICK HERE to learn more. CLICK HERE to sign up by August 10th for this next kit.
ALL STAR TUTORIALS I’m a designer with the All Stars, a group of globally recognized Stampin’ Up! demonstrators. And we are excited to share exclusively with our customers, paper crafting friends & team members our bundle of twelve August 2021 Hand-Penned Suite Tutorials which are now available! CLICK HERE for more information. Click here to get to my Tutorials for Sale page to see the others that have been offered. The next one featuring the You’re a Peach Suite will be available September 1st! AND these tutorial bundles include links to instructional videos!
KITS COLLECTION BY STAMPIN’ UP!® A new line of affordably priced, versatile all-inclusive kits is here! Creativity made easy!Click here for more details.
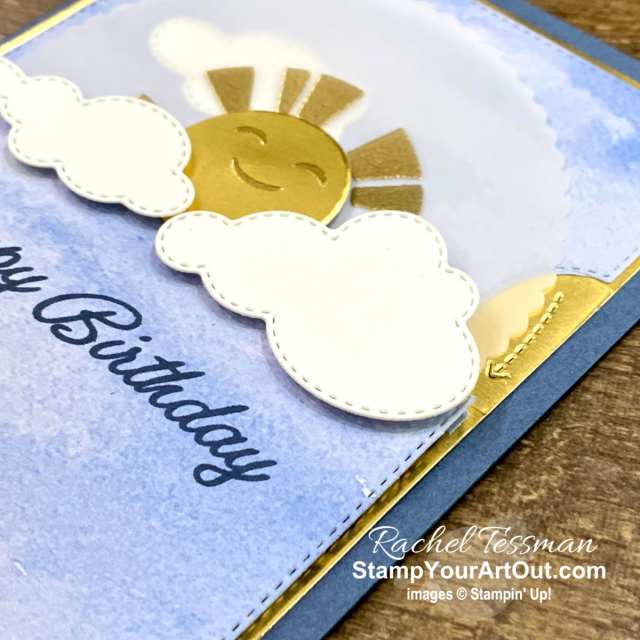
The new Give It a Whirl Dies are so much fun! Have you seen them yet? I’ve been inspired by many and have been pinning some of these creations on my 2021-22 Annual Catalog Pinterest board. But I’ve been most inspired by team member, Vy Tran’s spinner card variations. She does a great job making interactive cards! Click here to see her card that led me in the direction of my Spinning Sunshine Rays birthday card that I’ve just put together this weekend.
I just showed live on YouTube about an hour ago step-by-step directions for creating it. And now I’m sharing that video here in my blog post. Be sure to watch the video by clicking here (or you can just click on this image below if you are already on my blog post), scroll through the close-up photos that follow, check out the measurements & products list below, and then let me know if you have any questions.
I hope you enjoyed what I shared in this video. Below are measurements, close-up photos, and a product list for what I demonstrated. (Please subscribe to my YouTube channel so you can get updates when I share and go live).
Products I used… See below for a complete list of products linked to where you can find them in my online store.
Measurements …
Misty Moonlight Cardstock
5-1/2” x 8-1/2” scored parallel to the short side at 4-1/4”
Beauty of the Earth Designer Paper
4” x 5-1/2” for die-cutting top layer for the spinner
3-3/4” x 5” for the inside
Gold Foil Sheets
Two pieces that are 3-7/8” x 5-1/8”
1-1/8” diameter circle can be cut from one of these
Vellum Cardstock
4” x 4” for die-cutting spinner layer
Basic White Thick Cardstock
Scraps for die-cutting clouds
Here are photos of the finished card.
I hope you enjoyed what I shared!
I invite you to subscribe to my YouTube channel. And then click on the bell to the right of the subscribe button and set notifications to “all” so you can get updates when I share and when I go live. My next Live will be on Wednesday, July 7 at 11 AM Central Time. I hope you can join me!
By the way, today is the last day of June and the last day for these promotions…
LAST CHANCE PRODUCTS SALE It’s time to say goodbye to retiring products from the January-June 2021 Mini Catalog. Click here for more information and to access the list of products leaving.
HEY CHICK & HEY BIRTHDAY CHICK Available through June 30, 2021 – The popular Hey Chick returned to pair up with the Hey Birthday Chick stamp set in the January-June 2021 mini catalog!! And each with coordinating dies. Click here for a downloadable flyer. Click here to shop online.
Click here to shop my online store. Click here to access & view the current catalogs. Click here to shop My Favorite Extras. Click here to subscribe to those fun Paper Pumpkin kits of creativity! Click here to learn about my Loyalty Rewards program. You can earn free stamps just for shopping with me! Click here to learn more about joining my Stampers With ART community. Get the MOST rewards including a discount on future products! Follow me on social media! I share regularly on Pinterest, YouTube, Instagram, my Facebook Page, and my Facebook Group! Please subscribe to my blog, too!Click here and enter your email in the blue box (above the butterfly).
DESIGNER SERIES PAPER SALE STARTS JULY 1ST! Just a heads up…from July 1 to August 2, you can enjoy a 15% discount on select Designer Series Paper from the 2021–2022 Annual Catalogue! Click here for more information. Click here for the informational flyer.
KITS COLLECTION BY STAMPIN’ UP!® A new line of affordably priced, versatile all-inclusive kits is here! Creativity made easy!Click here for more details.
UNITED THROUGH CREATIVITY Celebrate what makes us unique through what brings us together: creativity! In honor of the Stampin’ Up! value statement, “we care about people first”—and in the spirit of World Diversity Day— Stampin’ Up! created a collection of inclusive, multicultural, and multilingual craft elements. Click here to access this digital download so you can create away! Available through May 2, 2022.
A PEEK AT JULY’S PAPER PUMPKIN KIT Life is full of big adventures that are best experienced together! This month’s The Adventure Begins Paper Pumpkin Kit helps you celebrate those exciting new chapters in the most creative of ways with enough supplies to create twelve motivating cards all featuring the exciting colors of nature. Send cards to your family and friends about to embark on a new journey and make connections while you explore and discover new levels of your creativity! Includes inspirational sentiments and adventure-themed imagery featuring these nature-inspired coordinating colors: Basic Black, Basic White, Bermuda Bay, Crushed Curry, Early Espresso, Flirty Flamingo, Garden Green, Granny Apple Green, Mango Melody, Night of Navy. If you are not a Paper Pumpkin subscriber, I invite you to give it a try. CLICK HERE to learn more. CLICK HERE to sign up by July 10th for this next kit.
ALL STAR TUTORIALS I’m a designer with the All Stars, a group of globally recognized Stampin’ Up! demonstrators. And we are excited to share exclusively with our customers, paper crafting friends & team members our bundle of twelve June 2021 Sand & Sea Suite Tutorials which are now available! CLICK HERE for more information. Click here to get to my Tutorials for Sale page to see the others that have been offered. The next one featuring the Expressions in Ink Suite will be available July 1st! AND these tutorial bundles include links to instructional videos!
I’m sharing a couple cards with you today that look a bit similar. I made the second one (the spinner card) first. And then I made this non-spinner simpler version (which I’m sharing first). This is a very easy card to make. I made multiples so I could send them to achieving team members.
Products I used… See below for a complete list of products linked to where you can find them in my online store.
Measurements
Early Espresso Cardstock
5-1/2” x 8-1/2” scored parallel to the short side at 4-1/4″
Pale Papaya Cardstock
3-3/4″ x 5″
Scrap for stamping and die-cutting sentiment piece
Calypso Coral Cardstock
3-3/4″ x 5″
Basic White Cardstock
3-5/8″ x 4-7/8″
Pear Pizzazz Cardstock
Scrap for stamping and die-cutting leaves
You’re a Peach Designer Paper
3″ x 3-5/8″
Tips
Die-cut a double leaf and two single leaves with the Give It a Whirl dies to create the look of a branch.
Attach the sentiment strip and the Calypso Coral layer with Dimensionals.
I really like the Early Espresso as the base layer on the card above and wish I would’ve done that with the spinner card (below). But this spinner card was the one I started assembling in just a couple hours time when I first got my Give It a Whirl dies…I wanted to have a quick sample of how to use the dies when I featured this die set in my box opening event with my demonstrator group the day my order arrived. It didn’t turn out bad. In fact, the card is quite cute. And I love the way the sentiments from the Sweet As a Peach stamp set fit the window so well. I guess I would just change the card base to bring in a bit more Early Espresso color. Do you agree?
The Give It a Whirl dies allow you to spin the circular layer underneath and show different things through the window. For this card I used three different sentiments in the You’re a Peach stamp set. So these next three photos show the three different views.
Measurements
Calypso Coral Cardstock
5-1/2” x 8-1/2” scored parallel to the short side at 4-1/4″
Pale Papaya Cardstock
3-3/4″ x 5-1/4″
4″ x 4″ scrap for die-cutting spinner layer
Calypso Coral Cardstock
3-3/4″ x 5″
Basic White Cardstock
4″ x 5-3/8″ for die-cutting the top layer for the spinner
Pear Pizzazz Cardstock
Scrap for stamping and die-cutting leaves
You’re a Peach Designer Paper
3-1/4″ x 4″
Tips
Attach designer paper to the white before die-cutting. Then die-cut the rectangular window.
Attach top layer of the spinner to the spinner layer with a brad.
Spin the spinner and stamp sentiments. Then add this whole layered section to the front of the card using Dimensionals in the four corners.
Die-cut a double leaf and two single leaves with the Give It a Whirl dies to create the look of a branch. (I also did this for the inside of the card (not shown).
Tomorrow at 11 AM Central Time I’m going to share a more advanced spinner card with the Give It a Whirl dies and the adorable Sharing Sunshine stamp set. Hope you can tune in to this YouTube live!
Click here to shop my online store. Click here to access & view the current catalogs. Click here to shop My Favorite Extras. Click here to subscribe to those fun Paper Pumpkin kits of creativity! Click here to learn about my Loyalty Rewards program. You can earn free stamps just for shopping with me! Click here to learn more about joining my Stampers With ART community. Get the MOST rewards including a discount on future products! Follow me on social media! I share regularly on Pinterest, YouTube, Instagram, my Facebook Page, and my Facebook Group! Please subscribe to my blog, too!Click here and enter your email in the blue box (above the butterfly).
DESIGNER SERIES PAPER SALE STARTS JULY 1ST! Just a heads up…from July 1 to August 2, you can enjoy a 15% discount on select Designer Series Paper from the 2021–2022 Annual Catalogue! Click here for more information. Click here for the informational flyer.
LAST CHANCE PRODUCTS SALE It’s time to say goodbye to retiring products from the January-June 2021 Mini Catalog. Click here for more information and to access the list of products leaving.
KITS COLLECTION BY STAMPIN’ UP!® A new line of affordably priced, versatile all-inclusive kits is here! Creativity made easy!Click here for more details.
UNITED THROUGH CREATIVITY Celebrate what makes us unique through what brings us together: creativity! In honor of the Stampin’ Up! value statement, “we care about people first”—and in the spirit of World Diversity Day— Stampin’ Up! created a collection of inclusive, multicultural, and multilingual craft elements. Click here to access this digital download so you can create away! Available through May 2, 2022.
A PEEK AT JULY’S PAPER PUMPKIN KIT Life is full of big adventures that are best experienced together! This month’s The Adventure Begins Paper Pumpkin Kit helps you celebrate those exciting new chapters in the most creative of ways with enough supplies to create twelve motivating cards all featuring the exciting colors of nature. Send cards to your family and friends about to embark on a new journey and make connections while you explore and discover new levels of your creativity! Includes inspirational sentiments and adventure-themed imagery featuring these nature-inspired coordinating colors: Basic Black, Basic White, Bermuda Bay, Crushed Curry, Early Espresso, Flirty Flamingo, Garden Green, Granny Apple Green, Mango Melody, Night of Navy. If you are not a Paper Pumpkin subscriber, I invite you to give it a try. CLICK HERE to learn more. CLICK HERE to sign up by July 10th for this next kit.
ALL STAR TUTORIALS I’m a designer with the All Stars, a group of globally recognized Stampin’ Up! demonstrators. And we are excited to share exclusively with our customers, paper crafting friends & team members our bundle of twelve June 2021 Sand & Sea Suite Tutorials which are now available! CLICK HERE for more information. Click here to get to my Tutorials for Sale page to see the others that have been offered. The next one featuring the Expressions in Ink Suite will be available July 1st! AND these tutorial bundles include links to instructional videos!
HEY CHICK & HEY BIRTHDAY CHICK Available February 2 – June 30, 2021 – The popular Hey Chick has returned to pair up with the Hey Birthday Chick stamp set in the current mini catalog!! And each with coordinating dies. Click here for a downloadable flyer. Click here to shop online.
Stamp Your Art Out! Rachel Tessman Independent Demonstrator 763-502-6813
This is the best way to enjoy all that Stampin' Up! has to offer. Plus it's fun to be on the demonstrator side of things!
Subscribe to our monthly Paper Pumpkin crafting kits through me to enjoy exclusive ideas shared in PDF tutorials from the our PP Creatives team of Stampin’ Up! demonstrators.
In the spirit of full disclosure, I am an affiliate with Stamp-n-Storage which means I may get commissions if you click on links I provide and decide to purchase anything from this company. I love their products and recommend them because I own several myself and believe my readers will benefit from them.
Recent Achievements
#5 Overall
#5 in Leadership
#11 in Sales
#4 in Team Building
2025 Incentive Trip Achiever (My 20th trip earned will be an Alaskan Cruise in 2026!)


")

 Designer Series Paper")
 Glittered Organdy Ribbon")


 \
\ 


 Designer Series Paper")
 Metallic Specialty Paper")

 Printed Gusseted Cellophane Bags")


")


")


 Designer Series Paper")


