
Welcome to the February 2020 Maui Achievers Blog Hop!

Follow along and check out all the other blogs in the hop (click on the names of the participants in the list below my signature) so you can see some fabulous cards and projects created by other demonstrators who also earned the Stampin’ Up!® Maui incentive trip coming up in July of 2020. (If you are receiving this blog post by email, click HERE to see the hop.)
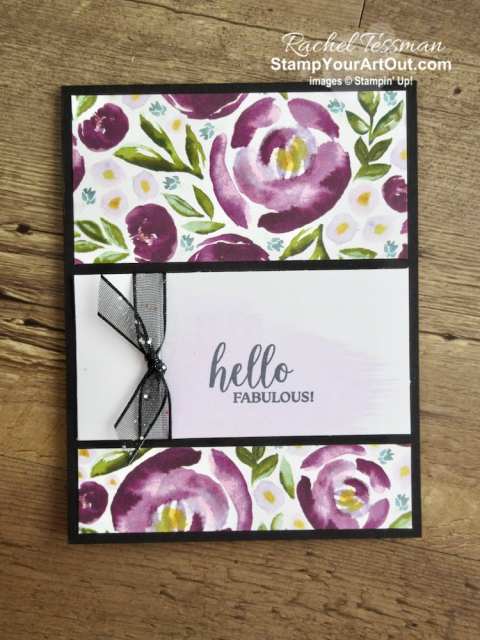
I have some cards to share today that Cheryl Lee, my mom and I made this past weekend at my 3rd annual Silver Elite Stars’ Retreat: cards made with the Best Dressed Note Cards, Best Dressed Designer Paper, Dressed to Impress Stamp Set, Black Glittered Organdy Ribbon, and Basic Black Cardstock. I wanted to do something different with those 3×3 note cards. So this is what I came up with.

I cut the note cards to create a layer on the front of a full size 4-1/4″ x 5-1/2″ and a small note to tuck into the pocket (the envelope) on the inside.
Products I used… See below for a complete list of products I used linked to where you can find them in my online store.
PDF Tutorial… Click here to access and download a direction sheet for this project.

Measurements per card
- Basic Black Cardstock: 11” x 4-1/4” scored parallel to the short side at 5-1/2”
- Best Dressed Note Card: 3” x 2” and 4” x 2” (or 2-1/4”) see directions for how to cut
- Best Dressed Designer Paper: 4” x 1” and 4” x 2” (or 1-3/4”) and scrap for cutting accent image for the inside of the card
- Black Glittered Organdy Ribbon: 5” and 8”
Directions
- Cut back half of note card parallel to the short edge at 2” to get 2” x 3” piece. Then cut this remaining 4” wide piece so that it is 4” x 2” focused around the colored section. (If you cut the yellow one a little taller, then you need to cut the designer paper shorter a bit. See measurements above.
- Stamp sentiment onto remaining note card piece, then tie on the 8” of ribbon to conceal the score mark.
- Adhere designer paper pieces at the top and bottom of the Basic Black card front leaving an 1/8” border above and below. Then adhere the stamped note card layer in the middle.
- Wrap the 5” of ribbon around the base of the coordinating note card envelope and secure in the back with Glue Dots.
- Cut a coordinating image from the designer paper scrap. Adhere to the envelope. Attach envelope to the inside of the card. And tuck in the 2” x 3” piece of note card. Use this piece for writing on. Insert a gift card or money into pocket if you wish.
Here are close-ups of each of these three cards.


I hope you enjoyed these variations of what to do with those Best Dressed Note Cards. Have fun on the hop! And enjoy seeing all those inspiring ideas made by fellow trip achievers!

Click here to shop my online store.
Click here to access & view the current catalogs.
Click here to subscribe to those fun Paper Pumpkin kits of creativity!
Click here to learn about my Loyalty Rewards program. You can earn free stamps just for shopping with me!
Click here for more information about joining my Online Paper Crafters’ Club. Earn even more goodies by joining a club!
Click here to learn more about joining my Stampers With ART community. Get the MOST rewards including a discount on future products!
Follow me on social media! I share regularly on Pinterest, YouTube, and Facebook!
Please subscribe to my blog, too! Click here and enter your email in the blue box (above the butterfly).
Product List
 Designer Series Paper")
 Note Cards & Envelopes")
")


 Glittered Organdy Ribbon")


ALL STAR TUTORIALS
I’m back as a designer with the All Stars, a group of globally recognized Stampin’ Up! demonstrators. And we are excited to share exclusively with our customers, paper crafting friends & team members in a series of five fabulous months! Our bundle of twelve February 2020 Peaceful Poppies Tutorials are now available! CLICK HERE for more information. Click here to get to my Tutorials for Sale page.


SALE-A-BRATION NEWS
January 3 to March 31, 2020. Free products for all! Click here to learn more.


COORDINATION PRODUCTS ARE HERE!
February 4-March 31 is the perfect opportunity to purchase products that coordinate with our favorite products from the January–June 2020 Mini Catalog and Sale-A-Bration. Only available for a limited time or while supplies last. Click here for the visual flyer so you view the products! Click here for the coordination products list flyer. Click here to shop these products in my online store.

A PEEK AT MARCH’S PAPER PUMPKIN KIT
March’s seven year anniversary Paper Pumpkin kit is just around the corner and will arrive in an exclusive, specially-designed box with supplies to make 12 note cards (4 of 3 designs). Because Paper Pumpkin is celebrating another milestone year, this kit will contain an extra bonus stamp set, too! Coordinating colors are: Balmy Blue, Basic Gray, Calypso Coral, Grapefruit Grove, Gray Granite, Pear Pizzazz, Petal Pink, Shaded Spruce, and So Saffron. Think daffodils, raindrops, and a fresh spring vibe. Then… Click here to activate your subscription by March 10th for this March kit.

MY ONLINE PAPER CRAFTERS CLUB IS LOOKING FOR NEW MEMBERS
We are looking for more to join our online Paper Crafters club. The commitment is to order at least $25 worth of Stampin’ Up! product in each of 6 consecutive months. In one of those months, you would reap the hosting rewards (free merchandise based on the club orders). And then you’d also be able to get in on monthly product perks that would be sent to you along with your monthly club cards.


These cards are so pretty. I hope you had a fun weekend.
Thanks so much Darlene! We really did.
What sweet cards! How wonderful to have a Silver Elite Stars Retreat!
Thanks Jessica! I loved spoiling Cheryl. ❤️
Love these cards! Thanks for sharing!
Thanks so very much Kim!
Thank you so much for sharing this idea, they are beautiful. Can I have your permission to case your idea, I would give credit to you as the designer.
I’m flattered. Thanks Rosalie! Yes. I’m fine with that. That is why I share.
Love love love!
Love how you have the envelope pocket on the inside of the cards- super cute
Thanks Wendy! Glad you like How I changed it up a bit. Hugs to you my friend.