

Welcome to our All Star Tutorial group blog hop! Did you get your hands on this month’s set of tutorials featuring the Playing with Patterns Suite?! These tutorials are designed by twelve Stampin’ Up! demonstrators from around the world. They are exclusive to those who earn them or purchase them. And they are complete with photos, video directions, supply lists, and measurements in both imperial and metric.
Here are peeks of the fantastic projects in our September bundle focusing on the Playing with Patterns Suite.
(Click here to find information for how to get your hands on this month’s compilation.)

And here is a larger peek of the project tutorial I contributed.

Our hop today will give you MORE ideas than what we are offering in our bundle. See what I have to share. Then to follow the hop and see other creative project ideas featuring the Playing with Patterns Suite, simply scroll down and click on the names of other hop participants in our tutorial team. (If you are receiving this blog post by email, click HERE to see links and follow the hop.)
My project idea that I’m sharing today is Halloween treat containers. I realized last weekend, that if September is already here, then October isn’t far away. I’m not sure how trick-or-treating will go this year with this pandemic, but I thought it would be good to start getting ready just in case. And these containers are SOOOooo super easy to put together using our new Little Treats Box Dies.

Products I used… See below for a complete list of products linked to where you can find them in my online store. And if you live in the USA and shop with me you will receive the September tutorial bundle FREE with your $50+ order!
Measurements for the striped box…
- Whisper White Thick Cardstock
- 5-1/2″ x 7-1/2″
- Black Glitter Paper (mounted on Foam Adhesive Sheets)
- Scraps for die-cutting letters
- Black Glittered Organdy Ribbon
- 10″

Directions…
- Stamp the stripes image several times on the die-cut unassembled box. I used full color to get the darkest stripes. The lighter stripes happened when I first stamped on my scrap paper and then stamped on my box. This is called “stamping off.” I stamped off once for the next set of stripes. I stamped off twice for the third set. And I stamped off three times for the fourth set. I rotated and repeated on all four sides. And I didn’t worry about stamping in the sections that wouldn’t be seen when assembled.
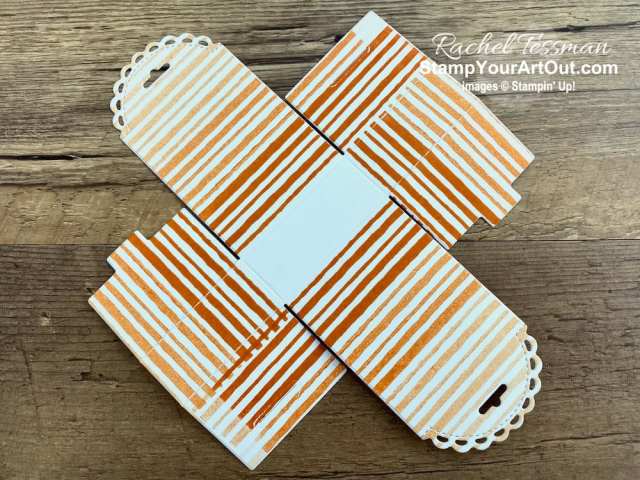
- When I assembled the box, I positioned the connecting tabs this way…so they were NOT inside the box. This creates a smoother “wall” on the inside of your box.
- I did use a bit of Tear & Tape Adhesive (which you will see in the photos below). But it may not be necessary as the box is pretty steady on its own.

- I tied the top shut with a bow.
- And then I die-cut the letters and stuck them on. Gotta love those Foam Adhesive Sheets!

Measurements for the “EEK” box…
- Magic In This Night Designer Paper
- 6″ x 6″
- Cajun Craze Cardstock
- Scrap for die-cutting scallop circle
- Black Glitter Paper
- Scraps for die-cutting letters
- Silver Metallic-Edge Ribbon
- 10″

Extra Tips…
- When cutting from a 12″ x 12″ sheet of designer or specialty paper, the box die will cut from a 6″ x 6″ piece if you angle it. That way you can make the most of the paper.
- You can see in this photo how I secured this box with Tear & Tape.

- I colored my ribbon with the Cajun Craze Blends Marker. Then after slipping it through the hole, I did an overhand knot to secure it shut. I probably shouldn’t be tying these shut before adding my treat/s. But with my broken toe, I can’t get to the store to buy any Halloween candy (not even sure if it’s available yet). LOL But you get the idea this way. (YES…put the candy/treats in first, THEN tie your bow or knot.)
- Die-cut your scallop circle and letters. Add the circle with Dimensionals. Add the letters with sponged-on Multipurpose Liquid Glue.

Measurements for the black box…
- Black Glitter Paper
- 6″ x 6″
- Silver Foil Sheets
- Scrap for die-cutting spider
- Metallic Mesh Ribbon
- 12″

Extra Tips…
- This photo shows another way to add the Tear & Tape. Again, this is an optional step, but it will help secure it.

- Add the ribbon at the top.
- Die-cut the spider, And add it to the front of the box with a Mini Dimensional.

I know this one didn’t use ANY items from the Playing with Patterns Suite, but it coordinated with the other boxes and I just HAD to share it because of that adorable detailed spider.

I hope you enjoyed these treat holder ideas and are now inspired to play with those letter dies and fun decorative stamps in this suite!
To get your hands on our wonderful September tutorial bundle…
- Be an active members of my Stampers With ART community.
- Spend $50+ in my online store (or through me directly) during the month of September 2020.
- Or purchase the September Tutorial Bundle of 12 for $15 US.

We are so excited to share our tutorial with you! I hope our ideas in this hop are inspiring your creativity! And we thank you for visiting our blog hop!

Click here to shop my online store.
Click here to access & view the current catalogs.
Click here to subscribe to those fun Paper Pumpkin kits of creativity!
Click here to learn about my Loyalty Rewards program. You can earn free stamps just for shopping with me!
Click here for more information about joining my Online Paper Crafters’ Club. Earn even more goodies by joining a club!
Click here to learn more about joining my Stampers With ART community. Get the MOST rewards including a discount on future products!
Follow me on social media! I share regularly on Pinterest, YouTube, and Facebook!
Please subscribe to my blog, too! Click here and enter your email in the blue box (above the butterfly).
Product List
- candy/treats
")


 Glittered Organdy Ribbon")


STAMPIN’ CUT & EMBOSS MACHINE NEWS
Click here to see these offerings in the online store. You can also find them on pages 170-172 in the 20-21 Annual Catalog. This machine and other related products weren’t quite ready with the launch of this publication. In fact there are still some COVID-19-related delays with the mini machine. But the larger Stampin’ Cut & Emboss Machine and its replacement plates are now available! Click here to learn more.
(In fact why not get this new machine for less along with other bonus items by purchasing it in the Stampin’ Up! Starter Kit!)

SEPTEMBER’S GET & GO STARTER KIT PROMOTION
The Starter Kit is a fantastic way for new demonstrators to get loads of products at a huge value (for $99, choose $125-worth of products). During the Get & Go Starter Kit Promotion (September 1-30), you can get even MORE products—and at the same great price! These additional products were specifically chosen to help new demonstrators hold an event right from the get-go and get their business off to a running start. Click here to learn the details of this promotion. Click here to access the flyer. And click here to learn more about the benefits of joining my community by purchasing the Starter Kit. A side note…Did you see that the new Stampin’ Cut & Emboss Machine is now available!? So here’s a thought… you could get this $120 machine, another $5 item (like Rhinestones), and this Get & Go bonus (along with the free business supplies and a bonus Paper Pumpkin kit) in your Starter kit order in September and pay only $99!

A PEEK AT SEPTEMBER’S PAPER PUMPKIN KIT
There’s so much to love about fall—some love the haunts of Halloween, many love the time to give thanks, and others love the changing colors and cooler temperatures. Whatever you love most about fall, September’s “Hello Pumpkin” Paper Pumpkin kit has everything you need to celebrate the season your way! Between a multi-occasion stamp set and enough supplies to design 20 cracker box treat packages, you can create custom fall crafts to celebrate Halloween, Thanksgiving, pumpkins, and leaves. Coordinating Colors: Bumblebee, Basic Black, Cajun Craze, Cinnamon Cider, Mossy Meadow, Old Olive, Pumpkin Pie, white.
If you are not a Paper Pumpkin subscriber, I invite you to give it a try. CLICK HERE to learn more. CLICK HERE to sign up by September 10th for this next kit.

ALL STAR TUTORIALS
I’m a designer with the All Stars, a group of globally recognized Stampin’ Up! demonstrators. And we are excited to share exclusively with our customers, paper crafting friends & team members our bundle of twelve September 2020 Playing With Patterns Tutorials which are now available! CLICK HERE for more information. Click here to get to my Tutorials for Sale page to see the others that have been offered. The next one featuring the Flowers for Every Season Suite will be available October 1st! AND these tutorial bundles (July-December) now include links to instructional videos!

AUTUMN 2020 MEGA TUTORIAL BUNDLE!
I took part in another mega tutorial bundle group where everyone involved contributed a project tutorial using Autumn-themed products from the Aug-Dec 2020 Mini Catalog. Each project includes instructions, photos, imperial and metric measurements, and complete product lists. Click here to learn how you can get this entire bundle of 82 great ideas.

MY ONLINE PAPER CRAFTERS CLUB IS LOOKING FOR NEW MEMBERS
We are looking for more to join our online Paper Crafters club. The commitment is to order at least $25 worth of Stampin’ Up! product in each of 6 consecutive months. In one of those months, you would reap the hosting rewards (free merchandise based on the club orders). And then you’d also be able to get in on monthly product perks that would be sent to you along with your monthly club cards.


Love your little treat boxes Rachel … thanks for the pictorals on how these boxes go together. Hmmm wish list adjusted again! 😉
Glad you enjoyed what I shared Cheryll. Thanks for the giggle with your last sentence. LOL
Such great treat options. Love them all!
Thanks Wendy. You’re too kind.
These are so cute! I love them all but the ombré stripes is really cool
Thanks Emma! ? That’s my favorite, too. And it shows off more of the Playing with Patterns suite of products. It’s such and awesome suite!